Public Lab Lesson 2: More Than Meets the Eye
Infrared Curriculum Lessons 1, 2, 3, 4
curricular standards this lesson meets
Two Hour Lesson
Grades 8-12
Co-written by Amanda Fisher and Mathew Lippincott
Description: In this lesson, students will explore the properties of both visible and IR light, as well as how we perceive light and color. This is intended to be the second lesson in the series of four.
Topics: Electromagnetic Spectrum, Physics, Biology
OVERVIEW
| Segment | Format | Time |
|---|---|---|
| Introduction | Large group discussion | 5 min |
| Electromagnetic Spectrum Discussion | Large group discussion | 10 min |
| Colored Boxes | Group inquiry activity | 20 min |
| Mixing Light | Partner inquiry activity | 20 min |
| Biology of our Eyes | Large group discussion | 10 min |
| Optical Illusions | Individual exploration | 20 min |
| Detecting Shades | Individual exploration | 15 min |
| Wrap-Up | Large group discussion | 10 min |
LEARNING GOALS
Content Goals Students will understand * properties of light waves and the electromagnetic spectrum * perceptions of color and shade * how certain tools use the interaction of light waves with matter to capture information or create illusion Skills Goals Students will be able to * predict outcomes and conduct experiments to answer guiding questions related to light, color, and perception * record observations using methods that compliment investigations
SUPPLIES
| Supplies | Amt | Notes |
|---|---|---|
| Optical Illusion Prints | 1/student | See Resource Section |
| Colored Objects | 4-5 items per group | Small items that will fit in shoe box. Need a variety of colors including red, white, and black. |
| Shoe Box or Similar | 1/group | See Advanced Prep, Needs to open and close easily |
| Camera with IR filter | 1 | A camera with an IR filter (most digital cameras have an IR filter) |
| Camera without IR filter | 1 | Typically cheaper cameras such as webcams. On iphone 5S and earlier, the front-facing camera does not have an IR filter while the back-facing camera does |
| Flashlights | 1/student | Activity will work best if each group has flashlights of about equal brightness. |
| Square of Red, Blue, and Green Filters | 1 of each/group | See Resource Section for where to buy, or make your own with transparencies and colored permenant markers |
| IR-emitting device | 1 | Most remote controls emit IR |
| Markers | 1 set/group | Set of red, blue, and yellow markers |
| Electromagnetic spectrum visual aid | 1 | See Reserouce Section |
| Filtered Light Worksheet | 1/group | See Reserouce Section |
| White paper | 1/student | for optical illusion activity |
| False and Pseudo Color images | 1 set / group | See Reserouce Section |
| Shades of grey optical illusion | 1/student | See Reserouce Section |
| Scissors | 1/student | or can be shared between students |
ADVANCED PREP
Create boxes with viewer (1 per student group)
- Using a box cutter or scissors, cut a small hole in side of box. This hole should be approximately 3-4” by 3-4”.
- If time allows, have students help with the construction of these boxes.
Read articles in preparation for classroom discussions * INSERT LINKS HERE
INTRODUCTION
5 minutes
Begin class by going over classroom expectations, and reminding students of the information learned in Lesson 1: Wetlands, Water, and Oil.
In our last lesson, we learned about the wetlands loss occurring in the gulf and the importance of protecting these lands. Today, we’re going to study light, and how we see light. We are learning about light so that we know more about how we can observe our environment, to ultimately help us protect it.
ELECTROMAGNETIC SPECTRUM
10 minutes
What is light? Light is electromagnetic radiation that is visible to the human eye.
You may have heard of the term “visible light”- does that mean there is also “invisible light”? What other types of light are there? Electromagnetic radiation that is outside the visible range has a wavelength that is too long or too short for the human eye to detect. Humans can only see a small portion of the electromagnetic spectrum!
Show visual aid of the electromagnetic spectrum.

Electromagnetic radiation is classified by its wavelength. The human eye can typically see wavelengths between approximately 400-700 nanometers, but this range is just a small fraction of the entire spectrum. Below 400 nanometers is ultra-violet, or UV, light, X rays, and gamma rays. Above 700 nanometers is Infrared, or IR, microwave, radio waves, and long radio waves. Today we will be taking a closer look at visible light, as well as IR light that is very near the visible light spectrum, also known as near-infrared.
Visible light is made up of all the colors of the rainbow- red, orange, yellow, green, blue, and purple. When all these colors combine, we see “white light”.
For more information, read www.physicsclassroom.com/class/light/Lesson-2/The-Electromagnetic-and-Visible-Spectra.
In your notebook, describe the similarities and differences between red light, blue light, white light, and X-rays. Think about the wavelengths and energies of these kinds of light. In a second paragraph, describe how white light striking a prism creates a rainbow.
COLORED BOXES
20 minutes
For this activity, arrange students in small groups of 2-4 students.
Materials per group
- Boxes with viewer cut out
- Small colored objects
- Red Filter
- Flashlight
- Filtered light worksheet
When we look at a object, why does it look a certain color? When light hits an object, the object will either absorb or reflect that light. The color of an object is just a combination of all the wavelengths of light that were reflected by the object. A red object appears red because it is absorbing the orange, yellow, green, blue, and purple wavelengths, and is reflecting the red wavelengths.
Why do white objects look white? What about black objects? White objects are reflecting all wavelengths of visible light. Black objects are absorbing all wavelengths of visible light.
Pass out the filtered light worksheet to each group and have them draw what happens to the visible light wavelengths in Section A. After each group has had a chance to complete Section A, review with the class to check for understanding.
Pass out a box, red filter, and a flashlight to each group.
In front of you, you each have a box with viewer on one side. You will be shining the flashlight through the red filter and into the box to look at different objects. What do you think happens to light as it enters this filter? Only the red wavelengths of light are able to pass through this filter.
In a moment, I will be passing out a few colored objects, including a red, black, blue, and white object. On your worksheet in Section B, make a prediction about what color each of these objects will appear when viewed through the red filter. Once you receive your objects, place them in the box and use the flashlight to shine through the filter and view your objects one at a time.
Pass out small colored objects to each group. After students have a chance to test out each of their objects, review as a class and discuss why each object appeared as it did. Discussion prompts can include: Why does an object appear red in natural lighting? If there is only red light striking a red object, will it still appear red? Why or why not? If there is only blue light striking a red object, will it still appear red? Why or why not? Can you explain how color filters impact the appearance of colored objects now?
Supplementary reading: www.education.com/science-fair/article/colored-lights-effect
MIXING LIGHT
20 minutes
For this activity, students will remain in small groups. This activity will be best in a dimmed room without much sunlight.
Materials per group
- 3 Flashlights
- Squares of colored film (blue, red, and green)
- White paper
- Worksheet
You likely learned about mixing colors when you were in elementary school. However, most of our experience with mixing colors usually comes from mixing pigments. This is very different from the results of mixing light. For example, when you mix all colors of the rainbow with paint, you get a lovely shade of brownish black. However, when you mix all colors of the rainbow in light, you get white light.
We are going to experiment with mixing light using the colored filters and flashlights in front of you.
Pass out the materials listed above to each group. First, have students use the worksheet to predict what color will form when they mix each of the colors of light, and what color will form when mixing all three colors. Then, instruct students to place a colored film on each flashlight and shine it onto the white piece of paper. Have them begin by mixing two colors at a time, then all three colors at once. Students should color in the light color wheel on their worksheet with the results. Discuss their predictions and the results of their experiment.
Students should observe that mixing red and green light results in yellow light, mixing red and blue results in magenta, and mixing green and blue results in cyan. Mixing all three results in white light.

These three colors of light are known as the primary color because when they combine they can create all other colors of light.
To explore mixing reflected light (versus emitted light), students should read www.rgbworld.com/color After reading the article, ask students to describe additive and subtracted color systems. Do t-shirts use additive or subtractive systems? When a t-shirt appears magenta, which primary light color(s) is(are) absorbed and which is(are) reflected?
More advanced classes may be interested in new technologies for light absorption. Read www.scientificamerican.com/article/antilaser-time-reversed. Ask students to draw a schematic of how the anti-laser works. For discussion, ask students to imagine what they might like to do with an anti-laser.
BIOLOGY OF OUR EYES
10 minutes
We now know how visible light can be reflected or absorbed and combined to form different colors. But how do our eyes detect those colors?
Our eyes have millions of light-receptor cells of two types: rods and cones. Each of these types have a very different purpose. Cones can detect color, while rods cannot. Rods are extremely sensitive and can detect light at very low levels. If you’ve looked around a dark room, chances are there was still enough light for you to make out different objects, but not enough light to tell what color the objects were. This is because at low levels of light, only your rods are active.
Cones need a much greater amount of light to activate. There are three types of cone cells- those that respond to long wavelengths, medium wavelengths, and short wavelengths. These allow us to see red, green, and blue light. We know from our light mixing experiment that these three colors of light can be mixed in different amounts to produce all other colors of light.
Color is the way that our eyes interpret the visible spectrum of light. By dividing the spectrum up amongst three different colors and looking at the differences between the responses of the three different color sensors, we can identify light's position on the visible spectrum. The ideal way to do this would be to get three perfectly clear, even divisions of the spectrum, like this:

But we don't have an ideal vision system, we have roughly 120 million high-sensitivity black and white photoreceptors called rods, and a more recently evolved color system six million cones. These different sensors neither divide the spectrum up evenly, nor are they of equal sensitivity. They look more like this (with the grey line showing what section of the spectrum the rods can absorb).

Notice how the rods are not sensitive to light in the orange/red range. This is why red light is used at night- it does not interfere with your rods and therefore doesn’t destroy your night vision.
The images that we see are not a raw feed from our eyes. Our brain's visual cortex system uses complex comparisons of the relative intensity of colors to get an idea of an idealized color, such as "red" across a wide variety of lighting conditions, even if the actual spectral profile of a specific object changes. This means the spectrum as our brain interprets it is more like this:

The normalized intensities of the different cones in our eyes, and the complex determination of relative color and brightness gives us the magnificent flexible vision system that we take for granted. In creating film and now digital cameras, people have had to do some hard thinking about how to make images that see color the way we do, so that color reproduction is consistent across lighting conditions.
Further Investigation A lot of people have wondered whether or not humans could see beyond the traditional visible spectrum, and some people have claimed to be able to see infrared light. Read this article for a discussion of the phenomenon, and ideas about why it might occur: www.scientificamerican.com/article/photons-double-up-to-help-us-see-beyond-the-visible-light-spectrum.
After reading the article, write a mathematical expression to explain the basis of the two-photon isomerization idea. In one or two paragraphs, design a scientific study to test the two-photon isomerization idea.
OPTICAL ILLUSIONS
20 minutes
For this activity, students can work alone, or remain in their groups.
Materials per student
- Optical Illusion Prints
- White Paper
- Markers
Pass out optical illusion prints to students. Ask them to stare at the middle of the print for one full minute, then look at their blank white paper. Students will observe an after-image on the white paper that has different colors from the print.

What did you observe? Why do you think you see the same image when you look away? What you observed when you looked at the white paper is called an afterimage. You may have seen this effect before if you’ve experienced seeing spots of lights in your vision after looking at a camera flash. This happens because the rods and cones in your eyes lose sensitivity if they are over stimulated.
Were the colors the same in the afterimage as they were in the original image? The colors were not the same. Your task is to figure out how the colors in the afterimage are related to the colors in the original image, and why they appear different. You can use the markers and white paper to test various colors and make your own optical illusions.
After allowing time for the students to experiment, discuss their results. They should discover the following connections:
| Original Color | Afterimage Color |
|---|---|
| black | white |
| red | cyan |
| blue | yellow |
| green | magenta |
| yellow | blue |
| magenta | green |
| cyan | red |
Encourage students to refer to the color wheel of light they created in the previous activity. They will notice a pattern in the colors of the afterimage: The afterimage is of a color across the color wheel from the original color. For example, if the original image is green, the afterimage will be magenta. This is because the green photoreceptors are fatigued, making the signal from the red and blue photoreceptors stronger by comparison. Sensing red and blue light together forms a magenta image.
_Similarly, an original yellow image is made from both red and green light. As the cones that sense red and green are fatigued, the blue photoreceptors are stronger by comparison and create a blue afterimage. _
If time allows, let the students draw their own optical illusions keeping in mind what colors the afterimage will appear. Have them trade pictures with their neighbors and view their optical illusion.
Further Exploration Ask students if they remember the controversy that erupted on social media about the bridesmaid's dress that was either white/gold or blue/black (cerca March 2015). The controversy surrounding this dress emerged from an optical illusion. Read this article to explore the phenomenon and some new questions that have emerged about how we perceive color: www.sciencenews.org/blog/culture-beaker/dress-divided-internet-it’s-really-about-subtraction. Ask the students to take notes while reading the article, and write a paragraph in their own words explaining ideas about why people see the dress colors differently, and what new questions have emerged for this field of research.
DETECTING SHADES
15 minutes
For this activity, students can work alone, or remain in their groups.
Materials
- Shades of Grey optical illusion
- False Color images
- Pseudo Color images
- Scissors
Pass out the Shades of Grey optical illusion to students and ask them to describe the image to you. Make sure they include specific information about the shades of grey and how they appear to change.

https://en.wikipedia.org/wiki/File:Gradient-optical-illusion.svg
Pass out scissors to each student and instruct them to cut out the middle bar of the optical illusion. They will find the entire bar is actually 1 shade of grey.
Although the shades appear very different, they are actually the same. Our eyes view shades of color in relation to what is surrounding the color we’re looking at. It can be very difficult for our eyes to distinguish between two different shades, or to tell that two shades are the same or different. When viewing an image of trees, lakes, and grass, it can be hard for our eyes to pick out which shade of green belongs to each. To help separate shades that are very similar, we can use something called psuedo color or false color on images.
With false color images, the three channels that a camera sees (red, blue, and green), are replaced with other colors or even with energy outside of the visible range. For example, the blue channel in a photograph can be altered to show red, and the red channel can be made to show infrared. These ways of viewing colors and other information from images can help our eyes separate shades that look similar.
Psuedo color images are similar but use only one channel of data. A popular example of a pseudo color image is in thermal images. Using only one input (temperature), a colorful image is created with higher temperatures assigned certain colors, and lower temperatures assigned other colors.
Pass out the aerial image of trees in regular colors.
For example, look at this image with regular colors: it can hard to tell apart the water from the treens. Try to find all the lakes and rivers.

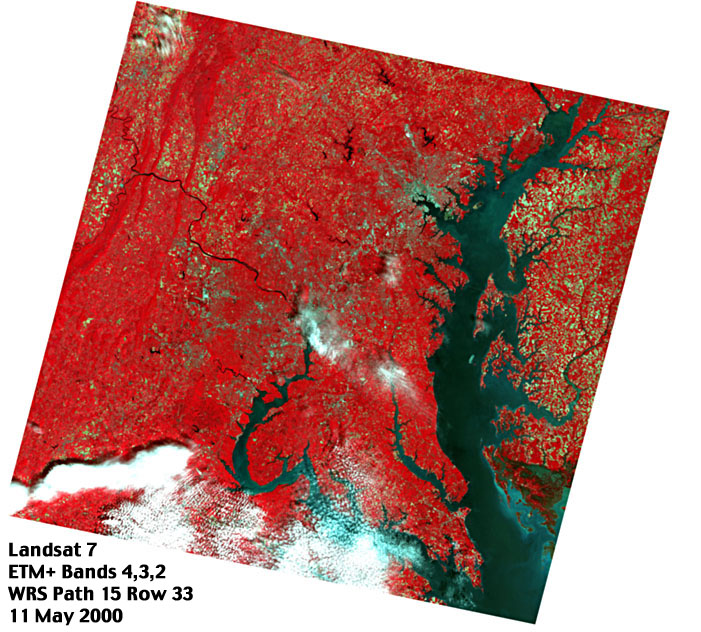
_Pass out the false color version of this same image. Ask students if they were able to find all the lakes and rivers, especially the smaller ones that blend in with the green of the trees. _
Using false color, we can immediately see where the water is and where the trees are. This technique can help us quickly identify all the shades that are the same, while eliminating confusion from comparing shades that are next to each other.

In our next lesson, we’ll learn how we can use this technique, along with all the information we learned today, to monitor the health of the wetlands.
For more in-depth discussion of aerial imagery and false and pseudo colors, and preparation for Lesson 3, students can read http://ngm-beta.nationalgeographic.com/archive/remote-sensing-new-eyes-to-see-the-world.
WRAP UP
10 minutes
Let students guide the discussion about the day’s lesson and present their hypotheses before discussing explanations.
What are the electromagnetic spectrum and visible light spectrum? Why can humans see some light and not other kinds of light?
How might it be useful to use false color or pseudo color images?
What surprised you about today’s lesson?
What would you like to learn more about from today’s lesson?
RESOURCES
Filter purchasing For red filter, Rosco Fire #19 is ideal and will be used again in Lesson 3.
- http://www.rosco.com/filters/roscolux.cfm This site allows you to search for stores near you that carry theatrical filters.
- http://www.barbizon.com/product_info/rosco-roscolux-fire.html This site allows you to buy a large filter for around $10 that could be cut into 30 4”x4” filters.
https://www.physicsclassroom.com/class/light/Lesson-2/The-Electromagnetic-and-Visible-Spectra
https://www.education.com/science-fair/article/colored-lights-effect
https://www.rgbworld.com/color
https://www.scientificamerican.com/article/antilaser-time-reversed
https://www.sciencenews.org/blog/culture-beaker/dress-divided-internet-it’s-really-about-subtraction
http://ngm-beta.nationalgeographic.com/archive/remote-sensing-new-eyes-to-see-the-world
https://en.wikipedia.org/wiki/Photoreceptor_cell Wikipedia entry on rods and cones
https://www.ncbi.nlm.nih.gov/pmc/articles/PMC1279132/?page=5 Study on the visual pigments of rods and cones
http://en.wikipedia.org/wiki/Electromagnetic_spectrum Wikipedia entry on the electromagnetic spectrum. Use image here as visual aid when introducing the electromagnetic spectrum.
http://en.wikipedia.org/wiki/Additive_color Wikipedia entry on additive color
http://en.wikipedia.org/wiki/Afterimage Wikipedia entry on afterimages
http://www.omsi.edu/tech/colormix.php an online tool that lets students experiment with mixing light to create different colors.
http://en.wikipedia.org/wiki/False_color Wikipedia on false color images.
VOCABULARY
Rods: Cells in the retina of the eye that provide side vision and the ability to see objects in dim light (night vision).
Cones: Cells in the retina of the eye that provide sharp central vision and color vision.
Electromagnetic Spectrum: The range of wavelengths of electromagnetic radiation extending from gamma rays to the longest radio waves and including visible light.
Infrared: Electromagnetic radiation having a wavelength just greater than that of the red end of the visible light spectrum but less than that of microwaves. Infrared radiation has a wavelength from about 800 nm to 1 mm, and is emitted particularly by heated objects.
Near-infrared: The part of the infrared spectrum that is closest to visible light.
Afterimage: An impression (usually a visual image) retained after the stimulus has ceased.
Photoreceptors: A nerve ending, cell, or group of cells specialized to sense or receive light.
False Color: A false color image does not use the natural colors (what’s called a true-color image). Instead, it assigns other colors to each channel in order to ease the detection of features that are not otherwise easy to see. This could involve changing visible colors, IR, or other data channels. For example, false color images depicting near infrared data are used for the detection of vegetation.
Pseudo Color: An image that uses one channel of data, such as temperature, elevation, etc, and assigns each intensity value a color. It is similar to false color images, but differs in that it uses a single channel of data, while false color images are commonly used to display three channels of data.