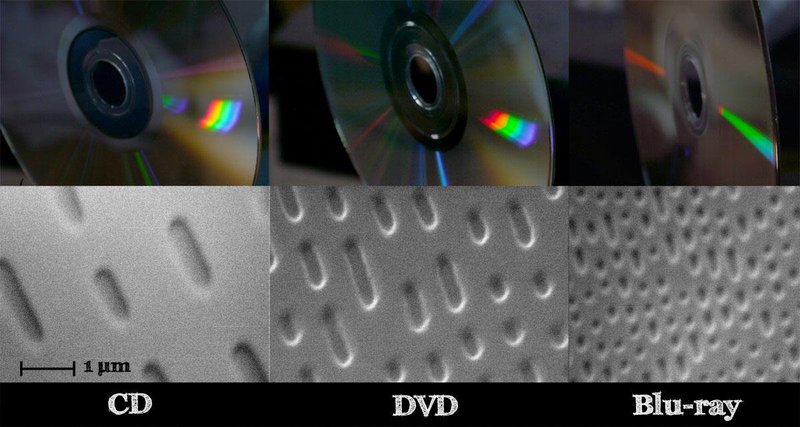
Micrometers, or microscopic rulers, are a little expensive; something like $15 each. But they're really helpful for measuring the scale of (i.e. calibrating) a microscope, as in these activities:
- https://publiclab.org/notes/partsandcrafts/02-26-2018/5-testing-and-calibrating-your-microscope
- https://publiclab.org/notes/MaggPi/06-23-2018/microscope-calibration-overlays-what-s-the-best-approach
I wonder if it'd be possible to print a micron scale on a DVD or blu-ray disc using one of these DIY techniques?
https://www.instructables.com/id/Burning-visible-images-onto-CD-Rs-with-data-beta/
I think there are other programs out there to do this too; it's just hard to search for them because "burn image onto DVD" usually means like a JPG image file, not a visible image... haha.
If we could print a square checkerboard grid with 10 micron resolution, it'd be pretty cheap to make lots of these. It might be necessary to peel the disc in half to use it, but that might be a good idea anyways to cut it into multiple calibration slides.
Looking at this image, i think it's possible either a DVD or Blu-ray disc could make a useful 10 micron scale ruler... though it'd be a little rough to look at... like, would it be squares of smooth and pitted regions, alternating?

Oh cool, this is a super interesting question.
I think this would be tricky to do at the scale that our calibration slides currently have (the ruler at 1mm with .01mm/10 micron lines)-- lasers have a kerf (the amount of material that they vaporize), and as far as I can tell, it's usually not TOO much less than .1mm/100 microns, but I've also never tried for anything that thin before!
The exact width of the kerf can be affected by a bunch of ambient and hard to control-for factors (at least at the scale we're talking about).. when I'm working on something that needs to be really small and perfect I plan on at least a little bit of drift/warp and do a lot of tinkering with power/frequency/vector sorting and placement of the material on the bed.
Now I'm actually kind of wondering if the frequency setting ON ITS OWN could be used to put down points at useful intervals-- whatever is just slightly less than continuous.
I know this is a minor thing given the scale of the etching, but not all lasers are great to used with mirrored material, and polycarbonate (which is in CD's and DVD) is one of those materials that seems to be on a "maybe ok depending on the laser" list-- there are some issues with health/exposure and with the way that a reflective surface can bounce things around. From the Epilog site, it looks like polycarbonate is etchable with fiber lasers but not recommended for CO2 lasers, but I'd want to dive into that a little more, because I'm not sure I understand what layers contain what materials (and materials lists are never as comprehensive as you want them to be), though for etching we'd only really need to worry about the topmost layer (we'd want to consider the material more carefully if we're cutting).
When you said you were thinking about splitting the DVD in half, do you mean to split apart the layers, like we do with the spectrometer, or something else?
Either way, I am super intrigued by this idea. I've got some laser time booked this weekend, so I might try this on a scrap of acrylic and a regular blank glass slide to see how fine a line I can achieve!
Is this a question? Click here to post it to the Questions page.
You know what, forget what I said about kerf width-- I'm used to the range I listed, but I'm finding some charts for lasers that makes it seem like finer is possible (though not necessarily with every laser). I'll give it a shot and report back!
Oh, actually this technique doesn't use a laser cutter - it forms an image by copying data onto the DVD at differing densities, so that the actual 1s and 0s line up across track lines and create visible patterns! So, it would be doable with just a DVD or Blu-Ray writer.
Oh, wow, I totally missed the mark, that's even cooler.
Reply to this comment...
Log in to comment
And to answer a question above, I /think/ this would put all "long" pits in the 1 regions, and all "short" pits in the 0 regions. So, you'd have to be able to tell those apart visually for it to work...
Although, "tell these apart" may also be a relative term. When you see the light or dark regions, you dont see the pits themselves but rather different 'shades' formed by their density, and might not even see the pits at the magnifications we're getting with the Community Microscope. We might just see denser or less dense regions...
Reply to this comment...
Log in to comment