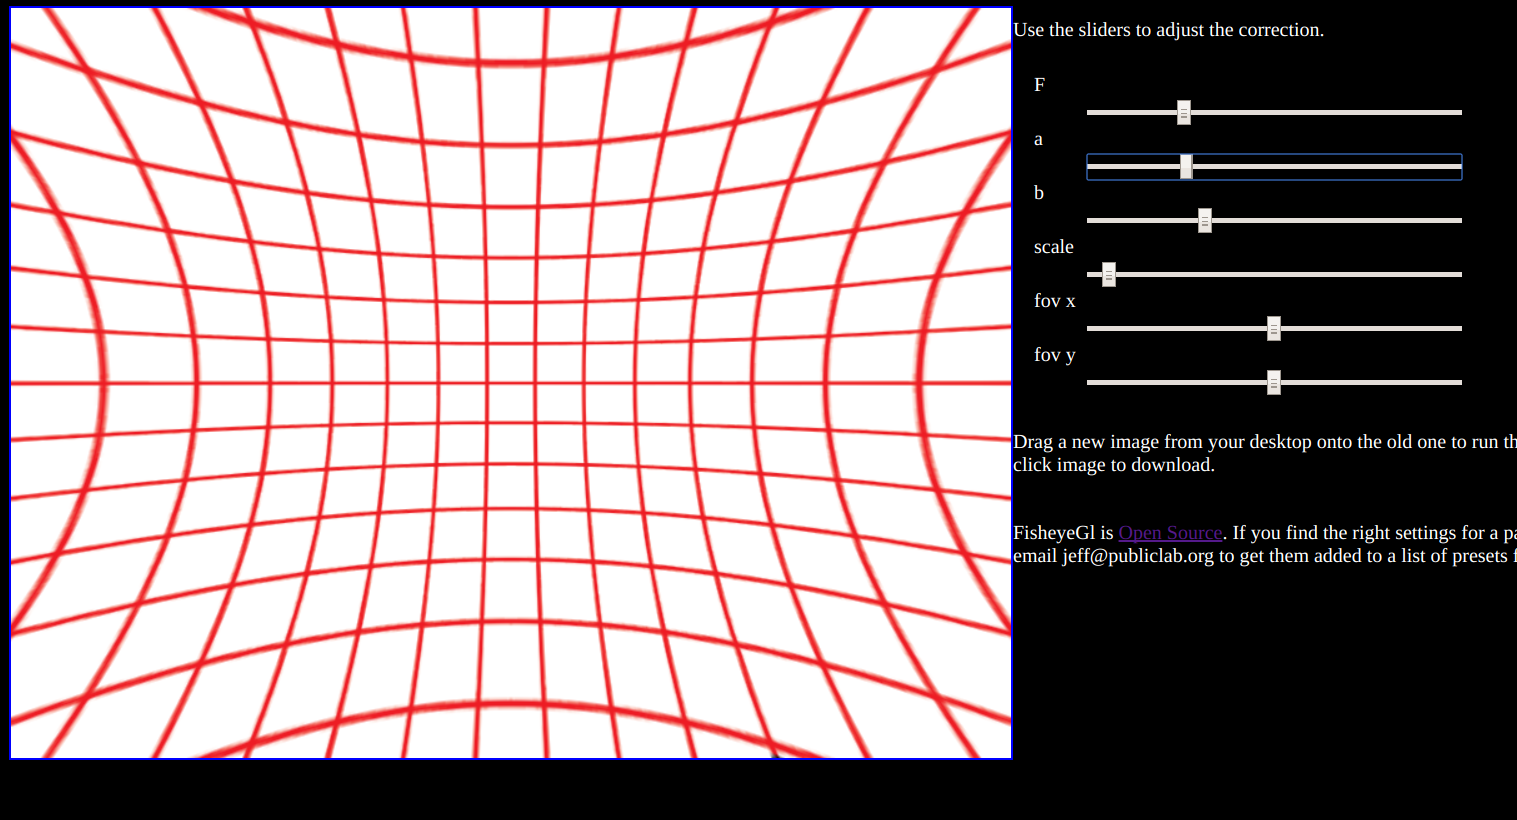
Hi, all - I'd been meaning to for some time, but I finally got a quick prototype up for in-browser #fisheye correction:
https://jywarren.github.io/fisheyegl/example/
Update (July 16): this is now functioning with full-resolution images and also both rectangular and square images. Give it a try!
Update 2 (Aug 2017): now with a guide and video tutorial: https://publiclab.org/n/14792
You can drag your own images onto the example image to correct distortions on anything.
It doesn't currently do full-size correction, but I think that'd be pretty easy to add, similarly to how the webgl-distort library worked.
Source code: https://github.com/jywarren/fisheyegl
I'd love to know if anyone uploads a #mobius image with some straight/gridded lines, and identifies the correct settings to fix Mobius images for the different lenses folks have. This could make it much easier to use MapKnitter on them. Please write back if you manage to get it working with some Mobius images.
If this seems to work, we could try to set it up to run on a batch of images as well.
Thanks!
18 Comments
Update: I added full-resolution, and also made it so that if you drop a succession of images onto it, it adds them below in a kind of 'gallery' -- so it's a little easier to do a batch process. Give it a try!
Reply to this comment...
Log in to comment
See https://publiclab.org/notes/eustatic/11-11-2014/a-method-for-distorting-mobius-action-cam-imagery-in-gimp-foss
Reply to this comment...
Log in to comment
Cool, thanks. I took a pic of a grid with my Mobius (an old one, i'm not actually sure of the lens) and got this:
I couldn't get a perfect undistort, but this is about as close as I got, using the settings:
a: 0.884, b: 0.912, F: 1.96, scale: 0.842, x: 1, y: 1I think it's possible the distortion is not working as it should on a non-square image? See how the horizontal lines are bent one way but the verticals the other.
Is this a question? Click here to post it to the Questions page.
Reply to this comment...
Log in to comment
Indeed, i used Scott's posted images and got the same issues.
But then I tried cropping them to square, and re-running them, using these settings:
And then it worked really well!
The outputs:
Reply to this comment...
Log in to comment
Hi, i dug into the code a bit and found the section I think we need to modify, but it's WebGL, and relatively obscure:
https://github.com/jywarren/fisheyegl/issues/3
I tried for a while, but wasn't able to get non-square images to distort properly!
Reply to this comment...
Log in to comment
I found this very interesting: I use NVDI Modded Mobius.. Blue filter Lens for Mobius ActionCam - 6mm for $6.00 each from public labs I get very little distortion. I have 5 second timelapse photo and from a height of 390 feet
Reply to this comment...
Log in to comment
I've added more detail to the issue here; https://github.com/jywarren/fisheyegl/issues/3
Would be GREAT to get this figured out!
Reply to this comment...
Log in to comment
This was solved today by SpaVec!
https://github.com/jywarren/fisheyegl/issues/3#issuecomment-315491151
The demo is updated: https://jywarren.github.io/fisheyegl/example/
Thanks!!!!
Reply to this comment...
Log in to comment
OK - the GoPro clones can be corrected with:
a: 1, b: 1, Fx: 0.16, Fy: 0.16, scale: 1.087, x: 1, y: 1Before:
After:
The Mobius (with default lens, i can check which it is) was harder but I got closest with:
a: 1.048, b: 1.059, Fx: 0.09, Fy: 0.22, scale: 1.087, x: 1, y: 1Using the first black image above, i got:
Before:
After:
@cfastie @patcoyle @eustatic you might want to give this a try now -- we can collect some different lens presets and even (in theory) recognize the type of camera by the EXIF data and auto-apply the right lens parameters:
https://jywarren.github.io/fisheyegl/example/
Once you have the parameters adjusted you can just keep dropping images on there and it'll batch them at the bottom.
Reply to this comment...
Log in to comment
@xose if you're testing any fisheye-lensed cameras please give it a try as well!
Reply to this comment...
Log in to comment
What do you mean it will batch them at the bottom? Is the information saved? Or do we have to write it all down?
Is this a question? Click here to post it to the Questions page.
Reply to this comment...
Log in to comment
The interface is really minimal at the moment, but i'm planning to make it save settings soon. But by "batch at the bottom" i mean that if you drag a new image onto the canvas, it'll save the previous image in a grid of thumbnails below, so you can drag image after image on and save them all when you're done.
Reply to this comment...
Log in to comment
But be aware this is pretty beta software! It can crash!
Reply to this comment...
Log in to comment
I tried with a photo from a PowerShot S100. That's the only camera I have other than the Mobius that has a fairly wide angle lens (24mm equiv.). But the firmware in the S100 corrects for distortion, so the photos are pretty square. I think I was able to make it more square with Fx=0.01 and Fy=0.02, but it won't matter much for stitching mapping photos.
I did not figure out how to save anything. I did figure out that you can make micro adjustments in the parameters by holding a mouse click on a slider and using the arrow keys on a keyboard. That's a nice feature.
Above: Uncorrected photo from a PowerShot S100 at full wide angle (24mm equiv). This is what the camera produces when it saves a jpeg.
Above: Corrected version of above photo using Fx=0.01, Fy=0.02,Scale=1.019.
Reply to this comment...
Log in to comment
Hm, so the PowerShot S100 actually fudges pixels to correct lens distortion? But you turned that off for this test picture? Or was this precorrected already?
You can save a picture with a right click and
Save as...- but if you could upload a before/after pair here, so we can see the change, that'd be best. Thanks!Is this a question? Click here to post it to the Questions page.
Reply to this comment...
Log in to comment
OK, I've just updated with a change that stores the settings in the URL, so you can pass a URL to someone else with the current settings. For example, for the Mobius example above, you can use this URL:
https://jywarren.github.io/fisheyegl/example/#a=1.048&b=1.059&Fx=0.09&Fy=0.22&scale=1.087&x=1&y=1
And it'll be set up with the same settings I came up with for the Mobius (not perfect but close):
a: 1.048, b: 1.059, Fx: 0.09, Fy: 0.22, scale: 1.087, x: 1, y: 1Reply to this comment...
Log in to comment
Right click -- got it!
I added the corrected version above.
Yes, I think most point and shoot cameras correct for lots of lens artifacts before they save jpegs. DSLRs have a special place in memory for lens profiles, so when you change the lens it can make the corrections for that lens. Point and shoots have only one lens, so the corrections are integrated into the firmware. Digitally correcting for distortion, chromatic aberration, vignetting, and other artifacts is much easier than making perfect lenses.
If you save the raw image file in a PowerShot, you might get an uncorrected photo, but I'm not sure. Trying to make the corrections manually will probably produce inferior results compared to the integrated lens profiles.
I did not use raw for the test above. I took a jpeg photo (which was corrected by the camera) and then did a teensy adjustment in the fisheyegl tool which seemed to remove some barrel distortion.
Reply to this comment...
Log in to comment
Actually i'm pretty jazzed for the possibility of some of actually doing the lens correction for the Raspberry Pi cameras folks are using, onboard -- like our own firmware!
Actually, if you have a Mobius with a non-standard lens, that'd also be really interesting to see... or even with the same lens, a confirmation that the settings I arrived at work for you smoothly?
Is this a question? Click here to post it to the Questions page.
Reply to this comment...
Log in to comment
Login to comment.