4k NDVI on the budget
Several months ago I got a key chain 1080p camera and converted it to use with my budget drone to perform NDVI analysis of agricultural and forest land. In that case scenario my budget drone (A Syma X8C converted to X8HC) carries two of these cameras, one normal RGB and the other without the IR cut filter and a red PublicLab.org Infragram Kit filter.
Some land features resulted with not so good resolution so why not go for 4k NDVI? Once again I found commercial 4k NDVI mini cameras but truly more expensive than I could imagine: $1,800 - $2,500. So why we could not try doing NDVI analysis with a budget 4k camera?
To do so, recently I got a couple of budget 4k sport cameras, a type known as sj8000, sort of a clone to the expensive and heavy GoPro4. It sells for $50-80 via mail order outlets.
On Youtube there is at least one procedure to disassemble the former sj5000, a similar but 1080p camera. However the sj8000 is a bit more complicated. Here I will explain how to convert the sj8000 camera by removing the IR cut filter and installing a red Infragram filter.
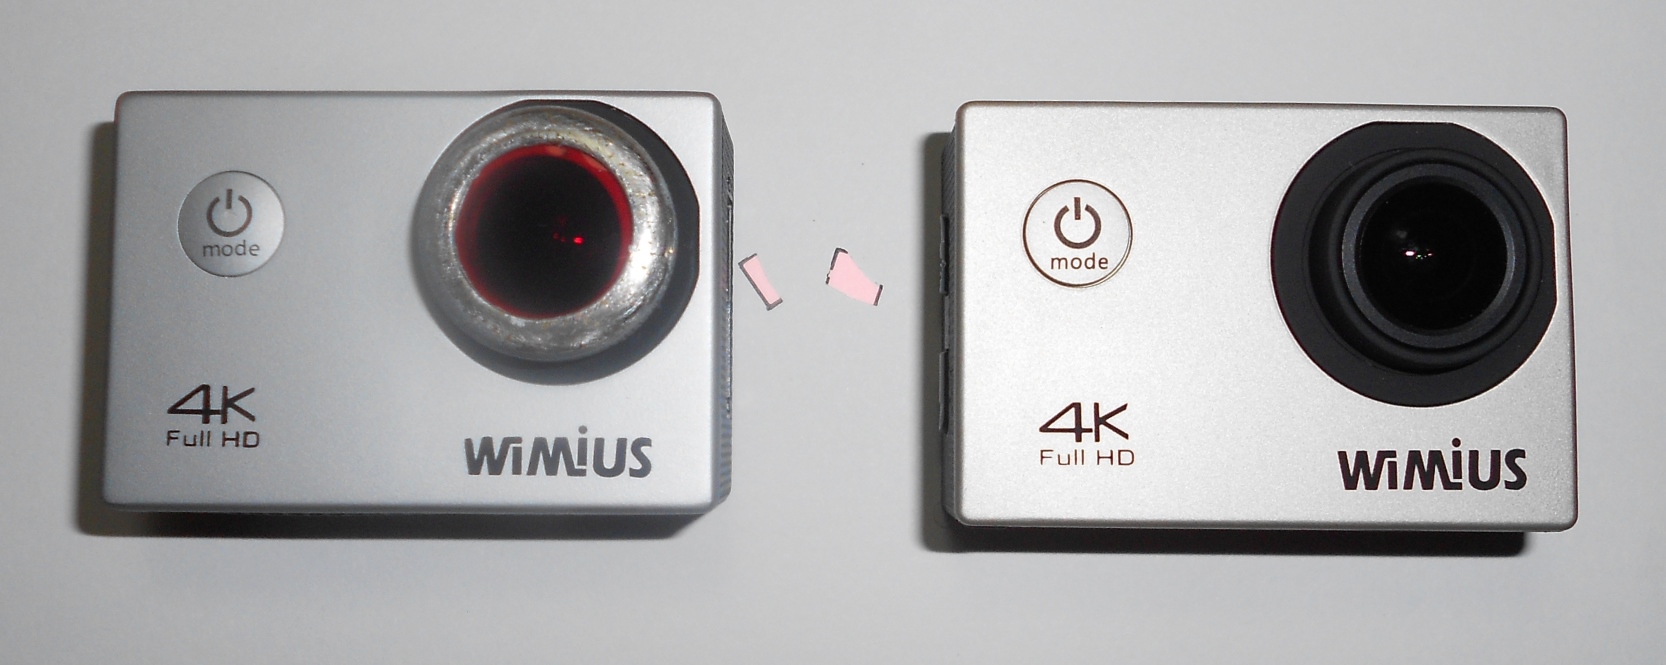
The converted 4k camera is the left one on the picture, the normal one is the right one. You may see the IR cut filter -broken- in between the cameras.
The conversion
These sj8000 cameras are rather easy to open, so be careful not to damage them. Get the following tools: 1. A very small Philips screwdriver (3/64" or 5/64") and a very small flat screwdriver, similar size. 2. A swiss army knife or similar 3. A GEM-type razor blade (one edge is non cutting). 4. A small pair of pliers, eyebrows pliers are very good. 5. Pressurized Air duster.
First you have to take the front plate off. To do do so, remove the battery. On the edge of the battery compartment you will see a lip of the front plate. Carefully push gently it to the front and it will snap loose and open. Then, with the knife remove the rubber lens cover by pushing it out gently, it has three legs attach to the camera.
You will need to remove now a delicate part: the screen. With the razor blade or the knife gently go through the slit between the camera body and the screen cover. Yes, the screen has a plastic cover with several thin films to protect the surface. Go slowly through the whole frame. Then pry it open from the camera body, by gently inserting the edge of the knife sideways. Do not go to deep (no more than 1/5") or you may damage the screen. After a little effort you may be able to pull the plastic screen cover off.
The screen comes with a white plastic edge. With the small flat screwdriver try pushing the screen frame off. Avoid touching the screen at all times. The screen has a plastic sheet behind that may prevent to take the screen out easy, so be patient. Once out you will see it has a flat connector to the board of the camera. Gently push open the connector lever which rotates out, the flat connector should come out with very little effort. Remove the screen.
Now comes the part to remove the lens. The lens of the camera is screwed, but it is glued at the focus position. With the knife gently remove the glue, which is usually white and rubber-like. Some of the removed glue can be extracted via the battery compartment. Once the glue is removed, make a mark on the front board and another to a position of the lens. I used a liquid paper sharp pen. This will help to mount the lens again.
Unscrew the lens. In sj5000 cameras the IR cut filter is on the bottom of the lens, in the sj8000 the filter is held by a rectangular plastic frame on top of the CMOS sensor. It takes about four turns to unscrew the lens.
Unscrew the plastic cover (4 screws in each corner). Save the screws. Take the frame out with the motherboard. You will find three small screws holding the mother board to the plastic frame, remove and save them.
You will need to remove the camera element with the lens case to then remove the filter. At this moment you must exercise extreme care. Unscrew the two larger screws in the motherboard that hold the camera element. With the small pliers, push out the holder electronic flat connector of the camera.
Now take the glue out of the edge between the camera back and the plastic lens case. Gently separate the camera element of the lens plastic case.
If you have learned a bit of surgery in high school now is the time to show that skill. Take the camera element and put it on top of some soft and clean surface. A cotton handkerchief makes a good one. I would recommend using surgical gloves or cotton swabs to hold the camera element motherboard.
Use the GEM razor blade to gently cut the filter plastic frame. The technique is similar to that you may use in the biology lab to create the microscope slides. Cut a small layer on each side of the frame at a time. Continue until the filter comes loose. It is so delicate that it may crack -it happened to me-. Remove the filter. That's it. Surgery is done. Time to stitch everything back.
When reassemble the camera element, first install the flat connector on the motherboard and insert it until you see the screw holes of the element board aligned with the holes of the motherboard. Secure the flat connector by pushing the holder with the pliers. Mount the lens case and screw it from the back.
Reassemble back the camera motherboard into the plastic frame with the 3 screws and then slide all into the case. The up/down switches may have come out, reinsert them and slide the frame into the camera body. Put in the 4 screws.
Reinstall the screen by inserting and securing the flat connector first. Then slide in the ribbon and install the screen frame in place and its cover. Use the duster to take out any dust over the camera element. Screw in the lens making about four turns. Remember the marks.
Install the battery and secure its cover. Turn the camera ON. The image will probably be blurry. Adjust the lens until you have a very sharp image. If you are not sure, use an HDMI adapter to connect the camera to a large HDTV and turn the lens until you have a sharp image. Put the rubber lens cover in. Install the nameplate. That's it.
I got a metal o-ring from an old faucet with screw to secure the Infragram filter to the camera lens, as seen on the picture (left).
I am sorry I do not have pictures of all steps. I would confess I was lucky enough to do it the first time and worked. I would not disassemble the camera right away yet. Maybe some other time, and then I will include pictures herein.
White Balance setup
One more aspect about the installation of the red Infragram filter is appropriate white balance. This type of sj8000 camera in particular does not have a fully adjustable white balance but five presets. I found that the one that renders a turquoise image of trees and greenery with the red filter is the preset 'Incandescent Light'. One has to press the On/Off button, four times for 'Settings' (shows a yellow sprocket logo), then find the screen with 'White Balance' settings and select it. The presets modes are shown, so move down and select 'Incandescent Light'. Other presets (auto,Sunny, Cloudy, Fluoresent Light) shows trees as red in different tones.
Questions and next steps
The images I had obtained with the converted 4k camera are similar to those I obtained with the 1080p keychain cameras, but extremely well resolved and sharp enough to get more decent NDVI indexes. Once I mount them in my drones I will post some results and their NDVI analysis.
Why I'm interested
I am currently helping small farmers to get better yields on their crops. These farmers have little funding to afford expensive and proprietary precision agriculture systems or even services. The specialized cameras and drones are too expensive making their rental or services expensive too for these small farmers. My interest on making use of readily available and cheap cameras, budget drones and open source NDVI tools is to help them succeed.
Any question, please make your comments below.
20 Comments
Wow, amazing -- do you have a link to where you can buy this camera, and any data on how much it weighs? It could be a great alternative for people doing balloon or kite mapping too, even unmodified.
Is this a question? Click here to post it to the Questions page.
Reply to this comment...
Log in to comment
Also do you have any pics you took with the camera to share? Raw and NDVI for comparison? Thank you!!!
Is this a question? Click here to post it to the Questions page.
Reply to this comment...
Log in to comment
Thanks warren, I got these cameras from Amazon, vendor digital_family, product ASIN B01FLVPZNY. It is now under $60. On pictures I just had some pictures which I am going to pass over some programs such as Fiji/ImageJwin64, Drawndvi, SPN-VEG to see how they compare vs raw. Once done I will post them here.
Reply to this comment...
Log in to comment
i want to buy DYI plant health analyzer filter......i tried to buy from public labs but it's already out of stock. How can i possibly buy it for integrating in my gopro for monitoring vegetation.
Reply to this comment...
Log in to comment
Hi, I have Mobius Infragarm cam for NDVI. I can't locate the White Balance settings for the mSetup program. Can you pls. give the values or a link to them ?. Thx. Dave
Is this a question? Click here to post it to the Questions page.
Reply to this comment...
Log in to comment
Trying slightly different values could yield better results in some situations.
CLF_SYSCFG.TXT
Reply to this comment...
Log in to comment
Thx. @cfastie
Reply to this comment...
Log in to comment
These or similar cameras are as low as $40 now! https://www.amazon.com/gp/aw/d/B01DG9UMS6/ref=mp_s_a_1_2?ie=UTF8&qid=1497436247&sr=8-2&pi=SL75_QL70&keywords=sj8000
Is this a question? Click here to post it to the Questions page.
Reply to this comment...
Log in to comment
Also see this page collecting cheap cameras of this type: https://publiclab.org/questions/warren/05-20-2017/cheap-lightweight-gopro-alternatives-for-aerial-mapping
Reply to this comment...
Log in to comment
@azaelb There's something I don't really get. Basically what we need to do is to remove the ir cutter from inside the camara and place the red filter outside? Me and a colleague disagree, he thinks the red filter goes inside, replacing the ir cutter, I think you take the ir cutter out and place the red filter outside.
Is this a question? Click here to post it to the Questions page.
Reply to this comment...
Log in to comment
The new filter can be inside the camera or in front of the lens. If it is in front, it will get scratched and might be bent (not flat), but it is easy to change to a new one. If it is inside, it is protected and requires a very small piece, but it is hard to change to a different filter.
Chris
Reply to this comment...
Log in to comment
Does anyone have some more photos of this conversion process we could show here, more step-by-step?
Is this a question? Click here to post it to the Questions page.
Reply to this comment...
Log in to comment
@amanda and I did a take apart session and this is pretty easy to do with a good pair of pliers -- wire strippers worked well!
Reply to this comment...
Log in to comment
Incandescent white balance seems to work all right!
But wait, here it is in NDVI using http://infragram.org -- black is zero NDVI, white is 1.0:
And here colorized for contrast:
Not super great. Maybe better sunlight would help? @cfastie, what do you think, can you say if this camera would work for a basic relative NDVI based on these images? (it's a real plant :-P)
Is this a question? Click here to post it to the Questions page.
Reply to this comment...
Log in to comment
A single camera NDVI system with a red filter should produce a photo with very turquoise foliage. The blue channel (NIR) should be much brighter than the red channel (red). Your photo has a brighter red channel, so NDVI values will not be in the standard range.
If most of the light was artificial, that could account for some of the lack of NIR brightness. I guess some fancy window glass could also block some NIR. But if you can't do a custom white balance, a jpg photo will never be directly convertible to meaningful NDVI. The custom white balance multiplies the values in the blue channel by 2 or 3. Without that adjustment, your only hope might be to capture RAW image files and do the adjustment afterwards. I have never managed to get meaningful NDVI from a jpg photo unless a custom white balance was used.
Chris
Reply to this comment...
Log in to comment
Hmm, could we manually multiply the blue channel by 2 or 3 to do a "post-processed white balance"? Of course this would need to be calibrated, but if that's all we're doing with custom white balance, why not?
Here's the same image using
(2*B-R)/(2*B+R)-- so blue is doubled, using Infragram.org:Is this a question? Click here to post it to the Questions page.
Reply to this comment...
Log in to comment
I have tried several times to adjust the histogram of bad infrared photos. It has always failed and I don't know why. I assume it is because the adjustments made by a custom white balance are more complex than multiplying all blue values by a factor. So the factor might have to vary depending on the values in the other channels. If we knew the formula we could do it. The other problem is that our adjustment is made on a jpg photo which has already been processed (including gamma correction, etc.). That's why starting with RAW image files might be more successful. Ned seemed to think that he could calibrate jpg photos if he could undo the gamma correction, but I'm not sure he ever got that far.
Although manipulated jpg photos seem to produce lousy NDVI images with lots of artifacts, they sometimes manage to discriminate most foliage from most non-foliage. If that is all you want an NDVI image to do, and you are happy with lots of false positives and false negatives, shifting all the NIR values by some factor might be adequate.
If you are stuck with a camera that does not do custom white balance and does not do RAW, another option is to find a filter which does a better job with your camera. Event 38 has sold a blue filter which makes very good NDVI images in some situations. Photos taken with any of the white balance presets from some cameras can be directly converted to NDVI with good results. Also, the photos straight from the camera look a lot like traditional CIR photos.
Above: Photo from a PowerShot S100 with an Event 38 blue filter. I think the cloudy white balance preset was used.
Above: NDVI image made directly from the photo above.
Reply to this comment...
Log in to comment
I guess to evaluate how well the 2x blue boost I posted above worked, we'd have to compare it to a better system, right? If other folks take a photo with this kind of modded camera and want to validate it, we can lend out a higher quality camera to test against it. Just ping me!
Is this a question? Click here to post it to the Questions page.
Reply to this comment...
Log in to comment
Ah! https://publiclab.org/notes/cfastie/08-20-2013/white-balance-recovery
Flashback!
Reply to this comment...
Log in to comment
I posted an activity for doing NDVI-like work using a camera like this -- with a coefficient (on the output of NDVI, so like "boosted" NDVI) here: https://publiclab.org/n/16843
Reply to this comment...
Log in to comment
Login to comment.