The Public Lab Kits Initiative uses Raspberry Pi cameras more and more, and was in need of a workflow to generate customized operating system images for specific needs such as the Microscope and Lego Spectrometer Kits.
In general, while Raspberry Pi mini-computer boards are amazing, there's a significant barrier for many people to use them, which is the installation and configuration of the memory card with useful software -- like camera software, for example!
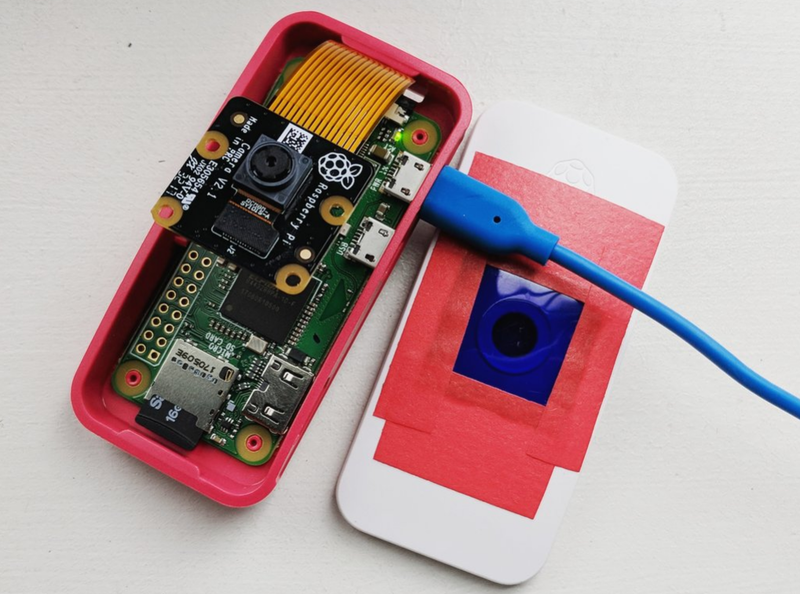
Plug and play
We wanted to have a way to generate different pre-loaded SD cards, repeatably and reliably, for different uses. And we wanted people to be able to simply insert an SD card, plug in the camera and power, and start using the Raspberry Pi as a camera as quickly as possible.
We also had a desire to build a process whereby the community could participate in the construction of the operating system that we distribute with our kits and also to share recipes and ready-made images for usage in specific scenarios.
The default operating system image is meant to simplify the workflow for kit users, so these well-defined features needed to be set up:
- A WiFi hotspot with a _captive portal _(like airport WiFi) so you are prompted as soon as you connect
- A streaming web camera application
- Ability to run scripts (e.g. Timelapse)
- A friendly landing page with links to the above
I was contracted for this and so I had to come up with great shoulders to stand on in order to deliver all features! Disclosure: I am also Public Lab's part time Systems Administrator.
Fortunately thanks to the great work of the Hypriot Project, and the Gitlab CI service, we are able to iterate quickly and collaboratively, from an orderly and flexible base.
Please consider this release a Beta to try out
Download
☁️ Download latest combined image
Documentation
The documentation is included with the combined image. You may also read it online.
We also have a page for Q&A, troubleshooting, and activity guides here.
Contributing
Adding a new "recipe" is quite easy -- it is possible to fork our repository, make your modifications and open a pull request, which our system will use to generate a new custom image. You can then download a fully built customized image ready to be burnt into your Pi¹.
¹: Tested on Pi Zero W only.
We'll be thrilled to see this repository evolve in alignment with the communities's needs.
9 Comments
Amazing!
At IMVEC we're working in a couple of cameras using RPi zero and one of them involves internet connection to display obtained images online.
Both involve the use of the Witty pi mini board to manage energy of the pi.
Using the combined image everything goes like a charm. The camera is accesible and the command line works perfectly.
Trying to connect to internet using wifi I'm unable to turn off the acces point and turn on the wifi.
I've set up wifi credentials using wpa_supplicat (wpa_phrase and so on..) and turn ap0 down using "ifconfig ap0 down". After this "ifconfig wlan0 up" but nothing happens... How can I do this?
Woul be great to have a little interface in the captive portal page to turn of acces point and connect to a wifi signal and download packages needed for the different recipes ;D.
I understand further connection should be done using terminal + keyboard + monitor...
Is this a question? Click here to post it to the Questions page.
Reply to this comment...
Log in to comment
This is great to hear, @xose - I've actually found that it should be possible to get a Pi Zero W running BOTH as an access point and connecting to another WiFi network.
I've started an issue here to work towards a recipe for that: https://github.com/publiclab/pi-builder/issues/34
We do have a web terminal connected too, which can help sometimes, in one of the recipes at https://github.com/publiclab/pi-builder/pulls
Would you be interested in posting some of your configuration steps to the above issue (or another that interests you) and we can work towards getting a reproducible build of that setup for anyone to download? The hope is that small incremental improvements to the image can be retained and versioned, making them more reproducible each time a change is made. This can be hard with Pi development -- so much can be lost since it's all "trapped" on that SD card :-)
Have you had much luck with the timelapse feature of RPi Cam web interface? I had some trouble downloading it in bulk since it tries to generate a .zip file, which then fails in the web interface.
On Wed, Oct 31, 2018 at 1:44 PM \<notifications@publiclab.org> wrote:
Is this a question? Click here to post it to the Questions page.
Reply to this comment...
Log in to comment
Also, interestingly, we have Infragram running in live-streaming mode pulling from the Pi camera on a web interface hosted from the Pi!
https://github.com/publiclab/pi-builder/pull/40
Reply to this comment...
Log in to comment
Hi, I am trying to download high resolution PI camera V1.3 images but Pi Builder locks up or produces files with no data. Is there a setting for high resolution picture settings ? My settings are attached. Not interested in video just trying to get 2592 x 1944 pictures for microscope observations. Thank You
Is this a question? Click here to post it to the Questions page.
Hi! Pi Builder itself is the recipe for building the customized Operating System image that we distribute, a version of which bundles the RPi-Cam-Web-Interface.
You may be running into the hardware limits of the Pi Zero W. My guess is that the RAM may be insufficient. Check available RAM from the command line with the command
freeortop.Here's a couple of things that you could try (please tell us if either helped!).
1) You could login to the Pi and edit the file
/boot/config.txt: It says "gpu_mem=128" but I believe you could tweak this to say "gpu_mem=64" or even "gpu_mem=16" might work. You need to reboot the Pi after editing the file. You could edit the file on the microSD card directly too.2) To handle a brief memory spike you might add some Swap Memory (Virtual Memory). Log into your Pi and as super user (
su): - Create a new swapfile: $ sudo fallocate -l 1G /swapfile (alternatively if fallocate isn't installed:) $ sudo dd if=/dev/zero of=/swapfile bs=1024 count=1048576Note: This will create 1GB file on the microSD card to be used as virtual RAM memory.
$ sudo chmod 600 /swapfile$ sudo swapon /swapfilefree. Test if high res works!/etc/fstab:/swapfile swap swap defaults 0 0Hope it goes well!
Reply to this comment...
Log in to comment
Oh also I was looking for references and found here that you could also try
gpu_mem=256.Reply to this comment...
Log in to comment
@icarito Thx for the information!
-Really like the interface, just fine tuning its application. -After a little experimentation, the interface can capture/load large format images if the Quality setting is adjusted to 100. its buried in the RPi-Cam-Web-Interface link you provided above:
"There are 2 settings to control quality and compression. Quality (1-100) controls the quality of the live image preview, and image_quality (1-100) controls quality of still image captures. The number does not match normal jpeg Q factor as the Raspberry camera compression software Q factor is quite non linear. The default 10 is approximately equivalent to 75 in normal JPEG usage and gives a decent trade-off between quality and file size. 7 is about Q 50, and 20 is about Q 95."
-I have been able to download large formats from v1.3 and 2.1 with no problems (with the Quality setting=100). I plan to post some pictures soon.
-The only problem I have now is that the my pi-zero locks up after about 20 minutes. Its behavior becomes erratic - the WiFI may not connect, may not store images or can't access commands). Have you ever had any problems with overheating? Since the camera mount prevents adding the supplied heat sink, not sure how to fix?
Thx again for your detailed response.
Is this a question? Click here to post it to the Questions page.
Reply to this comment...
Log in to comment
I just flashed the latest image onto a Pi Zero W and the browser livestream works as advertised. That's super cool and exciting. I'll be sending it up as a lightweight option for KAP - if I get any cool results, I'll be sure to share. Thanks for doing so much heavy-lifting!
Great to hear from you @thechan ! Please do share your experiences....maybe give that "I did this" blue button up there a click!
Reply to this comment...
Log in to comment
Login to comment.