What I want to do
Run through the Oil Testing Kit Beta program so I can better articulate what someone might need to do to run this as a workshop. Did this test with members of the Gulf Coast Chapter!
My attempt and results
Initially I had difficulty getting my oil cuvette holder to line up with the laser. I took a que from @Cindy_ExCites research note on technical adjustments and found that if I raised my holder slightly and angled the laser up just slightly, it lined up much better.
Also, when I got everything lined up correctly, the laser was not lining up where it should be at 405nm, but was instead around 200. So I recalibrated it and tried again. One thing I figured out was that I needed to refresh my scanning page with the new calibration and that seemed to work.
I ran through all the scans and they came out as follows::


Unknown
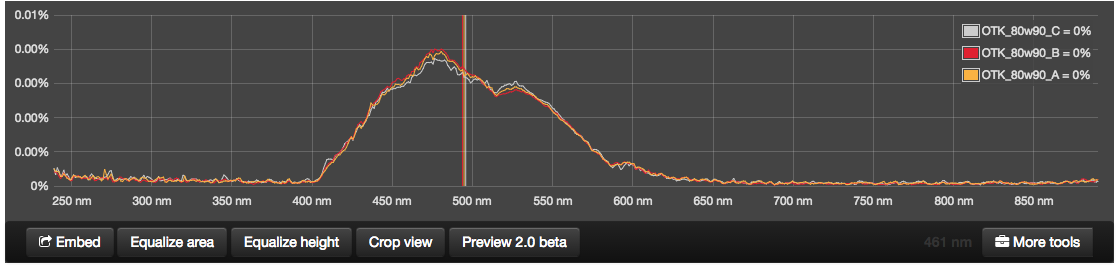
I had put the number stickers on my samples and recorded what they were in my notebook. I mixed up my samples and grabbed one without looking at the number, scanned it, and this is what the scan was::

Based on my other scans, I was able to correctly identify that this one was 80w90.
Some of my takeaways include::
I'm seeing the value having the steps walk you through taking samples. I found myself searching through all the options on SWB to find the ones that I was supposed to use for the beta program (some are right on the page, the others are hidden among many other options that I found a little confusing. One suggestion I could make would be to have a "bear bones" SWB version that is automatic and only includes the macros one needs to run through a basic scan and comparison test. Also a clippy for beginners.

I found myself wishing that the calibration I selected for my first scan stayed the default for the ones that followed. I had to select the same calibration for all of the scans. --Tags stay the same, can the calibration?
Some things that are not as intuitive or probably will need explaining on a workshop are ::: your scan page stays open, you only save once your sample scan goes the length of the window, your "sample" then opens on a new tab where you can detail info about what it is. You return to your "scan tab" when you're ready to scan your next sample.

Questions and next steps
Question: I did not change my sample on each scan, just did three scans. Wanted to make sure this was correct.
Next Steps: Keep an eye out for the workshop, coming soon! Also, love some feedback!
8 Comments
Wow, your scans look really awesome and consistent! the 20x50 less so, but still good. Why do you think the 20w50 varied more? Are all of those area-equalized?
We made a decision to force the user to explicitly choose the calibration each time, because some were just clicking "Save" without checking the calibration. Maybe we could have a "Same as last scan" button which you do have to specifically click, so it's explicit, and you can't overlook it?
you mean the height? I'm not sure that's necessary, if you do?
Is this a question? Click here to post it to the Questions page.
Reply to this comment...
Log in to comment
the "20w50 A" was my first scan. Might have taken me a bit to get these consistent, but I'm not really sure why it was so different. I equalized the area under the graph after I put the sets together. That's how I read the directions anyway.
Wouldn't you want to use the whole window for the scan? Otherwise you're getting just a clip of it. You could also be getting other samples if someone happened to be changing them out.
Is this a question? Click here to post it to the Questions page.
Reply to this comment...
Log in to comment
It only reads the top line of the image; this is documented but not as clearly as it should be. I just added this line to the display to help clarify; it'll show up in a week or two in a new version of the site. Thanks!
Reply to this comment...
Log in to comment
Another question I had was why we "auto smooth" each sample. I saw no difference from when I did this on my sample sets from when it wasn't done (I just tested an extra one where I didn't do this).
Reply to this comment...
Log in to comment
Oh, interesting. Can you make a set which compares smoothed vs. non-smoothed? In my tests, it reduced noise/spikiness, which helped discourage me from thinking that those tiny spikes were a good way to visually match spectra.
Is this a question? Click here to post it to the Questions page.
Reply to this comment...
Log in to comment
It's the "auto smooth 10 rows below" button right? here are the two graphs:: Smoothed::
Not Smoothed:
Is this a question? Click here to post it to the Questions page.
Reply to this comment...
Log in to comment
Oh, but are these in a set, or individual? Maybe auto-smooth is not working in the old sets viewer only when viewing spectra individually?
Is this a question? Click here to post it to the Questions page.
Reply to this comment...
Log in to comment
In a set, the beta program has people to post the "sets" in a research note. I smoothed the individual scans and compiled them as a set and posted them.
Looks like when you smooth a sample it doesn't save that way. Seems unnecessary for the beta testers to smooth the samples since they don't post the individual scans, and the smoothed version doesn't carry over to the set.
Reply to this comment...
Log in to comment
Login to comment.