DIY Near-Infrared Imaging
Published July 2012 in the Grassroots Mapping Forum #2. Order online.
Chris Fastie & Jeff Warren watch plants photosynthesize with modified cameras
use case: wetlands and farm mapping
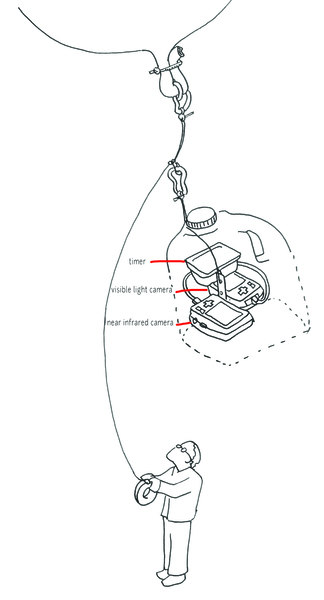
Over the past two years, two things have led to the development of an inexpensive infrared camera at Public Lab. First,the damage to wetland vegetation caused by the Deepwater Horizon oil spill led some of us to try to duplicate some of the sensors (infrared cameras) which are found onboard many satellites, and which are commonly used to assess vegetation health. Second, the desire of farmers to quantify plant health or stress, either to prove new, more effective organic farming practices or to reduce the use of fertilizer and thus agricultural runoff. Both scenarios also made use of our existing ability to reliably take aerial images using balloon- and kite-borne cameras. Here we’ll be discussing how this works, why, and giving you a starting point to begin taking infrared photos yourself.
plant health and color
One way to measure plant health is to compare the amount of red light reflected by foliage to the amount of infrared light reflected. Plants are green because leaves reflect green light— they don’t use it for photosynthesis, and they also reflect almost all infrared light, which we can’t see (image to left). Instead they use the blue and red wavelengths which are absorbed by the pigments in the leaves. The bigger the difference between the “redness” and the “infrared-ness” of the light reflected from a plant, the more the plant is photosynthesizing, and the healthier it is. The PLOTS IR camera tool allows us to compare how much red light and infrared light are reflected from plants and produce an index of how healthy or stressed the plants are (the Normalized Difference Vegetation Index or NDVI).
hacked DIY near-infrared cameras
To evaluate plant productivity, you compare an infrared photo with a regular “visible light” photo of exactly the same view. We’ve begun hacking cheap digital cameras by removing their “infrared block” filters, which are deep inside, right against the sensor. Canon cameras (the A490/A495 especially) are easy to modify in about 10-15 minutes, and we’ve published a YouTube video on the process (see links in “get involved”).
We replace the IR-block filter with a piece of exposed color film negative— just buy a fresh roll of color film, expose the whole roll by pulling it out of its canister, roll it up and have it made into negatives — the whole thing should cost you ~$8. Then carefully cut out a clean piece (no fingerprints!) identical in size to the filter you removed and place it where you removed the IR-block filter. This will block all visible light, but is transparent to infrared light. Reassemble the camera and you can take infrared photos!
(Try photographing the rest of your film negatives— they’ll be transparent to the camera!)
The standard filter in a film camera blocks infrared light from entering. Developed film blocks all but infrared light from entering the camera.
A camera’s standard light filter is usually accessible directly behind the lens. This illustration shows the back of a camera with the viewing LCD removed, exposing the filter. It can be easily removed with tweezers and replaced by a cut piece of developed film.
Contributers Welcome Our work is far from complete. Many steps are difficult or time consuming, and we need your
help to:
- streamline and simplify the process of taking infrared photos
- experiment with infrared mapping techniques by making more infrared maps
- help people interpret infrared images


