Infragram Point & Shoot
An up-to-date version of this documentation will always be available on this page
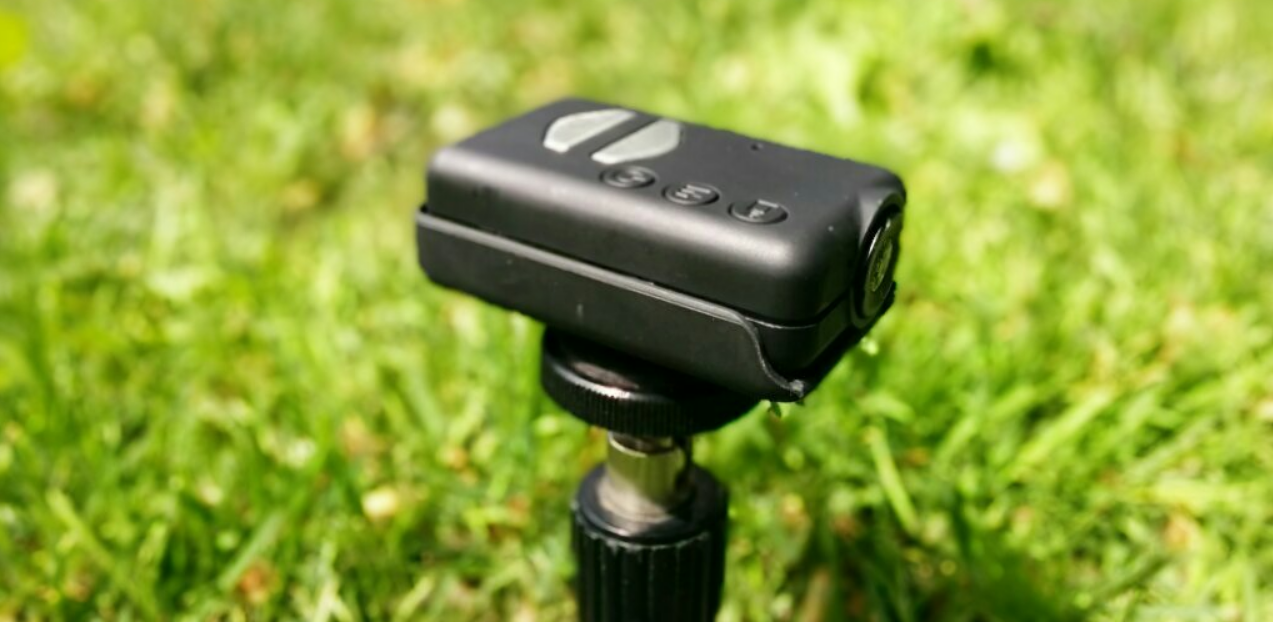
The Infragram Point & Shoot is a handheld, battery powered mini camera (a modified Mobius Action Cam) for doing plant analysis. It has been modified at the factory to replace its infrared-blocking filter with a red filter, effectively exchanging its blue light channel for infrared light. This is based on a great deal of research by Public Lab contributors and was initially pioneered in our community by @nedhorning and @cfastie. See especially these two research notes.
Vineyards, large farms, and NASA all use near-infrared photography for assessing plant health, usually by mounting expensive sensors on airplanes and satellites. At Public Lab, we've developed a Do-It-Yourself way to take these kinds of photos, enabling us to monitor our environment through quantifiable data.

Our technique uses a modified digital camera to capture near-infrared and red light in the same image, but in different color channels. We then post-process the image to attempt to infer how much plants are photosynthesizing. This allows us to better understand and quantify how much of the available light plants are using to produce sugar via photosynthesis.
Basics
Before you begin, to take useful plant analysis photos, you'll have to modify your camera's white balance, so that vegetation looks "bluish" but there is not an overall red tinge to the images. You can achieve this with a custom config file, as described below.
Some cameras may require a firmware upgrade to v1.20. If you've gotten your Infragram Point & Shoot from Public Lab's Kits initiative (through Kickstarter or the Public Lab store), both the config file and the v1.20 firmware should be on the SD card provided (in addition to this documentation!). However, you'll still have to load up the white balance file as described in "Installing config file" below.

Activities
| Purpose | Category | Status | Author | Time | Difficulty | Replications |
|---|---|---|---|---|---|---|
| Remove lens distortion from photos with FisheyeGL | - | - | @warren | - | - | 0 replications: Try it » |
| Getting started with the Infragram Point and Shoot | - | - | @abdul | 1hr | medium | 0 replications: Try it » |
| Mobius IR conversion | - | - | @cfastie | - | - | 0 replications: Try it » |
| Getting started with infrared photography on Infragram.org | - | - | @warren | - | - | 3 replications: Try it » |
| Set up a Mobius Action Cam for timelapse | - | - | @warren | - | - | 0 replications: Try it » |
| Install a filter or change the lens in a Mobius Action Cam | - | - | @warren | - | - | 0 replications: Try it » |
| Change the white balance (or other configuration) on a Mobius camera | - | - | @warren | - | - | 0 replications: Try it » |
| Update firmware on the Mobius Action Cam | - | - | @warren | - | - | 0 replications: Try it » |
Activities should include a materials list, costs and a step-by-step guide to construction with photos. Learn what makes a good activity here.
Questions
These are questions just for the Infragram Point & Shoot, also known as the Mobius Action Cam. For questions about infrared imaging or the Infragram project more broadly, see the Infragram page.
| Title | Author | Updated | Likes | Comments |
|---|---|---|---|---|
| Need help to reduce the Blue in mobius point and shoot camera | @Muneeswaran | over 5 years ago | 1 | 5 |
| Use of image in thesis | @petter_mansson1 | almost 6 years ago | 0 | 2 |
| Question infragram kit | @marfisistemidroni | over 8 years ago | 0 | 5 |
| What is the ideal white balance for the Infragam Point and Shoot? | @abdul | over 8 years ago | 1 | 1 |
| Can anyone help me troubleshoot my NDVI imagery? | @abdul | over 8 years ago | 0 | 6 |
| How to process images using a mobius with an IR lens? | @miguel_rosas | over 8 years ago | 1 | 1 |
| Correct Config. File & Trobule shooting2 | @will123 | over 8 years ago | 1 | 1 |
| Infragram Point and Shoot Plant Cam | @alexrfholland | over 8 years ago | 0 | 3 |
| Question: Infragram point & shoot image | @ino | almost 9 years ago | 1 | 2 |
| Initial results and resolution of timelapse mode issue: PL Mobius Infragram Point and Shoot | @patcoyle | over 10 years ago | 2 | 3 |
Troubleshooting
If you have trouble, please ask a question above.
For any information, support, or troubleshooting not covered here, please look to this epic thread about the Mobius Action Cam at RCGroups.com which contains a great deal of information about using and modifying the camera.
Upgrades
Done something cool with your Mobius? Added to it or improved on it? Post your upgrade guides here:
| Purpose | Category | Status | Author | Time | Difficulty | Builds |
|---|---|---|---|---|---|---|
| Mobius Filter-O-Matic | - | - | @cfastie | - | - | 0 builds: Try it » |
Documentation
An official manual for the Mobius Action Cam can also be found here: https://www.mobius-actioncam.com/downloads-info//
White balance
One step you need to take to set up this camera is to configure the white balance; otherwise, your images will be flooded with infrared and will look pinkish -- and the NDVI post-processing steps (see above) won't work.
Images should look roughly like the "GOOD" example below -- vegetation should appear generally pastel blue. An incorrectly white-balanced image such as the "BAD" example below may appear with an overall reddish tint. This means the camera probably has not accepted your config file, possibly due to misformatting or incorrect uploading.

Installing config file
If your camera did not ship with a config file or you are using a new SD card, follow these steps to get your Infragram Point & Shoot to take properly white-balanced images, necessary for post processing at Infragram.org. This is also relevant for anyone who has a Mobius Action Cam and wants to script or customize its settings.
The config file may also be used to set up Timelapse Mode -- see below at the Timelapse section.
Note: The WB setting in the config file should be "7" but occasionally we've found that some cameras require an "8" -- if you have trouble, please post to the plots-infrared list.
- turn the camera on with the "Power" button while also pressing "Mode" until the red light blinks 3 times (5-6 secons) to generate a config
- plug it in via USB and wait for the disk to appear
- replace the generated config file with this one in the home directory: SYSCFG.TXT or SYSCFG.TXT for a 2-second timelapse mode.
- repeat turn on pressing mode.
Timelapse
To set the camera to Timelapse mode, you'll need to follow the above instructions for uploading a custom config file; you can use this one to have a 2-second timelapse, or tweak the Set Time Lapse Shooting line for an interval you prefer: SYSCFG.TXT
To start timelapse mode:
- Turn on the camera
- Press M twice to enter Photo Mode
- Press the shutter button () to start the timer, and look for the blinking red light:

(Artwork based on: http://publiclab.org/notes/mathew/05-10-2014/illustrating-infragram-point-shoot-instructions)
Resources
Kit insert: infragram-ps-insert.pdf