The Infragram project brings together a range of different efforts to make Do-It-Yourself plant health comparisons possible with infrared photography. Use the web-based app at [Infragram.org](https://infragram.org/) to process your imagery. This project was made possible with support from Google and the [AREN Project at NASA](https://www.globe.gov/web/aren-project/). ## Uses Vineyards, large farms, and NASA all use near-infrared photography for assessment, usually by mounting expensive sensors on airplanes and satellites. Infrared analysis is used for a variety of things, but most focus on assessing plant health, such as: * to assess crops and the efficacy of #agriculture practices * better #soil management (reducing #fertilizer, soil treatments) * in #wetlands analysis [](https://publiclab.org/system/images/photos/000/021/972/original/Screenshot_2017-10-18_at_11.59.57_AM.png) Just as cell phone video has become instrumental in accountability today, we aim to democratize and improve reporting about environmental impacts. **** ## Getting started To start to do your own infrared analysis project, you'll need: 1. **[Photos](#Getting+images)**: A way to take near-infrared photos AND matching regular visible light photos from the same angle (in a single camera or two matched cameras) 2. [A **question** you'd like to answer](#Study+design) -- look through these templates for how to design your analysis 3. **[Software](#Software)** for processing and analysing your photos 4. **[Analysis](#Analysis)** -- tips and support to interpret and understand what your images are telling you To get a kit with this already set up on an SD card and/or Raspberry Pi camera, see: * [Infragram Pi Camera Kit](https://store.publiclab.org/products/infragram-pi-camera) * [Pre-flashed SD cards for Raspberry Pi cameras](https://store.publiclab.org/products/pi-builder-cards) [notes:grid:activity:pi-camera-setup] **** ## How it works ### Background In 2014, we launched an early version of this project on Kickstarter, and the video is a good overview of the project, although we've come a long way since: _The [Infragram Kickstarter](https://www.kickstarter.com/projects/publiclab/infragram-the-infrared-photography-project) video, a great introduction to the project._ **** [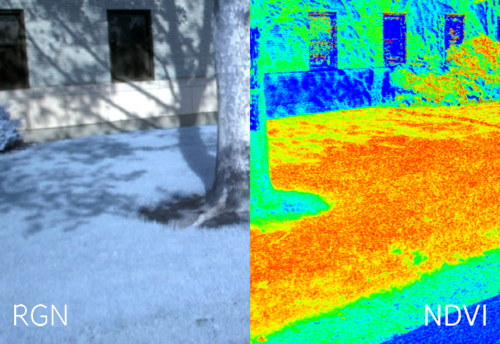](/i/45512?s=o) ## Infragram starter kits The [Public Lab Store](http://store.publiclab.org) offers a range of Do-It-Yourself kits to convert cameras for infrared photography, as well as ready-made cameras like the [Infragram Point & Shoot camera](/wiki/infragram-point-shoot): > [Get a kit to start](https://store.publiclab.org/collections/diy-infrared-photography) Also see [Getting images](#Getting+images), below. **** ## Getting images To start, you'll need **near-infrared images** and regular **visible light images** of the same scene -- or an image which combines these in different color channels. See the below White Balance section for example images. There are sources of #remote-sensing imagery from satellites and planes you can use, but the Infragram project is about making and using low-cost converted cameras to take our own images. There are both **single camera** and **dual camera** ways of doing this, and each has pros and cons. [Get a kit here](https://store.publiclab.org/collections/diy-infrared-photography) or learn about converting a camera here: > [Infrared Camera Conversion](/wiki/infrared-camera-conversion) **** ### White balance We've learned that careful white balancing of your converted Infragram camera is essential for good NDVI images. Learn how [in this short video](/notes/warren/08-15-2013/white-balancing-a-canon-camera-for-infragram-photography) and [read in depth on the topic in research by Chris Fastie](/notes/cfastie/06-17-2013/white-balance). There is also a wiki page on the subject at http://publiclab.org/wiki/infrablue-white-balance Here are samples of well-white-balanced images: _Left: pale blue from a RED filter; Right: pale yellow from a BLUE filter. Images by @mathew and [Eclectis students](https://publiclab.org/n/9372)_ [(/system/images/photos/000/018/533/original/Rosco_26_filtered.JPG) [](https://i.publiclab.org/system/images/photos/000/001/647/original/IMG_0025.JPG) If you're using an [Infragram Point & Shoot](/wiki/infragram-point-shoot) (aka Mobius Action Cam), see [this page for a guide on setting the white balance of that camera](/wiki/infragram-point-shoot#Activities). [](/i/45515?s=o) **** ### Filters _Should you use a **RED** or **BLUE** filter?_ See [Infragram filters](/wiki/infragram-filters) for more on different filters and how well they work. Early research by Public Lab contributors led to a blue filter technique for making Infragram cameras. But recent research on PublicLab.org has shown that red filters work better -- and on a wider range of cameras. Blue filters did not work on most CMOS cameras, especially cheaper webcams. Public Lab kits now ship with the red **Rosco #19 "Fire" filter**. **** ## Conversion types There are three major ways to produce multispectral "infragram" images: * Two-camera - one near-infrared camera and one normal RGB camera * Single camera w/ red filter - replacing blue with infrared * Single camera w/ blue filter - replacing red with infrared Since these are a hard to keep track of, here's a diagram to show the three main types (you can [edit the diagram here](https://docs.google.com/presentation/d/1hIR68D9sW16_A2eYAi4QJCrWagG4j89BTB7m15Ubom4/edit#slide=id.g3cb9c89f54_0_0)): [](/i/25365) **** ### Comparing plant health An important limitation of most DIY techniques is that we are using uncalibrated cameras, and so the analysis works best when we compare two vegetated areas under the same conditions (light, angle, time of day) rather than just take a photo of a single region. That is, the DIY approach is based on relative, or comparative, uses -- you can't learn a lot without a point of comparison. [questions:ndvi-comparison] An easy way to do a comparison is: 1. compare two areas (with the same type of plants) within a single photograph 2. compare two photographs with the same camera settings and lighting conditions (angle, brightness, color), of the same plants [illustration] Learn more at [Comparing Plant Health](/wiki/comparing-plant-health) **** ## Software Doing [NDVI analysis](/wiki/ndvi) on plants requires post-processing both infrared and visible images (or a combined image -- see [Getting images](#Getting+images)) into a composite image, using the NDVI equation (or another like it). This can be done with a variety of software; see this page for more: > [Infrared software](/wiki/infrared-software) **** ## Questions Post questions or troubleshooting requests here, for example about: * making sure your camera is working (color balance, exposure, light source) * what to compare against (see study design) * different lighting conditions or angles [questions:infragram] **** ## Activities [activities:infragram] **** ## Challenges We're working to refine and improve DIY infrared photography on a number of fronts; here, take a look at the leading challenges we're hoping to solve, and post your own. For now, we're using the Q&A feature, so just click "Ask a question" to post your own challenge. Be sure to add: * constraints: expense, complexity * goals: performance, use cases [questions:infragram-challenges] **** ## Give or get help Here are some resources to get help converting or using your Infragram camera. Keep in mind that we are a peer driven community and we encourage everyone to give as well as receive assistance and support! [questions:infragram] When describing your question or answer, please include details of the equipment and process you are using [as described here for Infragram photos](http://publiclab.org/notes/cfastie/07-17-2013/infrablue-minutiae) . Also see our older FAQ here: https://publiclab.org/wiki/infragram-faq ****   DIY Filter Pack: This is just a piece of "superblue" filter which you can use to turn your webcam or cheap point-and-shoot into an infrared camera. The filter allows you to take an infrared photo in the "red" channel of your camera, and a visible image in the "blue" channel. The Public Lab kit comes with a white balance card and instructions on how install your filter -- it's pretty easy! Infragram Point & Shoot: This is a straightforward, if basic, point-and-shoot camera which we're getting a factory to pre-convert with infrablue filters: you can simply take photos as you normally would, then upload them to our free and open-source web app to quickly and easily get a variety of composite images and analyses (the site is currently in beta with minimal initial features). **** _"We're excited that Public Laboratory is developing a low-cost infrared camera which will help us **track the success of wetland restoration projects in the Gulf Region--as well as help us track pollution.** The Gulf Restoration Network has been using the aerial monitoring techniques that Public Lab developed, so having the infrared camera available to put on the balloon and kite rig will only expand the applications of that technology as well as add value to airplane monitoring flights that help us watchdog the oil industry in the Gulf."_ -- [Scott Eustis](http://publiclab.org/profile/eustatic), M.S., Gulf Restoration Network ### More information The Public Lab community has been building up a knowledge base in DIY infrared imaging for years. Read more about the [history of this project here](http://publiclab.org/wiki/near-infrared-camera-history)   **** ### Infragram instructions and graphics _Digital files for the filter pack envelope (including logo) and instructions:_ infrablue-filter-envelope-color.pdf infragram-instructions-0.3.pdf infragram-instructions-back-0.2.pdf _Sketchup model for the "filter switch" graphic:_ filter-switch.skp ### Datasheets Datasheet for Infragram Webcam: infragram-webcam-new-old-diagram.pdf Focal length of the camera:3.27mm. Chip sensor size for the camera: Sensor:ov2643,SIZE:1/4" Spec_of_JDEPC-OV04_Ver_1.01.pdf Module_XJD__OEM_-_final_version_-_July_30-2013.xlsx HK-7035AS-582-2-M7_Model_(95955).pdf...