Why use the Hackteria stage?
The microscope stage holds the optics, the sensor, and the sample together in a fixed geometric relationship. The optics have to be lined up with the sensor in the camera and with the sample on the sample-holder. The sample holder needs to be held in place a slight distance away from the end of the objective lens and must be movable up and down. By moving the sample tiny distances closer to and further away from the lens we can get bring image into focus.
Hackteria has developed a nice simple stage that you can laser cut from 1/4 inch plywood or acrylic. If you'd like help finding materials or getting one, leave a comment below or ask a question on this page.
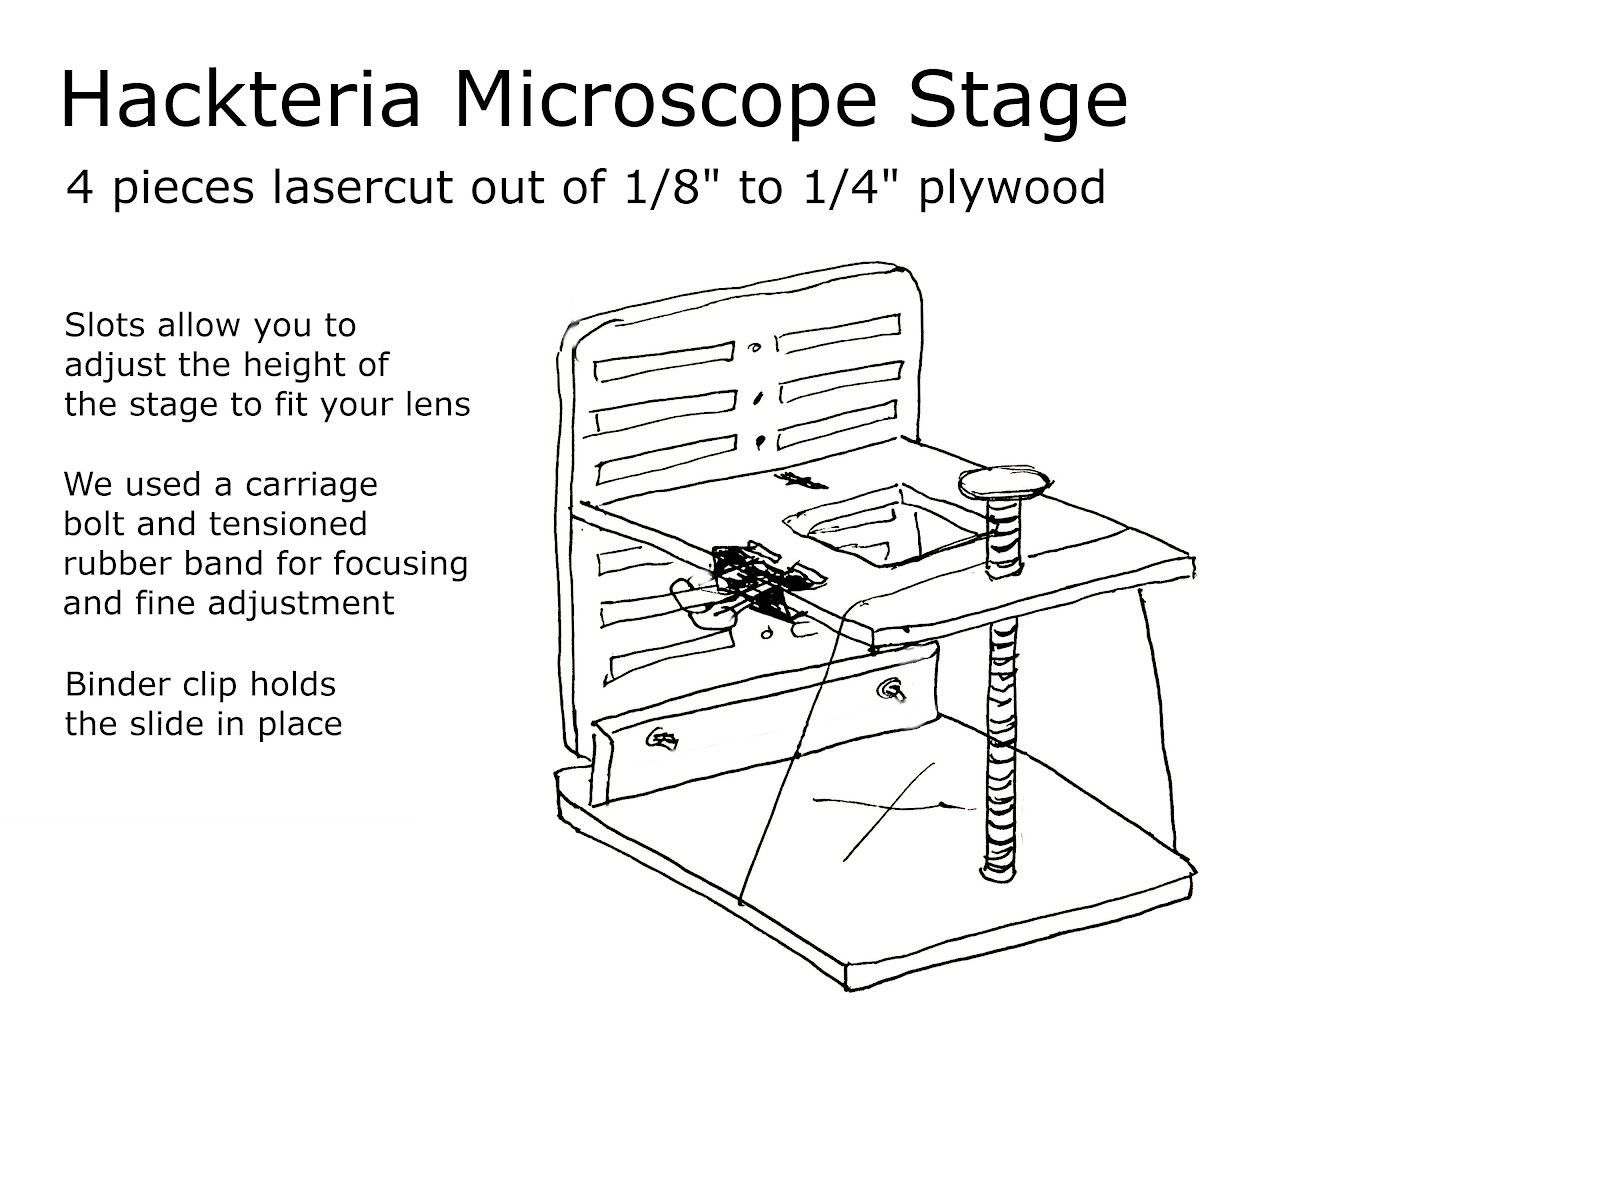
We use a modified version of the Hackteria laser cut microscope stage -- https://hackteria.org/wiki/Laser-cut_microscopy_stages. We used this design as our base because we found that it was pretty easy for people to successfully build and because the OpenSCAD template files they make available were easy to modify.
How to modify the template
Starting with the Hackteria openSCAD file, available here, https://www.thingiverse.com/thing:1057872, we made a few changes to fit our design:
1. Raise sample holder plate
The Hackteria stage is designed for using a particular set of webcam optics which are significantly shorter than the objective and tube that we are using, so we've increased the height of the backplate so you can put the sample holder higher.
2. Increase size of sample hole
The square hole in the sample-holder plate that allows light to pass through the sample into the lens was just barely large enough to fit the optics we are using. We made the hole bigger to make the build a bit more forgiving.
3. Add holes for camera mounting bolts
We wanted to be able to anchor the Raspberry Pi camera to the baseplate so we added two holes in the plate for mounting the camera to the stage with M3 bolts.
4. Increased size of focus bolt
The Hackteria stage uses a bolt which moves the stage up and down as the focus mechanism. We found that it was easier to make fine focus adjustments with a larger bolt so we increased the size of the hole to fit the carriage bolts we had lying around.
Design files
The resulting openSCAD file is here:
http://partsandcrafts.org/pi_microscope/Hackteria_Microscope_Modified_for_picam.scad
We used openSCAD to export the file as an .svg and then we had to scale that file up in inkscape to get to the appropriate dimensions. The unscaled .svg file is here:
http://partsandcrafts.org/pi_microscope/hacktera_modified_exported.svg
We scaled the initial output of the .svg export up to have an x-dimension of 7 inches and then sent this file to our laser cutter. You may need to experiment with various dimensions and scaling factors for your equipment and materials. Our scaled up and ready-to-cut .svg file is here:
http://partsandcrafts.org/pi_microscope/hackteria_modified_for_cut.pdf
Since the width of many of the cuts is directly related to the thickness of the materials you are using, you may need to play with various aspects of these settings to get your project to snap together correctly.
We used ¼" plywood (which can be anywhere between 3/16" and 5/16" thick.) Since the actual dimensions of the rest of the project are pretty forgiving you can scale the stage up or down to get a snug fit with your chosen material pretty freely without too much trouble.
If you are using a very different thickness of material you should adjust the "Base Material" and "Plate Material" parameters of the OpenSCAD file and export to svg from there.
Build the microscope stage
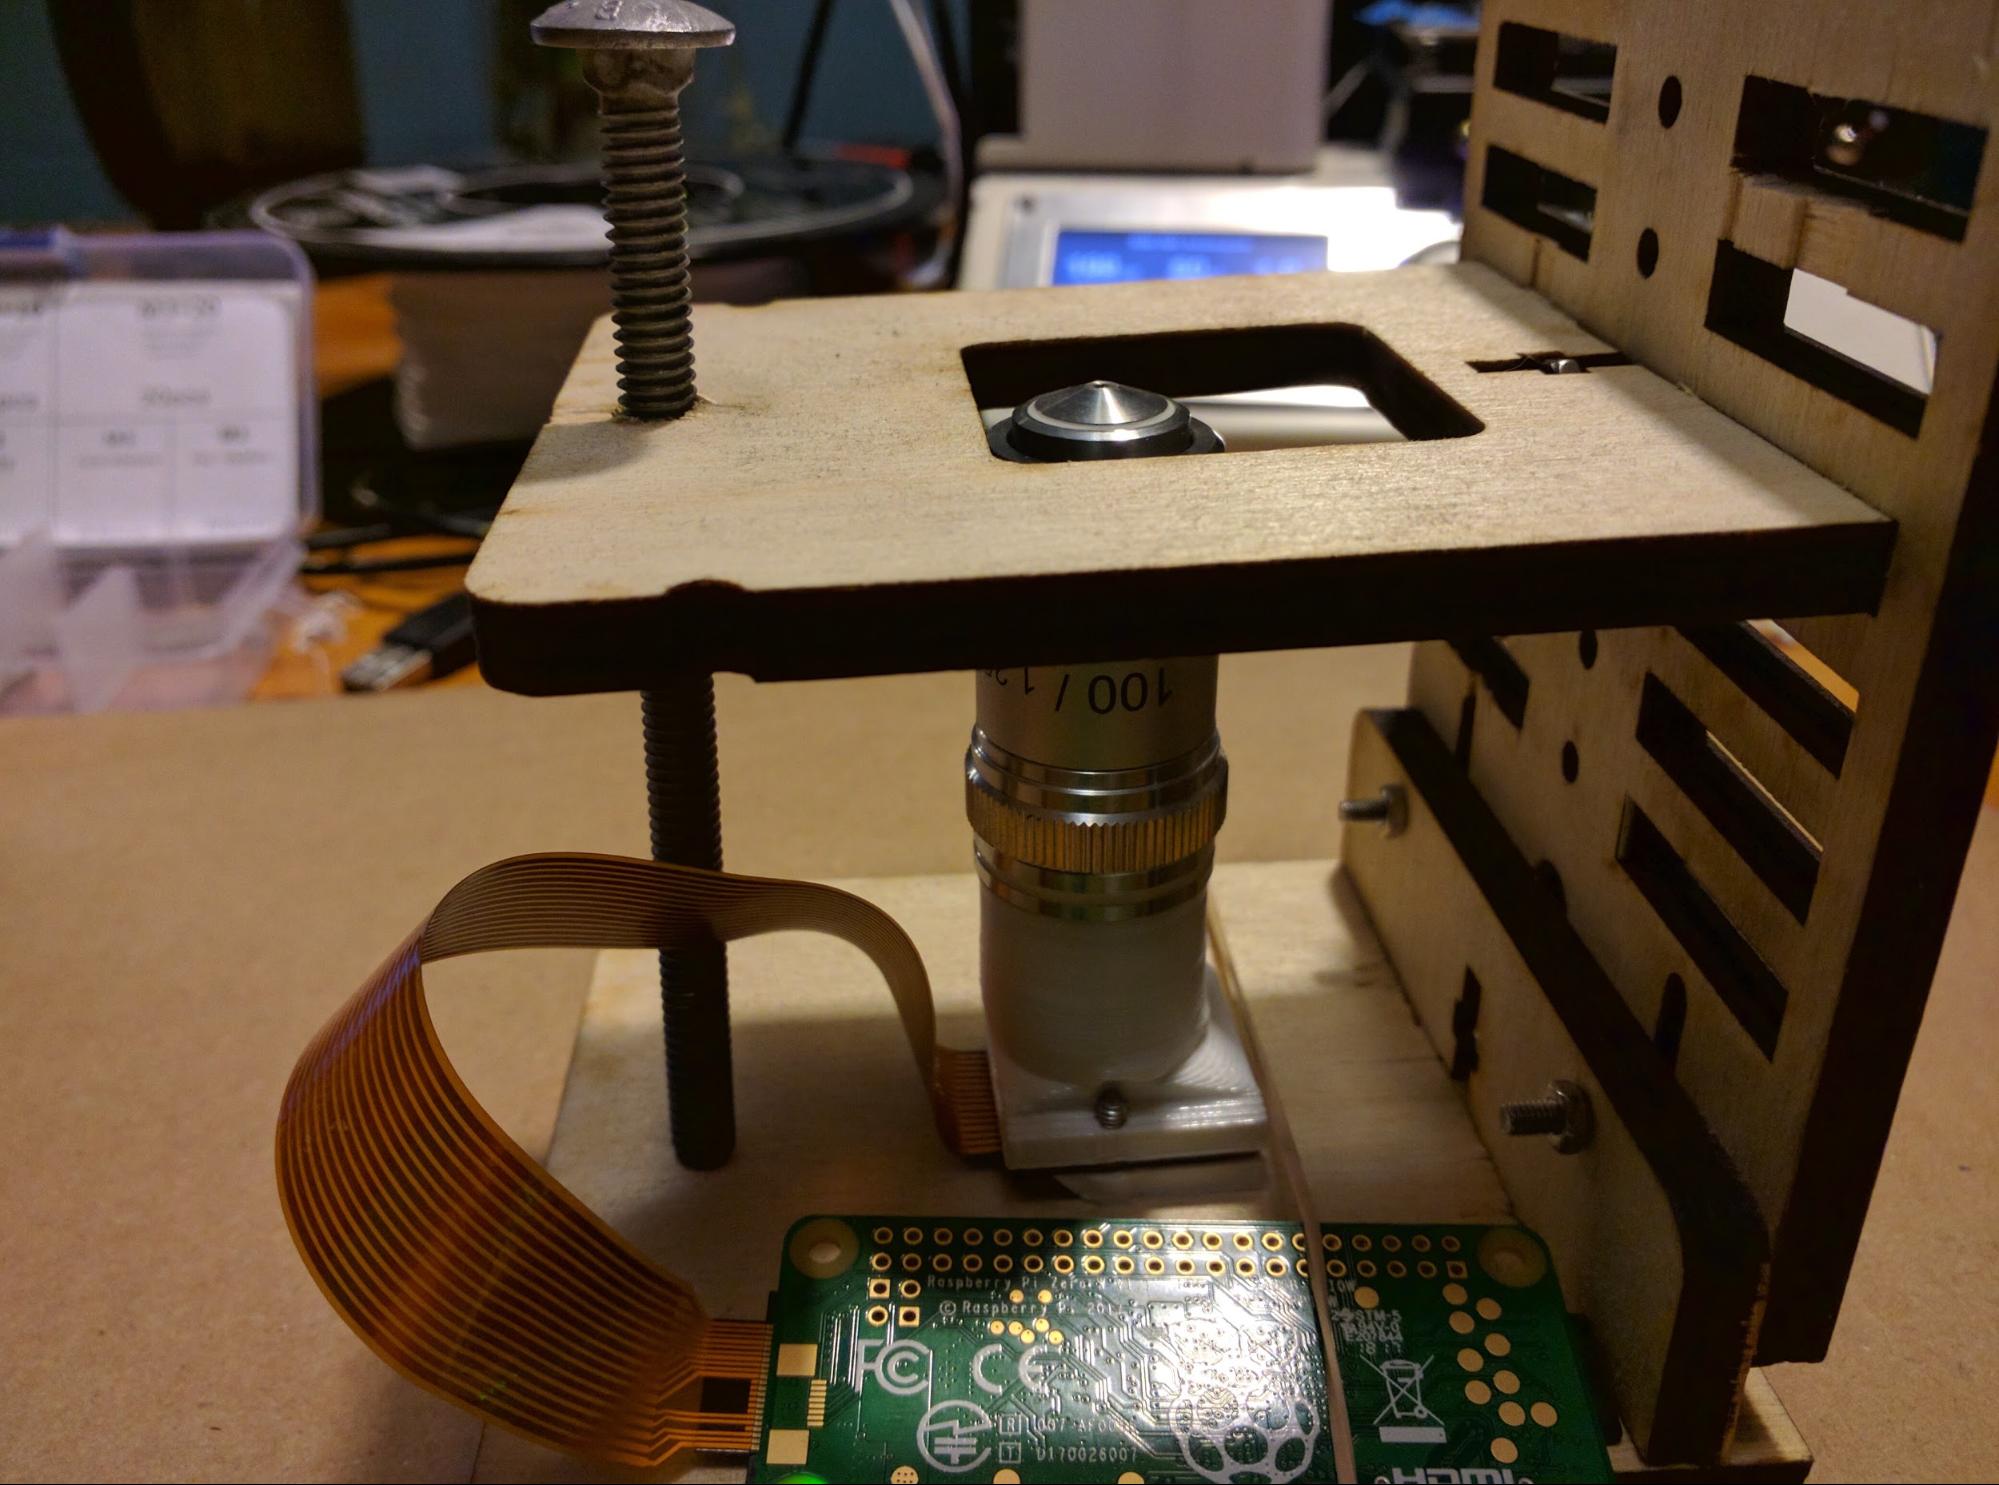
Building the stand is pretty straightforward. You will press-fit the laser-cut pieces together and secure them with nuts and bolts. If you are following our guide you will already have the camera and tube mounted to the baseplate and it will look like this:
NOTE: You may find it easier to build the stage with the objective unscrewed and the Raspberry Pi Zero W unplugged. If that's the case, back it up to Step 4 and start building the stage!

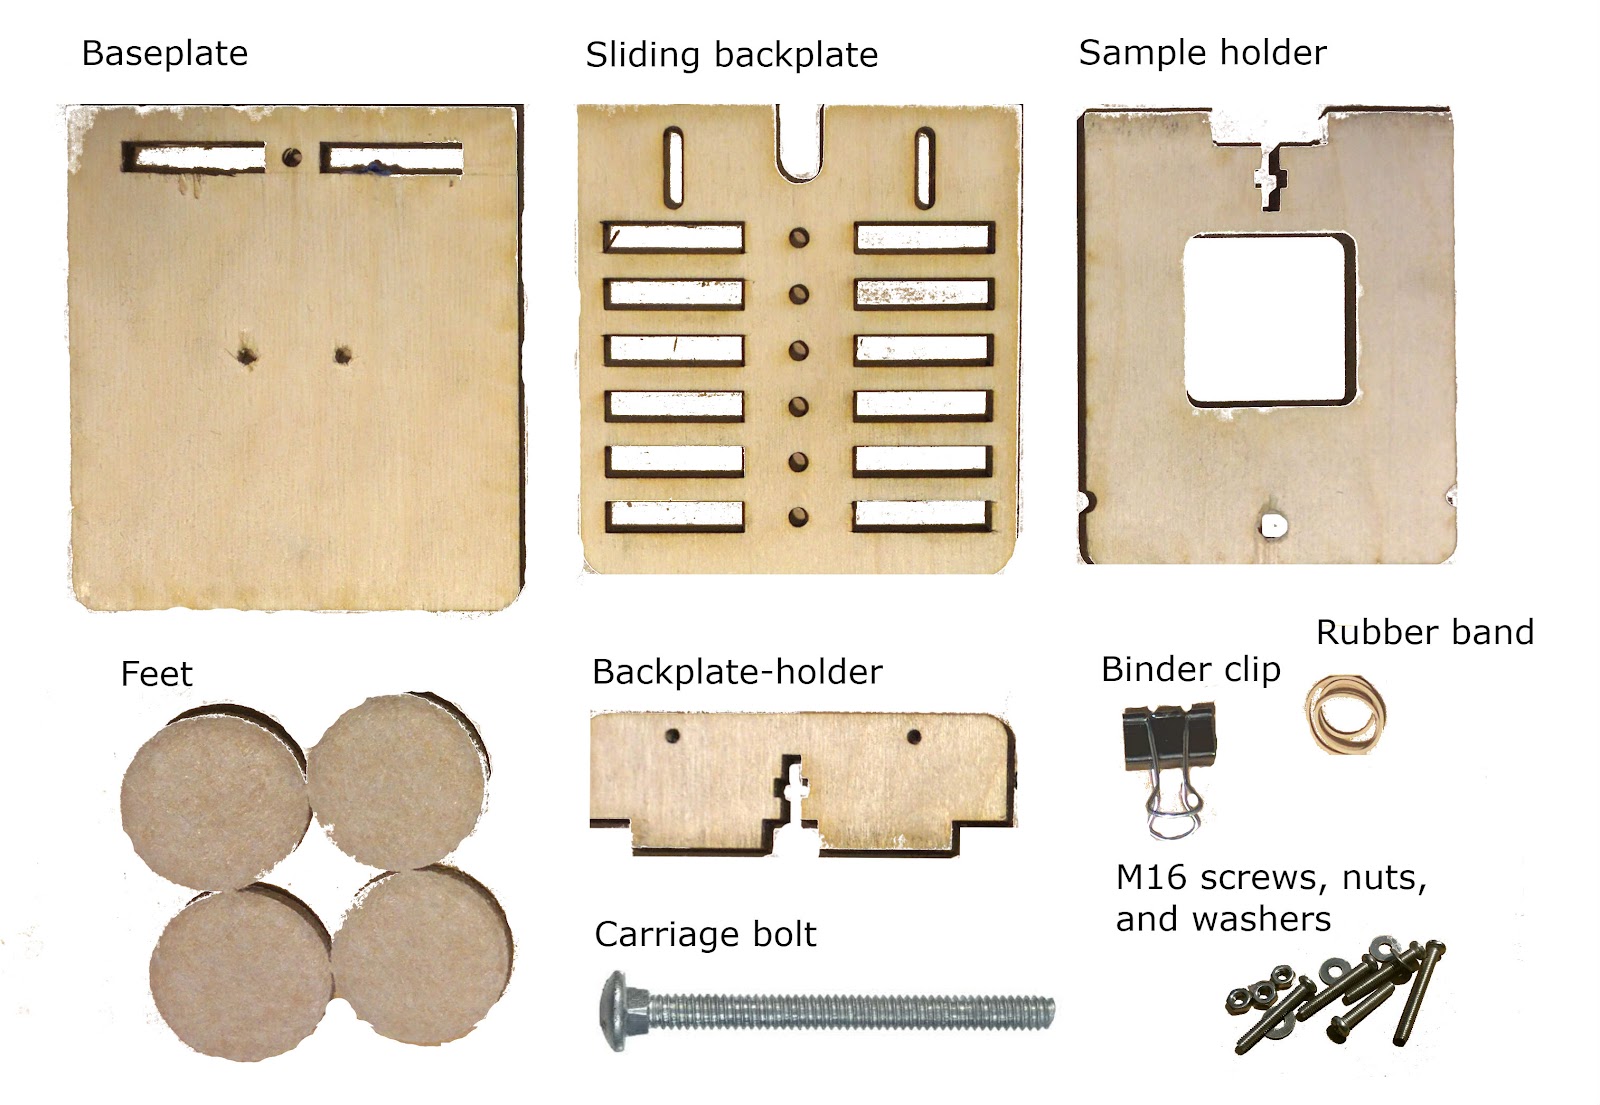
1. Attach backplate-holder to baseplate
The backplate-holder is about 1" tall and fits snugly in the rectangular holes in the baseplate. It has two holes through it for bolts to attach it to the sliding back-plate and is held in place with a nut and bolt vertically through a hole in the bottom of the baseplate.

2. Attach the sliding backplate to the backplate-holder
Bolt the backplate to the backplate-holder using bolts and washers. You should be able to slide the backplate up and down along the bolts and tighten them to hold it in place to adjust the height of the sample-holder. Make sure to use washers between the bolt-head and the backplate.


3. Attach the sample-holder to the backplate
The sample-holder wants to sit ever-so-slightly above the tip of the optics that you are using. You should be able to get approximately any desired height by sliding the backplate up and down along its rails and picking different notches for the sample-holder.
Once you've determined the correct notch height to use you can secure the sample holder with a nut and bolt. This is probably also a good time to reattach the microscope objective!

4. Add feet
Our microscope stage now has screws sticking out of the bottom so it doesn't sit flat on the table. We will add stick-on felt furniture pads to the bottom corners of the stage. These will allow the microscope to sit flat on a table and because they are soft they will also dampen vibrations between the table and the microscope.
Vibrations can be a big problem when you're trying to adjust sample placement or focus because the movement of the vibration is also magnified by our microscope so very small disturbances on the table make for very large disturbances in the magnified image.

5. Add focus knob and tensioning band
We will use a carriage bolt as a focusing knob. When the bolt turns the threads will cause the table to move up or down slightly based on whether we are tightening or loosening the bolt.
We will put a rubber band around the baseplate and the sample-holder as well. This will keep the sample-holder in tension pulled towards the baseplate which will make the focus knob more predictable and will minimize the effects of random movements and vibrations.
If your camera is not currently plugged into your Raspberry Pi you should plug it in now because it's easier to do so before we place the bolt and rubber band in the way.


6. Add magnet to baseplate.
Newer prototypes of this stage have a hole for a neodymium magnet in the baseplate. A 3/8" neodymium disk magnet should press-fit into this hole directly below the carriage bolt. This magnet will hold the carriage bolt in place so that it is always connecting the stage and the baseplate while still allowing it to turn freely to focus.
The rubber-band generally applies enough for for the system to work without the magnet but we believe the magnet just makes it all a little bit easier, so we're testing it out.
Done!
And you're done! At this point you should be able to turn the bolt and see the stage move up and down around the lens.
3 Comments
Just copying the files in here as a backup!
hackteria_modified_for_cut.pdf
hacktera_modified_exported.svg
Hackteria_Microscope_Modified_for_picam.scad.txt
Reply to this comment...
Log in to comment
Hi! I noticed on your last photo you also have a rubber band across the bottom of the scope. What does that one do?
Oh nice add-on with the magnet - do you have a photo of it from the bottom? Also where did you get it? Is there a certain type you should use?
Is this a question? Click here to post it to the Questions page.
Reply to this comment...
Log in to comment
Just built it - So awesome! This kit is really fun. Love it.
I might suggest a piece of double sided sticky tape to stick the Rasberry Pi to the base of the microscope stand. Also, we didn't have feet for it, though somehow we managed to find some around the house to use, and they seemed really important for leveling the bottom.
Reply to this comment...
Log in to comment
Login to comment.