Public Lab Spectrometry Kits
Public Lab’s Kits initiative offers several starter kits, including many of the basic components, and instructions for constructing a basic visible light spectrometer. The point of the kits is to provide a shared reference design for building experimental setups onto.

Lego Spectrometer Kit
Our most recent kit, incorporating community improvements while balancing low cost and ease of construction. Choose between webcam and Raspberry Pi camera versions and build attachments width standard Lego connectors.
You can also view this lesson plan as a Google Doc here.
Materials List:
- Printed Spectrometers from the Public Lab Store or [Printed PDF Foldable]*3
- Scissors
- Ball-Point Pen or Butterknife
- DVD (included in Kit)
- A Narrow Slit (Included in Kit or follow these steps to make one out of paper)
- Tape (included in Kit)
*Check out this post for tips on printing the Foldable Spectrometer yourself.
For Lego Spectrometers
- Lego Spectrometer Kit from the Public Lab Store or Assemble Your Own Kit from the lego parts listed here.
- Webcam (Included in Kit)
- DVD (included in Kit)
- Scissors
- Tape
For Calibration:
- Compact fluorescent lamp (CFL)
Assembly Instructions
Assembly Instructions
You can find Assembly Instructions for the Papercraft Spectrometer here.
You can find Assembly Instructions for the Lego Spectrometer here.
Student Requirements
- This lesson necessitates that students have some understanding of the nature of light. If your student’s haven’t mastered this material yet, check out the lessons below:
- Nature of Light (3rd - 5th Grade) from Energy Education
- Making Light of Science (6th - 8th Grade) from the American Association for the Advancement of Science
- A Collection of Light Lesson Plans (K - 8) from the American Association of Physics Teachers
- Students should be able to work with scissors and sharp cutting utensils.
Introduction
Optional Set up a prism and shine a light through the prism such that a rainbow is created. If a prism isn’t available, you can use a rainbow an an example of how light is diffracted by droplets of water in the air.
Pre-Introduction Assessment: Ask students what causes rainbows to form.
Colored light is often a blend of different colors. A rainbow is an example of diffracted, or bent, light. Water droplets in the air act like a prism and bend the light. Some colors of light bend more than others, and the amount that they bend is what causes them to line up like a rainbow.
A spectrometer, which we’ll build today, is a device which splits the colors of light apart, like a prism or raindrops, and measures the strength of each color. Spectrometers are tools used in the study of light and its interaction with the world. A typical output of a spectrometer looks like this spectrum of the daytime sky, with the actual light spectrum at the top and the graph of wavelength (horizontal axis, in nanometers of wavelength) and intensity (vertical axis) below:

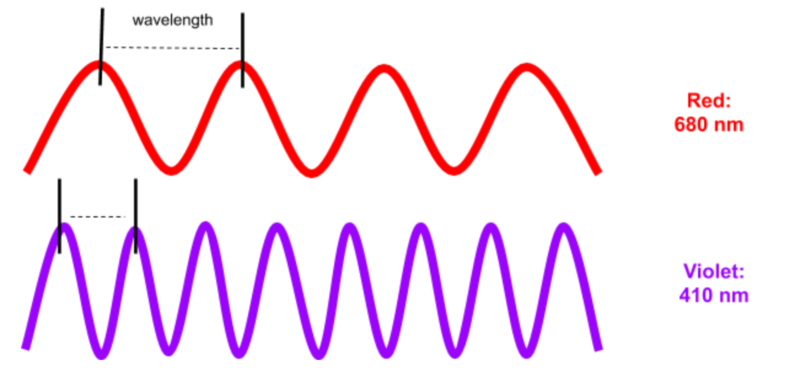
One special characteristic of light is that it behaves like a wave. As a result, we can describe light by its wavelength, or the distance between the crests, or peaks, of the wave which are measured in nanometers, abbreviated “nm”.

Spectrometers can be used to identify matter, study the stars, and learn about the makeup of the atmosphere on far away planets. This is possible because every type of matter has a unique emission spectra, viewable with spectrometers.
Class Discussion: Ask students to design more use cases for spectrometers. What questions could they answer with a spectrometer?
Building a Spectrometer
Today, each student’s job is to design and build a spectrometer that they’ll use to study a variety of light sources. To make building the spectrometers easier, you can print and hand out assembly instructions.
You can find Assembly Instructions for the Papercraft Spectrometer here.
You can find Assembly Instructions for the Lego Spectrometer here.
Using Your Spectrometer
SpectralWorkbench is a web-based software suite for collecting spectra, using your Public Lab DIY Spectrometer. Once you have an assembled spectrometer connected to your computer or smartphone, create an account at https://spectralworkbench.org, log in and click “Capture”. You'll then be able to connect to your spectrometer, capture and save spectra, and analyze and share them.
For an overview of SpectralWorkbench, watch this short YouTube video.
Calibrating Your Spectrometer

Basically, when you look at a graphed spectrum (as in the image above), you see a graphed series of intensities for each color along the spectrum, but the first time you do it, you won't see the wavelengths labelled in nanometers. This is because we just start out with an image from the webcam in the spectrometer, and don't know exactly which pixel of the image is at which
A CFL bulb is filled with mercury vapor, which when energized, emits a really well known spectrum, and one with very sharp, recognizable "peaks" -- as shown in the image above. These peaks always happen at the same wavelength, so we can recognize them by color and order, and compare our spectrum to a known reference to figure out the wavelength of each pixel of our spectrum.The two peaks we look for are:
 - the mercury 2 line - "B2" at ~435.8 nanometers
 - the mercury 3 line - "G2" at ~546.1 nanometers
You can read an in-depth activity on calibrating Public Lab Spectrometers here.
Activity Extensions
If you're looking for more to do with your Public Lab DIY Spectrometers, check out other activities below. To learn more about #Education at Public Lab, head over to our Education Wiki.
[activity:spectrometer]

1 Comments
The instructions for the Papercraft spectrometer Kit are terrible!!What part of the DVD are we supposed to use? by the way,a Dvd does not want to be cut! Dan White
Is this a question? Click here to post it to the Questions page.
Reply to this comment...
Log in to comment
Login to comment.