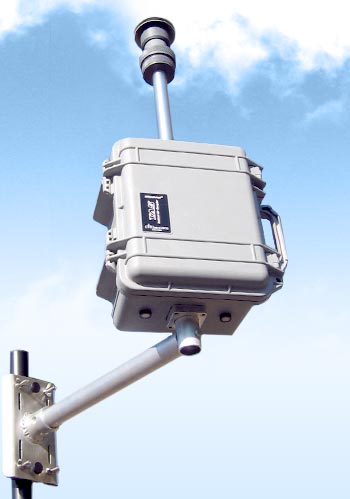
MiniVol PM sampling deployment procedure
MiniVol PM sampling procedure
This procedure follows the steps in the MiniVol TAS manual, section 4.15, with some expanded directions.
Transport the prepared impactor/filter holder assembly to the site in a vertical position (see the activity "Pre-deployment" for preparation instructions.) Verify that you have:
the MiniVol
- MiniVol battery
- a source for weather info from your weather source
- the flow rate set point for the rotameter (flow gauge)
2) Verify that the sampler's installation location meets the siting requirements detailed in the activity "Identifying a monitoring site." And take photos of your monitoring site.
3) place sampler on a firm level surface
4) loosen inlet tube compression nut and extend the inlet tube to the maxiumum height and re-tighten the nut.
5) Re-check for leaks using the procedure detailed in the activity "Pre-deployment."
6) Remove the clean impactor/Filter holder assembly from the plastic transport bag or case. Attach to the top of the sampler inlet tube.
7) Record the following information on the PM Field Data Sheet: site ID, number of the filter, the battery ID, sampler ID, ambient temperature and pressure. Flow meter reading, and elapsed-time meter reading.
8) Open the sampler case and obtain the beginning flow rate. Press the ON/AUTO/OFF button to start the pump. On the LCD display, the horizontal bar should move to "ON."
9) If the flow meter is vertical and indicates zero or a low reading, check for restrictions or leaks.
10) Use the flow rate adjustment control, set the flow meter to the flow rate set point calculated in "Pre-deployment.: Take the reading of the flowmeter from the center of the ball.
11) record local weather station data and altitude.
12) Press the ON/AUTO/OFF button twice to stop the pump. the Horizontal bar should move to "OFF."
13) Press the ON/AUTO/OFF button to set the timer to "AUTO" mode. The Sampler MUST be in auto mode before the operator leaves if the sampler is to run at the pre-programmed time.
14) Close the sampler case.
Retrieval
Return to retrieve the filter within the window programmed into the timer during "Pre-deployment."
Record ambeint temperature and pressure, flowmeter reading, and elapsed time on the Field Data Log.
Retrieval procedure
1) open sampler and check for error conditions.
2) verify correct time and day of week on time LCD
3) Record elapsed time as shown on the Elapsed TIme Totalizer
4) obtain ending flow rate:
- Press the ON/AUTO/OFF button to start the pump. The bar on the lower edge of the display should move to "ON."
- With the flow meter in a vertical postion, record flow rate to the nearest .25lpm, reading from the center of the ball.
- Press ON/AUTO/OFF button twice to stop the pump.
5) Return the filter holder to a plastic bag for transport.
6) Perform a cross-check of the exposed filter number with the filter number recorded on the Field Data Sheet for the monitoring period just completed. Also, check the filter number against the site number.
7) If another sampling period is to begin, exchange a prepared impactor/filter holder assembly for the exposed filter holder assembly.
8) Change the battery pack and return to PM sampling procedure step 1.
Packaging filter for shipment to the lab
In a clean location, unscrew the filter holder and remove the filter cassette
Locate the petrislide with the filter number that matches the number on the side of the filter holder assembly. This is the original petriside the filter came in.
If the filters came pre-packaged in cassettes, place the cassettes directly into the petrislide, otherwise proceed to re-package the filters following the steps below.
Use the cassette separator to remove the top half of the filter cassette.
Use forcepts to carefully remove the exposed fulter from the filter cassette and place it into its original Petrislide with the exposed side of the filter facing up. Replace the petrislide lid when finished. Be sure to replace the filter support screen in the filter cassette assembly.
Remove the old ID tag from the filter assembly and check this number matches the petrislide case, then discard.
Package in the return mailing container, and follow return mail instructions.
Troubleshooting:
Low battery indicator is on:
The MiniVol will shut down if the battery is too low, and a 'low battery' indicator light will light up. solution: replace or recharge the battery, abort sampling and start with a fresh filter.
Low flow indicator light is on:
The MiniVol will shut down if an accumulated particulate matter in the air flow tube restricts flow more than 10%.
0 Comments
Login to comment.