Originally posted on MentalMunition.com, on 10/18/2013.
This week, the World Health Organization (WHO) took a major step by announcing that air pollution is carcinogenic to humans.
WHO also announced they are considering particulate matter, a major component of indoor and outdoor air pollution, as carcinogenic to humans as well.
The International Agency for Research on Cancer (IARC), a special unit inside WHO tasked with promoting international collaborations on cancer research, reached that conclusion after reviewing more than 1000 scientific papers on the carcinogenicity of air pollutants.
Air pollution and particulate matter will be included in IARC's Monograph, which is an encyclopedia of known carcinogens. Particulate matter will be classified as a Group 1 carcinogen, along with tobacco smoke and asbestos.
In an IARC press release [1], the Deputy Head of the Monographs Programme, Dr. Dana Loomis, said that the group's goal was to "evaluate the air everyone breathes rather than focus on specific air pollutants."
"The results from the reviewed studies point in the same direction: the risk of developing lung cancer is significantly increased in people exposed to air pollution," he said.
This finding elevates the urgency to clean up the air, both outdoors and indoors. But how does one find out the condition of the air in the first place? How healthy is your air?
Finding that answer can be difficult and expensive. Most Environmental Protection Agency-quality particulate matter monitors send air through a filter, which must be precisely weighed, and produce only one reading a day. Other EPA monitors that sample continuously cost more than $14,000 each to deploy.[2]
Mass concentration is the norm for quantifying airborne particulate matter worldwide, and is usually expressed in micrograms of particulates per cubic meter of air (μg/m3). However, there are an increasing number of affordable particulate sensors coming on the market which rely instead on lasers and LEDs to count the number of particles instead.
For more background on the specifics of particulate matter sensing, please refer to earlier work on Mental Munition regarding particle counting sensors [3,4]. This post will focus on hacking together your own DustDuino prototype, which will allow you to monitor dust levels in your home (or back yard) from anywhere you have internet access, for about $100.
What will the end product look like, online? It will look a little like this (my own live DustDuino feed).
To make a DustDuino, you will need:

1) A WiFi network in your home 2) Arduino Uno development board 3) Arduino Wireless Proto Shield
4) Shinyei PPD-42 Dust Sensor 5) Sparkfun Roving Networks RN-XV WiFi module 6) USB type B cable (for programming the Arduino) 7) 9V DC power supply (or a 5V USB cell phone charger along with your USB-B cable) 8) 22AWG solid core hookup wire (M/M jumper wires can be used in a pinch) 9) Soldering equipment (soldering iron, solder, and soldering paste) 10) Arduino sketch from the DustDuino GitHub repository (zipped repo also contains background literature on the PPD-42, mass concentration algorithms, and the DustDuino logo).
Step 1: Program the WiFi module

For the DustDuino to transmit any data, it needs to be connected to your home WiFi network. Consult my post on programming the RN-XV for details.
Like the Arduino Uno, which serves as the DustDuino's "brain," the RN-XV will be on constantly. The RN-XV is set up to connect to your home's WiFi network as soon as power is connected, and it will remain connected so long as there is power.
Step 2: Hook up the Shinyei PPD-42 particulate sensor

When you order the Shinyei sensor, it will come packaged with a connector to interface with the Seeedstudio Grove Shield. Instead of purchasing a whole new shield just to attach a single sensor, I recommend simply sticking either jumper wires, or stripped 22AWG solid core wire into the end of the Grove connector.
The black wire on the Grove cable corresponds to ground, so that wire should be connected to GND on the Arduino Wireless Shield. The red wire on the Grove cable will be connected to 5V on the Wireless Shield, while the remaining white wire will be plugged into the digital "8" pin on the Shield.

There's another issue with using the included Grove connector: it doesn't make use of all the sensor's available channels. The included connector will only make use of the Shinyei's P1 channel, which is for counting particles between 1 and 10 microns. But the PPD-42 also has a P2 channel, which counts particles between 2.5 and 10 microns.
By measuring both P1 and P2 channels, it's possible for the DustDuino to differentiate between the PM2.5 and PM10, which are the two major ranges of particles recognized by the EPA and similar agencies. The smaller particulates that measure 2.5 microns and under are of special concern, since those have the potential to enter the blood stream and cause the most harm [5].
To measure the P2 channel, strip a solid core 22AWG wire and solder the end of the wire to the second pin on the PPD-42. This is the pin located between GND and 5V. It might be a good idea to use a little hot glue to insulate the connection and provide a little strength.
Your new P2 channel will be connected to the digital "9" pin on the Wireless Shield.
Step 3: Set up a Xively account

All that data being produced by the DustDuino will have to go somewhere, and it might as well go somewhere you can easily access. Xively is a service that markets itself as a "public cloud specifically for the internet of things," which allows you to view your sensor data from home computer, tablet, or smartphone.
That service can get quite expensive, but you can sign up for a free developer account, which can store up to 30 channels of data across five devices (a channel is a single stream of data -- like temperature, or humidity, or PM2.5 or PM10). With a free Xively account, any data older than 30 days will be deleted.
Xively can walk you through the process of setting up an account, but there are some specific things you'll need to do to make sure it's set up to receive DustDuino data.
You will need to create a device with four channels, named:
PM10 PM10count PM25 PM25count
PM10count and PM25count channels will store the number of PM10 and PM2.5 particles counted by the Shinyei PPD-42 sensor, while PM10 and PM25 channels will store mass concentration as calculated by the DustDuino code.
Record the Feed ID for this device, which you'll need to insert into the Arduino code later. Also save the name of the device, which you'll also need for the Arduino code.
The last thing you'll need to do here is to create an API key which will give your DustDuino permission to store data on your Xively account. Every time the DustDuino sends data to Xively, it needs send along this unique key. To make a new API key, or find an existing key, go to "settings," and then click "Master Keys."
Copy and paste this API key somewhere easy to find, as you'll need to manually insert it into the Arduino code in our next step.
Step 4: Code the Arduino
The Arduino is fairly capable "out of the box," but for more complicated tasks like getting the RN-XV to connect to the Xively server, it's helpful to have blocks of code already written out. Those blocks of code are known as libraries.
Fortunately there's only one library you'll need for the DustDuino, and that's the WiFlyHQ library. The Arduino website has instructions on how to install Arduino libraries.
After installing the WiFlyHQ library, open up the DustDuino.ino file in the Arduino IDE. Find the #define APIKEY code and replace the hash signs with your API Key.
Find the very next line, which begins #define FEEDID, and replace the hash signs with the Feed ID.
Finally, in the very next line, which begins #define USERAGENT, replace the hash signs with the device name.
Save the sketch, and with the Wireless Shield detached from the Arduino Uno, upload the sketch to the Arduino. After the sketch is uploaded, you may re-connect the Wireless Shield. Make sure the switch on the Wireless Shield is set to "Micro" before connecting your DustDuino to a power source.
You have several options for powering your DustDuino. You can purchase a separate "wall wart" style 9-volt DC adapter for the Arduino, or you can run power through the Arduino Uno's USB-B port.
If you do decide to supply power through the USB-B port, you may do so with a universal cell charging adapter that has a female USB connector. Most of these chargers supply 5 volts, but just to be sure, make sure to read any text on your cell charger. Another easy way to power the Arduino Uno is to keep it plugged in to your computer's USB port, but you have to keep your computer powered at all times.
Step 5: Keep everything together

The Shinyei PPD-42 must be placed upright to work correctly. In other words, it must be placed on a vertical surface, with the connector must be pointing down, and the chrome part of the sensor pointing up.
This placement is important to drive air into the sensor. Inside the sensor chamber, at the bottom, is a resistor that heats up when power is connected. With this resistor, the sensor creates a warm updraft of air, which is meant to circulate dust inside the chamber.
According to an email from Shinyei customer service, the sensor doesn't need any kind of fan to blow air inside the sensor chamber. But the chamber must be open to the air you wish to sense.
The container doesn't have to be elaborate. One solution is to secure the sensor to the side of a cardboard box with a pushpin (the sensor has a convenient hole at the top of its circuit board for this kind of thing). If you have a cork board or other board that can be stuck with pins, you also can mount your sensor on a wall.

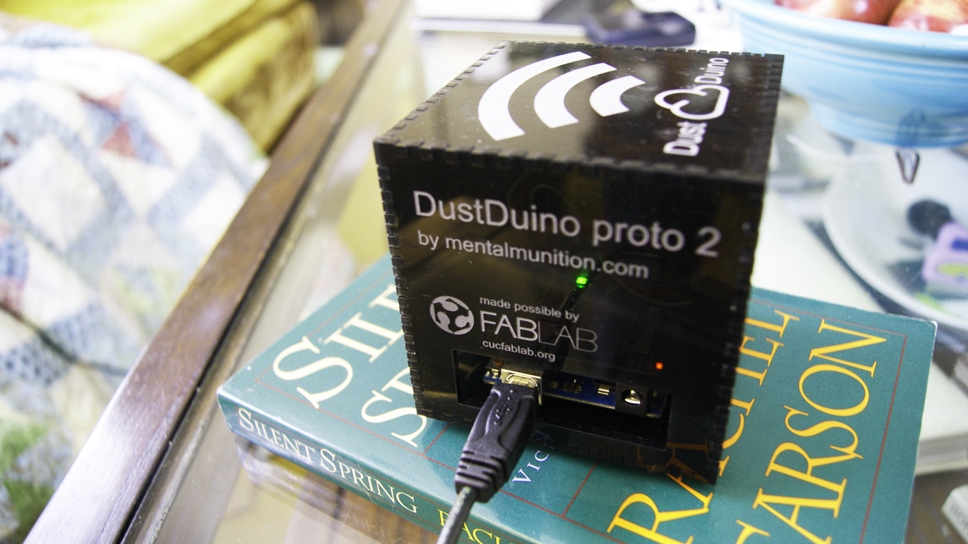
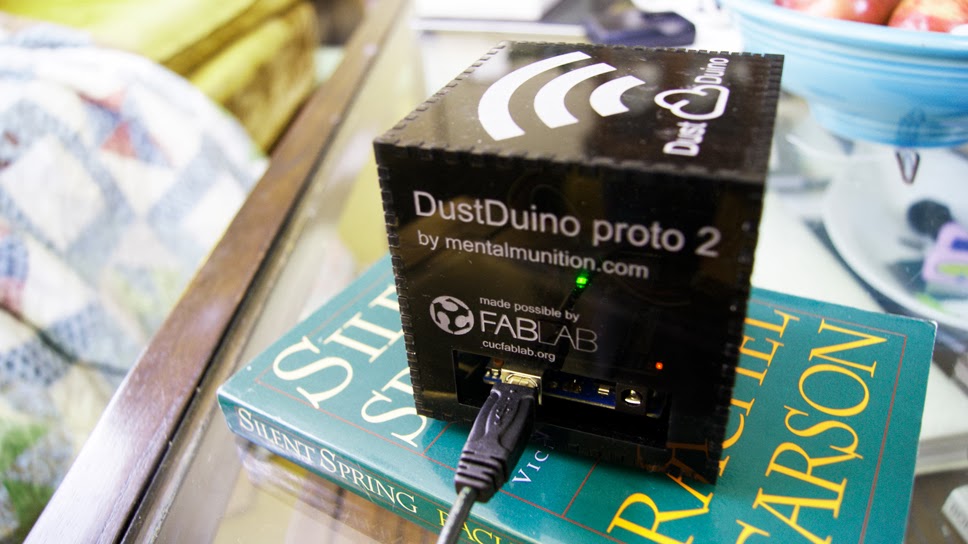
At the beginning of this post is a picture of a work in progress: an acrylic cube in which to store the DustDuino. The sides of this cube were cut from an 1/8th inch acrylic sheet using a 50-watt CO2 Epilog laser engraver at the CU Community Fab Lab. The design is not yet perfected, but when finished, the pattern will be made available as a PDF for download.
Please note that if you intend to deploy this sensor in your backyard, you will need to make a waterproof housing that still allows the sensor to sample air. You must also ensure the power source to your DIY housing is waterproof, as well. Like the indoor acrylic housing, this is a work in progress.
One last word about this prototype

The DustDuino is a work in progress. I cannot make any guarantees as to whether your particular project will work. Having said that, this device has worked great for me so far. So given my personal success, and the recent WHO and IARC findings about particulate matter being carcinogenic, I felt it was time to release instructions and code into the wild.
If you put together a DustDuino have it working correctly, or have any suggestions, feel free to drop me a line at mschroyer@gmail.com.
Sources
[1] "IARC: Outdoor air pollution a leading environmental cause of cancer deaths," International Agency for Research on Cancer, 17 October 2013.
[2] Uva, M., Falcone, R., McClellan, A., Ostapowicz, E. "Preliminary Screening System for Ambient Air Quality in Southeast Philadelphia," Drexel University, 2009.
[3] Schroyer, M. "Understanding air pollution with a simple dust sensor," MentalMunition.com, 5 September 2013.
[4] Schroyer, M. "DustDuino: A plan to crowdsource environmental reporting with low-cost dust sensors," 30 May 2013.
[5] "What Are the Six Common Air Pollutants?" Environmental Protection Agency, 20 April 2012.
33 Comments
could defintely use this in plaquemines parish
picture of coal terminal pollution --check the one person's headlights
Reply to this comment...
Log in to comment
eustatic - Wow, that's quite a dust-up! Interesting that you mention Plaquemines, as I have in-laws in Louisiana. One lives not far from a large paper mill, which produces quite a smell.
Reply to this comment...
Log in to comment
I think this actually needs to be a wiki page for the tools tag to work. I could be wrong, though.
Reply to this comment...
Log in to comment
Yes - you could make a page at http://publiclab.org/wiki/dustduino and tag that?
I'm curious about two things - would this be appropriate for detecting silica particulate pollution, for communities with silicosis problems? And do you think that by skipping the wifi module and perhaps using a TinyDuino or something similar, we could cut the cost more? Tinyduino and digispark are like $12 vs Arduino's $40, and the wifi is $34; do you think a reasonable "low-end" pricepoint could be... ~$45?
Is this a question? Click here to post it to the Questions page.
Reply to this comment...
Log in to comment
I agree that the cost should be cut. It is prohibiting me from replicating this at the moment. Warren, can you post how to use those alternatives?
Is this a question? Click here to post it to the Questions page.
Reply to this comment...
Log in to comment
Warren and Aidan, you might be happy to know I've been developing a slimmed down board that will cut cost and energy consumption. Also looking at SD card as an option for local storage, perhaps with an RTC to give a time stamp for data logging.
This is being made possible with help from Internews, whose journalists I'll be training to deploy and service the DustDuino later in the year.
Here's an early alpha of the custom PCB, which was etched using a Modela CNC at the Champaign Urbana Community Fab Lab:
Reply to this comment...
Log in to comment
Awesome! Is this on github?
Is this a question? Click here to post it to the Questions page.
Reply to this comment...
Log in to comment
Aidan, I think the github link is in this writeup? I dunno, i'm a biologist, i don't speak github well.
Schroyer, that is cool. Bogalusa? or someplace in north louisiana?
Is this a question? Click here to post it to the Questions page.
Reply to this comment...
Log in to comment
Anyway, Jeff
I was thinking of using this as a possible screening tool with the ongoing PM sampling that we are doing in Plaquemines, in preparation for the Coal export dumping that is about to go down, due to the environmental victories in the NW against coal exports, and the pending Tar Sands refining that is going to produce large amounts of petroleum coke.
That drum sampler counts pm, but also comes with a lab that is identifying silicate, i think, from the physical samples. So perhaps if the dust duino code could spit out raw data from the sensor, some genius could re-interpret that raw data compared to the silica data we are getting with the other machine.
Because of the high expense (the drum monitor is $25k / 60 samples / year, for one machine) there's usually a limit to community monitoring, decisions have to be made about which community gets to use the machine...I'm hoping this could be both a low-cost tool that gives us more coverage, plus a way to avoid that kind of inter-community tension in "who gets the monitor" for five different communities, all of whom are suffering from asthma and dust, etc.
Reply to this comment...
Log in to comment
Hi eustatic,
The particulates sensor being used for the DustDuino could not identify the composition of the particulate matter, but indeed could be helpful for your investigation. It would be great to get in contact with you and see how I might be able to help. Feel free to shoot me an email at mschroyer@gmail.com.
Also, I have in-laws in both Ouachita Parish and Baton Rouge. Had a chance to do some drone mapping in Ouachita Parish in November: https://mapknitter.org/map/view/prairie-bayou-la
Reply to this comment...
Log in to comment
Willie just posted a followup about a field-test of the optical sensor component: http://publiclab.org/notes/Willie/04-01-2014/field-testing-the-shenyei-pm-sensor
Reply to this comment...
Log in to comment
So I think the sensor the Speck is using, the "Syhitech DSM501A" (http://publiclab.org/notes/chrisbartley/04-15-2014/speck-particle-monitor) is ~$2, and the CMU folks said it compares well with the Shenyei ($15.90). I'm wondering about a radically cheap sensor that's just a Digispark ($12) plugged into the Syhitech sensor; it could cost < $20 total and just plug directly into your laptop. Or, could show an RGB LED with a color mapping for concentration.
Reply to this comment...
Log in to comment
Is reading from the Shenyei really as easy as this?
valP1 = digitalRead(8);
valP2 = digitalRead(9);
What do the values represent, or how do you scale them?
Is this a question? Click here to post it to the Questions page.
Reply to this comment...
Log in to comment
Hi Warren,
The Syhitech looks neat, especially for the price point, but I would like to see more peer-reviewed studies to confirm how well the sensor performs.
As for reading the Shineyi sensor, the process is more complicated than using digitalRead. The Arduino sketch and supporting documents in the GitHub repository should yield more information on how this all works.
Reply to this comment...
Log in to comment
Hi Folks! Great comment thread here. Just following up on Schroyer's lead: the github code had a nice link, in a commented section, to a useful resourceful for code for the sensor, on the "How Much Snow" site's Air Quality Sensing page.
Under the "Approach" section, they describe how the setup works. If I understand it: Willie's nice teardown of the Shenyei sensor shows that the sensor is shining an IR LED into an air gap inside the device, and the IR LED is collimated by a "light baffle" so that it comes out in a nice straight beam. There's also an IR photodiode that is looking at the same air gap -- using a focusing lens to enhance sensitivity, I guess, and gather light from the region of air that the IR LED beam is hitting.
The basic idea, I think, is that if there are no particles in the air, then IR photodiode won't see the collimated IR LED beam, which is directed off at an angle. But if a particle floats in front of the LED beam, the LED light may scatter off the particle at an odd angle, and some of the time this scattered light will be directed towards the photodiode. (Either this is how it works, or the photodiode is constantly receiving a certain amount of IR light; when a particle floats in front of the photodiode, we no longer see this light, and this is our indication that there's a particle in the air gap. But I think it's the former situation, because of the way in which the IR LED and the photodiode are angled.)
In any case, the IR photodiode puts out a voltage signal, which an Arduino can measure on a pin. It seems that the photodiode is constructed such that if it sees any IR light above a certain threshold, it sends out a "high" value, which seems to be 5V in the case of this particular photodiode. (This is the same functionality you'd want in e.g. an IR remote.) So you hook up an Arduino pin to the photodiode, and you write code that runs a 'timing loop' to measure what fraction of the time the photodiode pin is 'low' in a given sampling period (this is set by the "sampletime_ms" variable in the github code, which appears to be set to 30 seconds). This gives you what they're calling the "low pulse occupancy time" (see the figure here -- and they've derived a formula for how to relate the "low pulse occupancy time" to the "particles per .01 cubic feet".
So, that's all just to say -- in order to hook it up, you seem to need simply to be able to register a 'high' value on a digital pin -- easy peasy -- the rest of the code is just performing the 'low pulse occupancy time' calculation in the loop() function by setting a flag, starting and stopping a timer, etc -- pretty standard stuff. It looks like the Shineyi photodiode might require 5V, so you might need your microcontroller to be running at 5V (or, if it isn't, to be able to power a 5V device, and to handle 5V signals via a level shifter); and you might also need the microcontroller to be running at a certain minimal clock speed -- since they're using an UNO, 16 MHz is apparently sufficient.
Note: it looks like there's some additional discussion of this technique (using this particular sensor, I think) in an Arduino forum post, here.
Reply to this comment...
Log in to comment
Awesome commentary here.
By popular demand: a dustduino wiki page: http://publiclab.org/wiki/dustduino
Got to give the people...give the people what they want.
Reply to this comment...
Log in to comment
Thinking about this a bit further: when determining particle counts, is the "% low pulse occupancy time" technique relatively insensitive to temperature? Is the picture I'm supposed to have that regardless of actual air flow, the relative amount of time that the IR beam is interrupted by particles would be the same? Or would it be help to calibrate the device by measuring the temperature inside the air chamber, with e.g. a thermistor?
Aside: if it would help to calibrate the sensor by measuring actual air flow through the device, a 'hot wire anemometer', built using a theristor, might be a neat approach -- there's an open source design for such a device, here:
http://moderndevice.com/product/wind-sensor/
Is this a question? Click here to post it to the Questions page.
Reply to this comment...
Log in to comment
The Speck team indicates that airflow is a big issue. they're controlling with a fan. If I move the Speck around just a little bit the values change dramatically. Also, the EPA requires flow calibration before each filter test. I think calibrating for temp, humidity, and controlling airspeed (like Don's anemometer suggestion) are going to be crucial
Reply to this comment...
Log in to comment
Hi Matthew! Can I use the picture of the Dustduino in a presentation I'm giving on Wednesday? Hope all is well, did you get any sent off to Wisconsin? -Stevie
Is this a question? Click here to post it to the Questions page.
Reply to this comment...
Log in to comment
Hi guys! I'm Italian and i'd like to build a Dustduino... How can I find the components of the Dustduino?
Is this a question? Click here to post it to the Questions page.
Reply to this comment...
Log in to comment
right above "Step 1" is a paragraph with links to the stores where parts are available.
Reply to this comment...
Log in to comment
Hey guys. I'm building a similar system, but instead of Shinyei PPD-42, I am using SHARP GP2Y1010AU0F dust sensor. However, I am not sure whether this sensor needs fan to direct air into the chamber or not. Does this sensor has that resistor heating elements too?
Any advice would be much appreciated! thank you! here's the datasheet for that sensor. Sharp_GP2Y1010AU0F_dust_sensor_datasheet.pdf
Is this a question? Click here to post it to the Questions page.
Reply to this comment...
Log in to comment
@mathew wrote a great overview of lots of different ways that different projects/sensors measure particulates: http://publiclab.org/notes/mathew/05-05-2015/evaluating-low-cost-optical-dust-sensors
I think the long and short of it is that if the datasheet doesn't specify, you may have to open it up like Willie Shubert did: http://publiclab.org/notes/Willie/04-01-2014/field-testing-the-shenyei-pm-sensor
And I've been working with @mathew on running a whole batch of them at the same time, to compare: http://publiclab.org/notes/mathew/06-01-2015/plan-for-recording-shinyei-optical-sensors-using-open-pipe-kit
so it'd be great to try to write a matching Open Pipe Kit driver for that sensor too! How much does it cost?
Is this a question? Click here to post it to the Questions page.
Reply to this comment...
Log in to comment
@schroyer Putting together my own DustDuino now and heads up, the personal Xively data hosting is buggy as all hell now. Can't even get past creating a development device without getting a general Internal Server Error. I'm guessing they're maybe phasing out non-enterprise accounts?
I'm looking at some of the other data stream hosting options now. Any opinions before I go and start altering code? https://data.sparkfun.com/ https://thingspeak.com/
Is this a question? Click here to post it to the Questions page.
Reply to this comment...
Log in to comment
I'm using thingspeak to post my data online as Xively is not free anymore or at least you can't use free account to post all this data online.
I've got one question though - if P1 channel is for counting particles 1-10 microns then why do you count PM 10 from channel P2? In your code:
float PM10count = countP2;float PM25count = countP1 - countP2;Is this a question? Click here to post it to the Questions page.
Reply to this comment...
Log in to comment
Question for @Schroyer , @Willie , @imvec , @nanocastro , @jefffalk or anyone else who is able to answer this question - I understand that the Shinyei sensor must be placed vertically such that the chrome tube has a 'northwest' orientation. Are there important considerations for the housing of this sensor and the other electronics? Does the shinyei sensor need to be open to the air? Does it only need to be partially exposed? Should it be entirely closed to the air in a solid and opaque container?
Any and all help appreciated
Is this a question? Click here to post it to the Questions page.
Reply to this comment...
Log in to comment
Hi! As I understand the sensor needs to be vertical and inside a ventilated dark case but I'm not sooooo sure.
Reply to this comment...
Log in to comment
Maybe @GreenFrogg might also have an idea? @jitovien could you post a pic of the case open as you received it in the mail?
Is this a question? Click here to post it to the Questions page.
Reply to this comment...
Log in to comment
Reply to this comment...
Log in to comment
If its still a point. From my archive.
The project I am involved in has changed to the SDS011.
From my archive.
The project I am involved in has changed to the SDS011.
Reply to this comment...
Log in to comment
Hey @GreenFrogg what's the project you're working on now? I haven't heard of it. Where are you testing it out?
Is this a question? Click here to post it to the Questions page.
Reply to this comment...
Log in to comment
https://www.samenmetenaanluchtkwaliteit.nl/international and https://platform.hackair.eu/ and http://smartemission.ruhosting.nl/visitors/
Reply to this comment...
Log in to comment
My PPD42NS was lost with an attempt to update the sofware. I use now the SDS011 from hackair.
Reply to this comment...
Log in to comment
Login to comment.