Hi!
I am using a Picam and a PiNOIR to take visible-light and infrared picture at the same time and create a NDVI picture using Warren photoshop tutorial but the results doesn't seems correct (the shadows appears produce a lot of photosynthesis).
Please could you confirm if that results are correct and if not what can I do to correct them?
visible-light

infrared

NRG

NDVI

I tried to calibrate the IR following this post but the result is the same.

15 Comments
@Rayishido -the high NDVI values is a normal occurrence with shadows. You will notice that the NDVI values will change in the shadows depending on how light or dark the shadow is. I understand there is a method for correcting some of this in pre-processing however I have not attempted it myself. For me it is just an indicator that the area does not contain accurate values. If you can, try to take images at a different time of day when the shadows are not noticeable.
Reply to this comment...
Log in to comment
Hi Rayishido,
Nice Pi photos. Claytonb is correct about the shadows. It's a common artifact for dark areas to have very high NDVI values. In your photos, the shadows in the NIR photo are not nearly as dark as in the VIS photo. So there is a big difference between NIR and VIS in the shadows and NDVI computes to very high values. Calibrating the process should improve the results.
The Photoshop process you used is quite tedious compared to using Ned Horning's plugin for Fiji. Below are results from Fiji.
Above: NDVI using the green channel from the NIR photo and the red channel from the VIS photo.
Above: NDVI using the red channel from the NIR photo and the red channel from the VIS photo.
Chris
The KAPtery
Reply to this comment...
Log in to comment
Hi!
Thank you very much for your answers! I have downloaded Fiji and it's plugin and will test as soon as possible. This weekend I am going to make some aerial shots and will try the calibration process.
@cfastie, the blue is well separated but the green and red are very close of each other in the last IR picture (the calibrated one). Do you think I need to teak the white balance a bit more to improve the result?
Is this a question? Click here to post it to the Questions page.
Reply to this comment...
Log in to comment
Rayishido,
I assume the orangish photo was taken with the PiNoir camera with a blue filter. By calibration I think you mean you used the AWB_gains feature to adjust the automatic white balance. The photo has very good separation of the red and blue channels. The green channel is not so important. The NDVI values computed from the photo are very much in the proper range. The plant health information in the photo is compromised because the foliage is backlit or in the shade. This is from Fiji:
What kind of tree is that in the center of the photo?
Chris
The KAPtery
Is this a question? Click here to post it to the Questions page.
Reply to this comment...
Log in to comment
Hi Chris!
You assumed right! :D The pictures was taken with the pi noir and the blue filter and turned off the automatic white balance to set my own values (awb off awbg 1.28,0.57 determined in their post
Hi have done some areal images and test them with Fiji. Here are the results
visible:
IR
NRG
NDVI (dual image index processing)
Single image index processing
At this point I am under the impression that the single image processing NDVI is more accurate than the dual image processing. What is your opinion? What could be happening?
ps: I'll confirm the species of the tree as soon as I am at the local.
Is this a question? Click here to post it to the Questions page.
Reply to this comment...
Log in to comment
Both NDVI images look good. Both seem to have some biological meaning and both have reasonable NDVI values in areas that are shady which is very good. The dual photo result has some artifacts of high NDVI (magenta) at the bottom. If the histogram of the VIS photo is not stretched, the dual photo result does not have those extreme artifacts:
There will likely be lots of this type of variation in NDVI values and artifacts from one photo to the next and from one flight to the next. You will have to decide which workflow gives the most meaningful results and then be consistent.
Chris
The KAPtery
Reply to this comment...
Log in to comment
Hi Chris,
to obtain this picture you stretched the histogram of the visible or visible and IR. As far as I understand to make NDVI picture a visible light picture is required, isn't it? or is it possible to create NDVI with NIR photo alone? I need to work on the calibration as you suggest. I'll post the result as soon as they are ready.
Is this a question? Click here to post it to the Questions page.
Reply to this comment...
Log in to comment
The NDVI image in my last comment was made by stretching only the NIR channel. The default is to stretch both NIR and VIS and that usually works well. Sometimes stretching only one channel works better.
NDVI requires information about both NIR and VIS. The information can come from two photos or one photo with NIR and VIS separated into different channels. Using a blue filter on the PiNoir camera does some separation, but there is some VIS and NIR in all channels. Using a red filter does a better job of producing a pure NIR channel (blue channel) but has a lot of NIR mixed in with red in the red channel. Either a red or blue filter does enough separation that the NDVI results can resemble real NDVI. But results can be highly variable and hard to interpret.
Using two cameras allows you to capture pure VIS photos (unmodified camera) and pure NIR photos. If you are flying two cameras, NDVI results will probably be better if the NIR camera records only NIR. The PiNoir could have a Wratten 87 or developed color film as the filter so only NIR reaches the sensor.
Are you triggering the shutters of two Pi cameras from one Raspberry Pi? How well are the shutters synchronized?
Chris
The KAPtery
Is this a question? Click here to post it to the Questions page.
Reply to this comment...
Log in to comment
I am using 2 raspberry Pis (one camera on each) and I synchronize the shutters using interrupts. I had some strange behavior (one Pi taking more picture than the other one) but it's negligible: 2 more pictures in a set of 200. My concern is more about image quality (quite poor with the VIS) and the reliability of the results. The Pi Noir seems good but I still have some doubt. Now that Carnaval has ended (everything stop during Carnaval in Brazil ... :( ) I will try to speak with the people of the university of agronomy and make some test with them. I'll continue to post the results of my test here. My next steps will be to check the calibration and make some test with the filter you mentioned. did you know if the Wratten 87 is included with the filter pack sold by public lab?
Is this a question? Click here to post it to the Questions page.
Reply to this comment...
Log in to comment
Do you know how well synchronized the photo pairs are? Do you have to start them both taking photos at the same time, or synchronize their clocks?
Wratten 87 is not included in the filter pack. If you can find somebody who once used color film, they might be able to find a black piece of film at the end of a roll. After development, color slide film is black if it has not been exposed to light, and color print film is black if it has been exposed to light. Either can be mostly opaque to visible light but pass most NIR.
Chris
The KAPtery
Is this a question? Click here to post it to the Questions page.
Reply to this comment...
Log in to comment
Hi!
I was in the filed without internet. I wrote a program that trigger the photo on the second pi when a picture is taken with the first so it is instantaneous. I read here that: "If you put the little blue filter (Rosco) over the lens (or behind it), then you can learn even more about plant health. The Rosco filter blocks most red light but passes the blue end of the spectrum and also near infrared light. The blue channel will now capture visible blue light as usual (plus some infrared) but there is no red light for the red channel to capture so it captures mostly near infrared light."
What is your point of view. I'll go back in the field tomorrow, so, no internet again for a few day.
Reply to this comment...
Log in to comment
That's a good description of what the Rosco blue filter does. Both the blue and the red channels will have a mixture of visible and NIR light. The blue channel will capture mostly blue, and the red channel will capture mostly NIR. So it does not produce the most pure NIR photo but it can work. A red filter generally produces a more pure NIR photo in the blue channel. Wratten 87 produces pure NIR photos in all three channels.
Chris
Reply to this comment...
Log in to comment
Hi,
Iam back with some update on the project. I didn't tweak the program but I brought the written 87 filter. and put everything on my phantom 2.
I made an othomosaic maps of the the picture obtained. Everything works fine except that Fiji do not accept the picture as they do not have the camera data in exif and when I tried to make the NDVI with photoshop everything is in gray.
Do you have any idea?
The good news is that I talked with a professor at the university and I may be able to calibrate the pinoir. the bad news is that he will only come back in 3 week :/
Is this a question? Click here to post it to the Questions page.
Reply to this comment...
Log in to comment
VIS
Reply to this comment...
Log in to comment
Hi Rayishido,
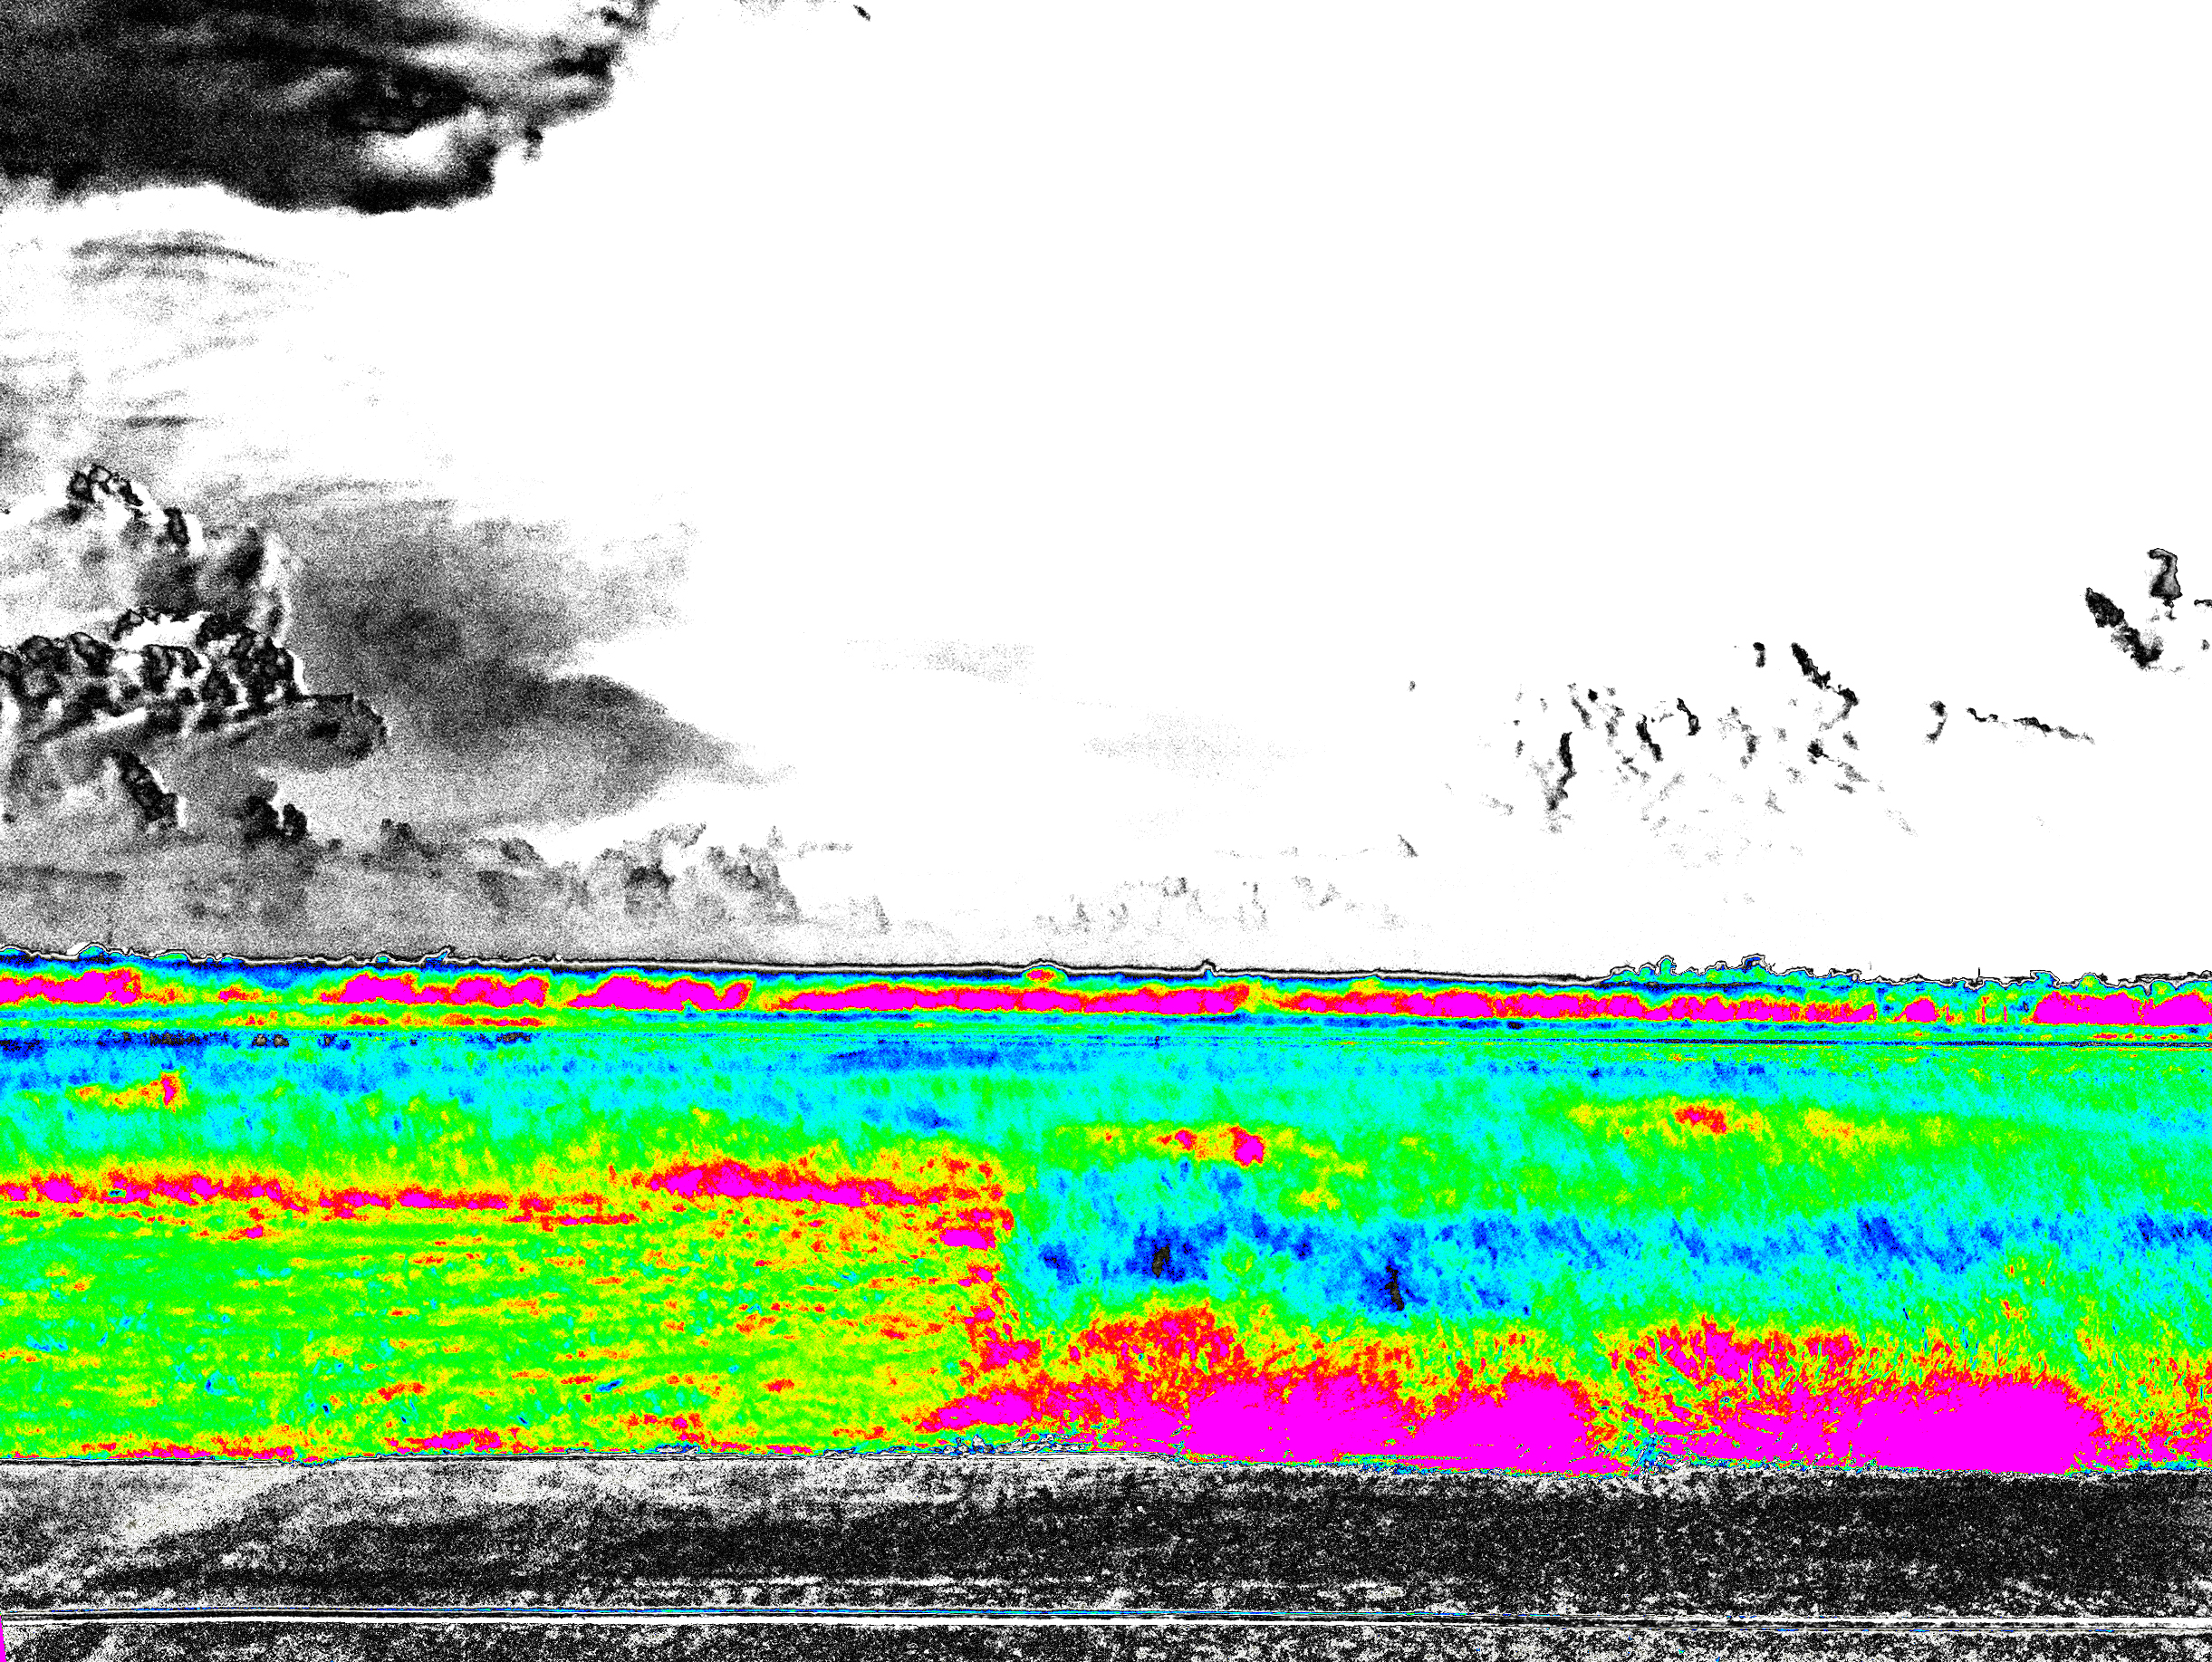
They are beautiful mosaics. I didn't have any problem using these images in Fiji. But the Photo Monitoring plugin does not do a very good job aligning mosaic images like these. Slight differences between the VIS and NIR mosaics don't allow the SIFT algorithm to rubber sheet the images enough to align them well. I did some manual alignment in Photoshop first and then it worked better in Fiji, but the registration is still not consistent across the image. You can see that best in the NRG image:
The same registration is used for the NDVI image, so the values it computes might not be very reliable:
It might be possible to get better registration with the options in the plugin.
I think somebody is working on a Python program that will combine the photo pairs into four channel TIFFs. Then those can be stitched together and the single mosaic can be used to compute NDVI. But I might have than plan wrong.
Chris
Reply to this comment...
Log in to comment
Login to comment.