What do I want to do
So after my first post of DIYing it with the plastic pen caps I decided to go back to the drawing board for sourcing a camera mount. The key things I wanted to keep were: 1. The tripod ball mount, (these are pretty universal so any camera could be mounted. 2. A way to fix it directly to the pole.
I considered Chris Fastie's picavet and pendulum suspensions but came to the conclusion that these would both require more assembly than I wanted in an out of the box mapping tool. The suspension is probably superior for orienting the camera but after several tests with the new parts we have come to see that they are in fact pretty secure and more so, since they are able to be tightened down with these nifty thumbscrews picked up at the local hardware store.
Steps
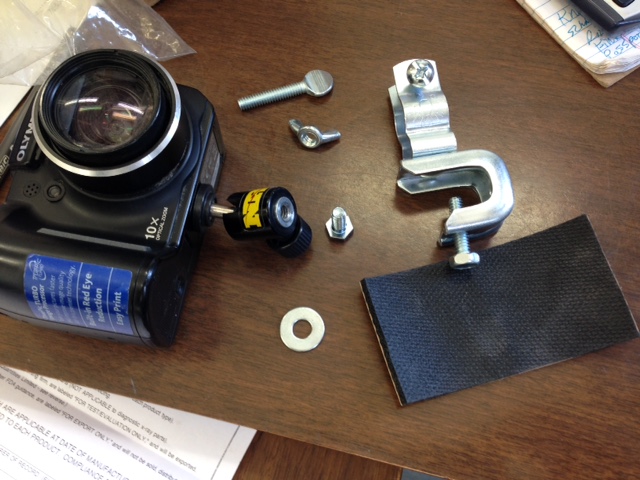
First thing I did was go to Mcmastercarr.com and after searching around, I found these things:
 The metal clamp is called a Swiveling I-Beam Clamp for Pipe and Conduit. I also searched for rubber strips and found an adhesive backed one which was pretty inexpensive for a 10' roll.
The thumbscrews and bolts I sourced at the local hardware store as mentioned and will be included in the pole kits. The pole you see pictured is our very own:
 Ron Thompson Gangster Carp Drone Swatter
Next thing was to attach the clamp to the pole:
 But first I needed to put a piece of rubber strip inside the clamping part to buffer and keep the clamp from sliding around too much.
 Next I slip it over the end of the pole and down close to the base of the second section from the top.
 And using the trusty thumbscrew and wingnut, clamp it down. This is a semi-delicate part. Although the rubber helps to pad the pole section from the metal clamp, you need to be careful not to tighten too much. Carbon fiber is strong but at this particular point thinnest and also hollow inside. Over tightening could very easily crush the pole.
(ecta64 posted a research not and included a suggestion for buying and using a gorilla tripod. This is definitely not a bad idea. Would be cool to have cameras at different heights together. We are going to test is the pole can support the weight of multiple cameras. As a side note here, we will be offering different size mounts as an upgrade/bundle pack through the Public Lab store. We want to encourage folks to use smaller cameras and get the maximum height with the pole. The mount that is included in the kit I think works best at the base of the section that is second from the top (2A). This way the clamp is actually secured around 2 sections, the inner and outer parts of the put over. At this location it gives you a camera height of about 30ft. That being said, some will want to use a larger or heavier camera, such as a compact or a super zoom. That is why we are going to offer the various sizes.)
After the clamp was securely attached, it was time to attach the tripod ball mount. There are 2 small bolts included with the hardware and when we start shipping should be already in place for easy attachment.
 Since the hole and bolt are both 1/4-20 the bolt needs to be manually screwed tight. After this it needs to be secure and not turn when attaching the tripod mount. So for this, (as pictured above) I added a nut to lock the bolt in place.
After that it's pretty self explanatory. Attach the tripod ball mount and the camera.
 And Voila'!
 The world's longest selfie pole is born!
As mentioned, this set up is surprisingly secure. Even torque from the weight and rotation of the heavy camera I used was not enough to know loose the rig. I am currently shipping a few of these out to beta testers for feedback, but if anyone else has some insight or has tried this process before, let me know what you think. mathew, ecta64, cfastie. Anticipated snags? When fully put together, this pole extends to over 36ft. You get a little dip due to angle and gravity when its at that length but not so much that it's unmanageable. I'll try to post a picture of the full extension with mount soon.
6 Comments
Ecta64 How sturdy is the mount? Does it stay in place after moving the pole around? I'm just wondering if we need to consider any reinforcement for larger cameras...
Is this a question? Click here to post it to the Questions page.
Reply to this comment...
Log in to comment
Hello @natalie, and any others working with the pole mapping kit - This kit was my xmas gift, finally getting to set up and use it. However, the mount is confusing. In the package it has a diagram of the mount, and says to see this wiki page (https://publiclab.org/notes/Natalie/03-06-2015/diy-pole-mapping-camera-mount) for assembly instructions. In the included diagram the tripod mount comes out of the swiveling Ibeam clamp parallel to the pole. But above the set up has it coming out perpendicular to the pole. The latter makes more sense, but none of the screws work for that set up, not enough room inside the clamp. But even if it did, the ball joint seems to work against you as well.
The challenge is that you want the camera to be horizontal, parallel to the earth, but since the tripod mount is on the bottom of the camera, you need the mount to hold it perpendicular. And even if you can achieve that, because in my camera (Canon Powershot SD1000), and the one in the pics on the wiki page, the tripod attachment hole is not in the middle of the camera, so the camera lists off to one side and does not remain parallel to the ground. It looks like the same is happening in the last pic on the wiki page as well.
I'm perplexed...Has anyone used the kit who could offer guidance? It's not self-evident to me. Thanks for your help!
Is this a question? Click here to post it to the Questions page.
Hi @pataxte! Amanda here from the store. I can see how the different set ups are a bit confusing. I took a look at the mount and it seems that there are actually multiple ways to assemble - with the camera on the top, side, or bottom of the clamp. This works well because, as you mentioned, people may be working with a wide variety of cameras that all have their mounts in different locations. If you use your attachment like in I've added below, and mount your camera from the bottom so it is facing the ground, would that help? My understanding is that the camera does not need to be entirely parallel to the ground to capture results, and the pole will have a slight lean in one direction as well. Great question! I hope that helps a bit, please let me know your thoughts. This is excellent feedback that we can use to improve our kits and instructions!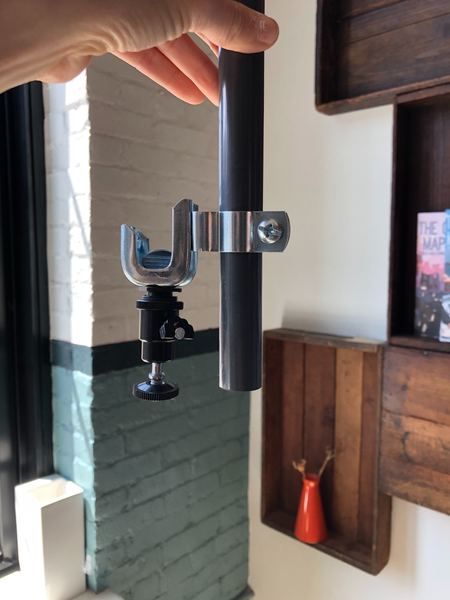
Best, Amanda
Is this a question? Click here to post it to the Questions page.
Recently I've returned to fiddle with pole mapping of gardens, and working on the camera mount, see earlier notes in this thread. I liked the soda bottle rig for kite & balloon mapping because it allowed the camera to adjust to string or pole angle and stay relatively parallel to the ground. Also good was that it had a direct line of support (using rubber bands) for the camera in a face-down-to-the-earth position, as opposed to being cantilevered from the tripod mount that in most cameras is on the bottom (the surface 90 degrees from the lens surface), not the back of the camera (the surface that lies parallel to the lens surface). That may sound confusing, but the cantilevered position is how the camera rig with the pole mapping kit works, and it has to stay rigid to keep the lens somewhat parallel to the ground, not adjusting its position relative to the ground. At least that’s how the kit rigging worked for me.
So the issues to figure out were a rigging that a) allowed the camera to adjust its position relative to the ground, and b) securely held the camera facing down, not cantilevered. My partner David and I worked out a super basic design and (mostly he) constructed it. We: • Found a 3” plate with holes in it at the hardware store to screw onto the hardware of the kit. This is important because it gets the hanging camera far enough away from the pole so that the pole does not interfere with the camera position. I put a small piece of old hose between the plate and the C part of the existing kit hardware so the plate didn’t slip around. Clip the carabiner that came with the kit through the most distal hole on the plate. • Cut a piece of scrap 1x down to a square plate not much larger than the camera • Took advantage of the headmount for the GoPro camera I’m using, screwing that on to the wood. This makes it super easy to place and remove the camera. Without a headmount option I would use the soda bottle rigging hung from the 3” plate. • Placed eye screws in each corner of the plate on the opposite side of the plate from the camera mount. Angled the eyes so anything strung through them would have as little resistance as possible. • Threaded a strong string continuously through all eyes and tied it into a loop. • Gathered the string between 2 sets of eyes on opposite sides, then looped those on the carabiner hanging from the 3” plate.
You now have a secure mount that can adjust to the angle of your pole! Let us know how this works if you try it!
Here's the 3" steel plate to extend the camera away from the pole
1st, The headmount on the wooden plate + camera; 2nd, camera in position to photograph from the pole
Here's a map from photos taken from this revised rig
2021_garden_AUG_1.pdf
Is this a question? Click here to post it to the Questions page.
This looks fantastic @pataxte !!!! So valuable to have these instructions and photos. Also, your garden looks lovely. :) I will write back if i try this method of attaching a camera to the pole !
Reply to this comment...
Log in to comment
Thanks for the cheering @liz!! That reminded me - here's one other idea that may be useful. Holding the very long carp pole can be tiring, and pretty difficult to keep it at a relatively consistent height and angle. To improve on this I found a surplus canteen holder that we had, and my old belt and made a waist rig similar to what people use to carry flags in parades. It makes pole mapping a lot easier!
here is the set up, subbing a walking stick for my carp pole that I had just packed away, but you can get the idea.
Is this a question? Click here to post it to the Questions page.
Reply to this comment...
Log in to comment
Login to comment.