Mount a camera on a pole
So, we just got in our new low aerial mapping poles, which will shortly be "kittified." The idea is that these are relatively cheap alternative to drones and kites. Where you may bump up against regulations with flying objects (even toys), nothing can touch a super long pole with a camera on top! (They are also great for swatting pesky drones.) The poles we have in stock now are the Ron Thompson Gangster Carp Pole.

 They are all carbon fiber and fully extended 11 meters long or about 36ft. The sections are "put over" rather than telescopic, which makes it impossible to collapse due to weight.
These poles are super long and are likely to be the longest selfie pole ever. If I can just mount the camera. Started out first with our small Mobius Infragram.
They are all carbon fiber and fully extended 11 meters long or about 36ft. The sections are "put over" rather than telescopic, which makes it impossible to collapse due to weight.
These poles are super long and are likely to be the longest selfie pole ever. If I can just mount the camera. Started out first with our small Mobius Infragram.
 P&S on a standard tripod mount
Sourcing Hardware and junk drawer options
Standard camera/tripod mounts are not a problem. I am confident that I can source these fairly inexpensively and throw them in with the pole kits. The problem is mounting them to the pole. First attempts Noah and I used velcro straps and plastic ties from the balloon kits. Not much success there. I got the idea to use a pen cap and barrel from diy (homemade/jailhouse) tattoo guns. The pen barrel fits like a sleeve over the thin part of the pole
 The tip of the barrel, sometimes removable on pens makes the cap slide on easy
 but the problem is with the carbon fiber, sometimes this piece gets stuck.
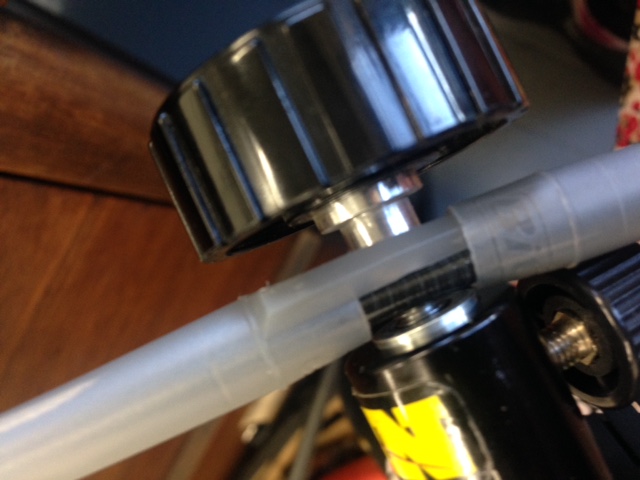
Anyway, after the barrel was sleeved, I took two caps and punched holes in the tops so that they would slide over the pole.

Then I fit the arm of the tripod mount in between them and connected the caps pushing them together inside each, making a pocket to hold the mounting piece. As shown
 here.
And above,
here.
And above,

The thing about it is, is that this ended up working really well. They tension of all the pieces holds it into place. For added security you could put a rubber band or zip-tie around the whole thing, but it is surprisingly very rigid as is and still allows you to adjust the angle with the mount. But let's be honest, my science is a little jenky here, so...
Ideas? Links to share?
What are your thoughts? Now that you see what I am trying to accomplish, in an inexpensive and accessible way, what would you do or try? Are there similar things you have seen or maybe tried? Parts that I could find at any hardware store and do this same thing? Maybe 3d print something small and simple. I'm sure cfastie has a way to super charge this!I've seen this guy, our main competitor, and these things
 which might be better options, but let me know what you think.
I want this kit to be easy, out of the box ready.
I don't want to have to source expensive specialty hardware that is difficult for someone else to replicate. I am looking to our balloon mapping kit and the soda bottle camera mount for inspiration here. Along those lines preferably.
2 Comments
Those Ron Thompson Carp poles are excellent tools. The trick to mounting a camera on these long poles for mapping (nadir photos) is to get the camera to be pointed down all the time. With most of the pole sections deployed, there is considerable flex to the pole, and the arc of the pole depends on the angle at which you hold it and the weight of the camera. Predicting what this arc will be and adjusting the angle of the camera is problematical, and then holding the pole always at that angle is difficult. A solution is to allow the camera to dangle. This works best if the camera weighs a lot more than a Mobius Actioncam. If the camera is heavy enough, a simple flexible connection will ensure that the camera always points where you want it to regardless of pole angle and arc.
Two standard hardware store materials are all you need for such a suspension. If you don't use the thinnest section of the pole (it is very floppy and whippy and not good for photography), the diameter of the top of the second section of the pole is about 5/16 inch. Over the end of that section slide a 6 to 8 inch length of reinforced PVC tubing with 5/16 inch internal diameter. In the other end of that tubing, slide a short section of 5/16 inch rod (wooden dowel or fiberglass). If you attach the camera to that rod, the weight will keep it vertical. It just happens that the Redstone and Titan 2 rigs have a bracket on top that is a perfect fit for 5/16 inch rods. Voila. A PowerShot in a Redstone Rig is just massive enough to always hang at the same angle, and the PVC tubing damps most swaying and completely eliminates spinning. A Redstone Rig is not required, you just have to rigidly attach the camera (or something with a tripod screw) to the 5/16 inch rod.

.
The string that is twisted around the pole is a safety lanyard because I did not secure any of the connections; they were all just friction fits, but they held tightly.
.
For less height but more stability, take off a second section of carp pole. The upper diameter of the third section is too big to fit the PVC tubing over, but a 5/16 inch rod will slide right into the end of the pole. You can insert the other end of the rod into the PVC tubing. This is stable enough to hold a Titan 2 Rig with two cameras (RGB and NIR) for plant health analysis. Depending on the fit of the rods and tubing, you might have to secure the joints somehow. A lanyard wrapped tightly around the whole thing can help hold the joints together.
Without the flexible tubing to keep the camera pointed in the same direction, pole photography with such a long whippy pole is kind of erratic. Remember -- to control the angle, let it dangle.
Chris
Is this a question? Click here to post it to the Questions page.
Reply to this comment...
Log in to comment
Super ideas and images. These poles were initially difficult to track down. After much searching though we were able to get a hold of the manufacturer overseas who wasn't too excited initially at the prospect of shipping to the U.S. After assuring them that I wanted to order a bundle though they sent them.
I like the idea of including a standard tripod mount with the pole kits but as cfastie outlines it is problematic at those extended lengths to judge the angle and hold steady, so I am leaning more towards the suspension mount. I did come up with a similar mounting option to Ecta64. I'd be interested to see what kind of pictures you were able to get and your experience getting the camera to point in the right direction consistently. Granted you are using a much shorter pole than we are anticipating it might be quite different. Here's what I came up with using a rubber stopper with a screw to hole the tripod mount.
Reply to this comment...
Log in to comment
Login to comment.