ABSTRACT:
This note outlines several ways that Image Sequencer can be used to calibrate images recorded from digital microscopes. Calibration techniques are demonstrated for Public Lab Intro, Plus and Pi microscope kits. Calibration data is listed in a comparison table and the design of a new Image Sequencer module with prestored calibration settings is discussed.
INTRODUCTION:
Image Sequencer is an online image processing application that consists of a series of modules that can be used for image formation, visualization or analysis. The note uses the Image Sequencer beta version but the same features (and more) will soon be available in an updated standard version.
DIY microscope kits such as Public Lab’s Community Microscope Series seek to develop tools that are 'affordable and simple as possible while still providing great microscopic images'. One option to simplify microscopic measurement is to create calibration overlays that provide a scale reference. This note describes several ways that Image Sequencer can provide reference overlays on images from Public Lab's digital microscopes. The advantages of an overlay is that the viewer can see a reference scale and image at the same time. Processing steps are first shown in detail for Public Lab Intro kit, and then demonstrated for the Plus and Pi microscope kits.
CALIBRATION REFERENCE SOURCES
Microscope calibration procedures typically use a very small ruler of a known length that will permit an accurate comparison for additional measurements. This demonstration uses a 1mm microscope calibration slide with minimum division of 0.01mm or 10 micrometer. In order to provide a practical example of calibration techniques, human red blood cells are observed for each of the different microscopes. Red blood cells permit an easy way to ‘self-calibrate’ microscope images since the average diameter is 7.5 micrometer and interior circle diameter is approximately 2 micrometer. Reference drawings of a red blood cell and calibration slide are shown below.

CALIBRATION WITH (REFERENCE) IMAGE OVERLAY
The first examples were all taken with Public Lab’s Intro Microscope Kit and use 640 x480 format unless otherwise indicated.
One of the easiest methods to scale microscope images is to overlay the calibration reference slide directly onto the image. Calibration image overlay advantages are that they document both the image and scale for future reference.

Image Sequencer steps for Image overlay:
- Load Image
- Import calibration image
- Overlay Image (250,250,-2)
Image Sequencer processing functions can scale and manipulate the reference for a more professional view. While this involves additional processing steps, cleaning up the reference slide by image processing may be easier than trying to capture a ‘perfect’ picture of the calibration slide.


Image Sequencer Steps for Processed Reference Overlay:
- Load Image
- Import calibration image
- Brightness
- Rotate
- Threshold
- Convolution
- Crop
- Overlay Image (0,0,-7)
CALIBRATION WITH GRID OVERLAY
Another calibration technique involves a scale ratio which is used to create a grid overlay. This approach transfers the calibration reference onto the image. There are lots of variations of this approach but one of the simplest is use the rotate command followed by a draw rectangle command. The rotate command aligns the reference scale in either the horizontal or vertical direction and the draw rectangle command is used to count the number of pixels per divisions. For the example below, the line is drawn from pixels 472 to 135. Since 472-135 = 337pixels, we know that 337 pixels covers 150 microns or 2.25 pixels/micron. The scale ratio can now be multiplied to get the desired grid spacing(pixel lines) for input into the grid overlay module. For example:
- For the Intro Public Lab Kit:
- 337 pixels/150 microns 2.25.pixel lines /micron
- 5 micron grid, 2.25 x 5 = 11.23 ~11 pixel lines
- 10 micron grid, 2.25 x 10 = 22.5 ~22 pixel lines
- 50 micron grid, 2.25 x 50 = 112.3 ~112 pixel lines
At this point, the grid overlays the calibrated ruler instead of the red blood cell image. Eliminating the intermediate steps (2,3,4) will create a new sequence with the selected micrometer grid over the red blood cells.
- Load Image
- Grid Overlay (11,11)


In practice, the Intro kit has repeatable calibrations so I typically use 11 (5 micron), 22 (10 micron) and 112 (micron) grid spacing as default settings. (See picture below)
 The same technique can be applied for the plus kit. Since there are different operating modes, it’s slightly more complicated. This review considers operation with the inverted lens and 40x microscope objective at minimum (1X) and maximum (2x) zoom settings.
In order to permit comparisons between the different kits, overlays of both the calibration scale and the red blood cells with a 50 micrometer grid are shown. The picture below shows the inverted lens or wide field of view configuration of the plus kit for 1x and 2x zoom.

- For the inverted lens minimum 1x zoom:
- 559pixels/1000microns =0.56 pixels/micron
- 50 micron grid, 0.56 x 50 = 28 pixel lines
- For the inverted lens maximum 2x zoom:
- 640pixels/570microns =1.12pixels/micron
- 50 micron grid, 1.12 x 50 = 56 pixel lines -
Replacing the inverted lens with a 40 microscope objective provides high magnification images as shown below.

For the 40x microscope objective min zoom:
- 618pixels/320microns = 1.93pixels/micron
- 50 micron grid, 1.93 x 50 = 96.6
For the 40x microscope objective max zoom:
- 580pixels/150microns = 3.9pixels/micron
- 50 micron grid, 3.9 x 50 = 193.3 lines
The next set of pictures compares different Pi Kit image formats. The different formats are accessed by a specially designed wireless camera interface that adjust camera settings. This is a nifty interface since it controls the image format and image compression (plus a whole lot more like time lapse videos) of the raspberry pi v1.3 detector array. The picture below show two formats for images taken at different (low) zoom settings 512 x 384 and 512 x 288.

- For the 40x microscope 512 x384 resolution:
- 346pixels/250microns = 1.4 pixels/micron
- 50 micron grid, 1.4 x 50 = 70 pixel lines
- For the 40x microscope 512 x288 (quality =10):
- 225pixels/120microns = 1.88pixels/micron
- 50 micron grid, 1.88 x 50 = 94 pixel lines
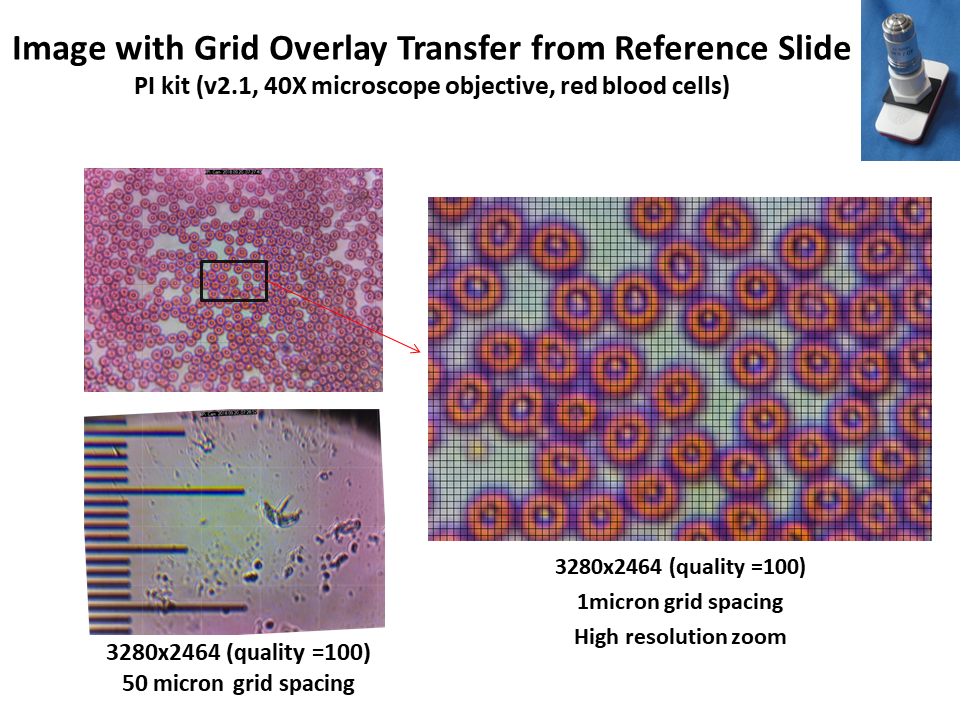
The last comparison is also with the Pi Kit but with the v2.1 picamera detector array. For this example the full resolution of the detector (quality setting =100) will be used with 3280x2464 format. The picture below shows the red blood cell image with a 50 micron grid (left) and a zoomed in portion of the image with a 1 micron grid. (In this example, the grid is established before expanding/zooming the image). The picamera combined with high ’quality’ interface settings permits the highest resolution option of the three microscopes.

- For the 40x microscope, 3280x2464 resolution:
- 1915pixels/150microns = 12.8 pixels/micron ( 1 micron spacing used for right image)
- 50 micron grid 12.8 x 50 = 640 pixel lines
Summary
This note provides examples of how Image Sequencer can create grid overlays that are useful for calibrating microscope images. Examples images of red bloods cells and calibration slide reference of three Public Lab Microscope Kits were compared. The techniques have been tailored to public lab microscopes but are applicable to other microscope systems as well.
An excel reference table of camera formats, pixels/micron ratios and field of view permits comparison of the microscope kits and the different operating modes(click view raw and download). In general, higher magnification can be associated with an increased higher pixel lines/micron and reduced field of view.
One application of this review is to identify if settings could be preset or stored for calibration without a reference. The ability to have a pre-calibrated microscope would not only save time but would be of value in classroom settings where only a limited number of calibration references may be available. For example, since the Intro kit has a fixed lens and zoom configuration, it is possible to use sequence strings or design an Image Sequencer module with prestored calibration settings. This video describes how a new Image Sequencer ‘micro’ module can select between 5, 10 and 50 microns grid spacing for Public Lab Intro Kits.
Notes:
There are many different options that can be used to estimate the pixel/micron ratio for the grid reference overlay. In practice, it may be easier to create a very fine grid and compare/count lines or use the blend module to compare the microscope image and calibration slide.

Related posts:
- https://publiclab.org/notes/MaggPi/06-23-2018/microscope-calibration-overlays-what-s-the-best-approach
- https://publiclab.org/notes/mathew/08-23-2016/calibrating-a-microscope
- https://publiclab.org/notes/partsandcrafts/02-26-2018/5-testing-and-calibrating-your-microscope
2 Comments
Wow, this is so cool, @maggpi - so great to see these software tools in such creative remixings! I love the one where you calibrate, then remove step to apply the grid to another image! 🎉
Reply to this comment...
Log in to comment
Woah! Your work here is awesome and I appreciate how well laid out and easy to follow you've made this process.
I like the idea of having a preset calibration in image sequencer and your video! I think it could expand what people are able to do with the intro kit.
Excited to see what comes next.
Reply to this comment...
Log in to comment
Login to comment.