I recently decided to take a dive into NDVI imagery for use with my home hydroponics system, tracking plant growth over time. That's still a work in progress (I'm a better developer & engineer than a farmer) but I thought I'd share the idea I had to convert a cheap ($20) common camera for dual-camera NDVI. I have some prior experience with NDVI from remote-sensing (at satellite and UAV-scale) applications and though bringing it into my side hydroponics project would be neat.
Wait, how you can you do dual-camera images with a single camera? Because this incredible $20 1080p camera actually comes with a daytime IR-cut filter AND a nighttime NoIR lack-of-a-filter AND a mechanism to switch between them seamlessly, which if you put a custom firmware on the camera you can control very easily for taking sequential, aligned photos with each filter whenever you want!
The camera I used is the Wyze Cam v2, which you've probably seen on Amazon or a similar site. It's incredibly cheap (probably at high moral cost) and very high quality for the price. Out of the box, the firmware requires you to set up an account through Wyze, use their app for control, and if you want storage you've got to use AWS or an SD card, which isn't fun. BUT quite a while ago, I stumbled across a custom firmware for these cameras that opens up a lot more flexibility. The Dafang-Hacks firmware is reasonably simple to install for any programming/electronics hobbyist, and opens up the camera for local streaming (and video grabs, network storage, MQTT integration with your favorite automation system like Home Assistant or Alexa, etc.) as well as getting rid of any pesky PRC spyware that comes with the app or default firmware. With that custom firmware installed, you have a 1080p camera linked to Wifi with a web-based control interface and the ability to use something like MQTT to toggle between the two filters, at will. It even has a separate IR source (some small IR LEDs) which you can toggle as well!
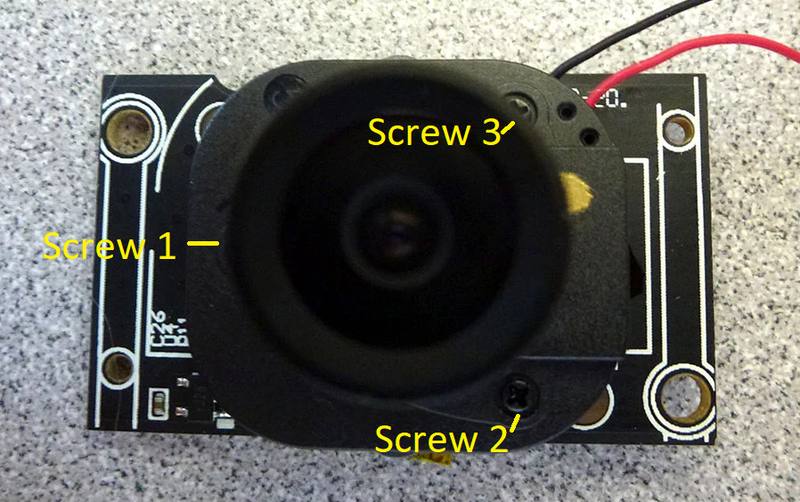
The next part would be installing the appropriate Infragram filter over/in place of the clear NoIR filter. I won't go into details on the disassembly process, this guy did it really well, and I'm going to borrow 2 of his photos and if you attempt this I recommend carefully reviewing his teardown. The short version is that you carefully(it's a $20 camera, it's not built for rough handling) extract the 3-circut-board stack from the housing (there's at least one screw to undo inside the device, several on the outside, etc.), unscrew the 3 boards from eachother, and then with the board with the camera (see image below) use a very fine screwdriver to remove the 3 screws on the plastic housing around the lens, after which you can slide the lens off of the part containing the filters and the filter switcher.

Once inside, you'll see two square filters in a mechanism that switches them, as shown in the image below.

The "clear" one (the upper-right one in this photo) is the one you want to modify. I opted to cut out a small square of Infragram DIY red filter, dab the square corners of the existing filter with the tiniest bit of superglue using a toothpick, and have my far-more-dexterous spouse carefully put the red filter material in place. Make sure to trim any excess filter hanging off the edge, so that anything you put in doesn't interfere with the mechanism's movement, you can move it around pretty easily to check without doing any damage.
Once that's done, you can seal it back up and you've got a dual-filter setup in a single camera, perfectly aligned, that can be used for multispectral imaging.
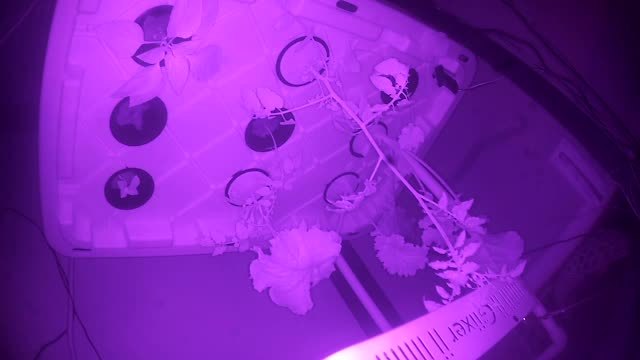
The method I currently use to take the photos is that I use MQTT to tell the camera to switch to normal IR-block mode with the separate IR source off, use ffmpeg to grab a frame from the camera stream, use MQTT to switch to the new filter with separate IR source on, grab a second frame, and voila! Two aligned images, seconds apart, for you to process into whatever you want. Sample shell script for something like this below.
#!/bin/bash

#Get camera in 'normal' mode with extra IR light off
mosquitto_pub -h [REDACTED] "Hydroponics/Camera/set" -m "ir_cut_on"
mosquitto_pub -h [REDACTED] "Hydroponics/Camera/set" -m "ir_led_off"

#Give it a few seconds for the stream to reflect the changes
sleep 5

#Grab a frame from the stream
ffmpeg -loglevel fatal -rtsp_transport tcp -i "rtsp://[REDACTED]:8554/unicast" -r 1 -vframes 1 vis.jpg

#Get camera in 'red filter' mode with extra IR light on
mosquitto_pub -h [REDACTED] "Hydroponics/Camera/set" -m "ir_cut_off"
mosquitto_pub -h [REDACTED] "Hydroponics/Camera/set" -m "ir_led_on"

#Give it a few seconds for the stream to reflect the changes
sleep 5

#Grab a frame from the stream
ffmpeg -loglevel fatal -rtsp_transport tcp -i "rtsp://[REDACTED]:8554/unicast" -r 1 -vframes 1 nir.jpg

#You might want to reset it back to the first "normal" setup here, depending on your application

#Do analysis using your preferred method, mine is a Python PIL-based script
python analysis.py -v vis.jpg -n nir.jpg
I'm still working on fine-tuning the color-maps and such for my specific application, but below is a sample output from one of my early tests. There's a lot that can be done to improve it - like reorienting the camera to eliminate shadows, this is a temporary location - and I don't know that I'll be back to write about it or answer many questions, but I did want to share that it was relatively straightforward and very inexpensive. The hardest part was definitely adding the red filter since it required very fine motor function my old hands have never had, hence why I'm an engineer and not a surgeon. But it was fun and I think it holds a lot of promise in producing decent 2-camera NDVI photos for the price, with a single camera, keeping the ability of the camera to do regular-spectrum images, AND with the AMAZINGLY GREAT feature of programmatic control.
Wyze is likely to roll out a 4k camera someday. It'll likely use a similar filter-switcher mechanism to the current 1080p one, and 4k would obviously produce better photos than 1080p, so I'll probably upgrade this to that when it comes. If you want to replicate this some of the Wyze cameras also have pan/tilt/zoom, I used the most basic $20 one but if you want to get a nicer one for this project check the Dafang-Hacks GitHub page to make sure that firmware will work on the model you want. Arducam also makes a few cameras that have a switchable ir-cut and could be programmed accordingly, including a 13MP one connectable to a Pi, that might be an interim upgrade for me, though from what I've read there are some complexities to the Arducam models regarding drivers and the OS on the Pi.
Cheers and good luck! -DS501st
Shoutout to the folks at Dafang-Hacks and the guy who did that teardown.


3 Comments
@DS501st What a great way to combine your interests! Thanks for documenting your process and sharing for the Public Lab community to replicate ❤️ Appreciate the resource links especially! And you have some healthy looking plants over there!
Reply to this comment...
Log in to comment
Very impressive - and yeah, what a great cheap camera... that filter switcher is amazing!
Reply to this comment...
Log in to comment
Gud Ur Post Always Important all of us
Reply to this comment...
Log in to comment
Login to comment.