This walk-through describes how to build the tools needed to perform a simple terrain survey, commonly called the Emery Board method.
This technique can be used for monitoring elevation change over time, or to create a snapshot profile of a sloping land form.
Background
The Emery Board terrain survey technique is named after Kenneth O. Emery, a world renowned coastal scientist and geologist. According to his obituary, Emery was the kind of person who had many interests, and when he was excited by an idea or concept, he'd obsessively study it and learn the ins and outs of it, sometimes even write a book about it (he wrote 290 articles and 15 books!). Although he was super well learned, he preached teaching others through discussion, and he is remembered as an educator and a collaborator. K.O. believed synthesis to be the most important duty of a scientist, and throughout his life he accumulated an incredibly broad body of knowledge spanning geology, marine science, physics, climatology, spiritual geography, & material culture. If he were alive today, I imagine he'd be a part of the Public Lab community.
Emery is best known in the citizen science circuit for inventing the emery board terrain survey technique. This technique is an extremely simple, fast, and low cost way of generating topographic data that can be used to monitor terrain change over time.
Original Method
It's impossible to stress how awesomely simple this process is, materially and conceptually, however it takes a bit of mental gymnastics to understand theoretically versus practicing in the field. A concise overview of the emery board method can be found here, thanks to the University of South Florida, but in the spirit of K.O., I'm going to try to simplify the process further:
The emery board method was originally intended for generating a profile of a shoreline, using two meter sticks, a rope of known length, and the horizon. The rope would be stretched out and the meter sticks would be placed at either end. One person would stand behind the meter stick farthest away from the shore, and then would line up the top of the lower stick with the horizon. That means:
- If the beach is sloping downward looking out to the horizon:
- Stand so that the top of the seaward board is in line with the horizon
- Read the number on the landward board at the point of the horizon
- If the beach is sloping upward looking out to the horizon:
- Stand so that the top of the landward board is in line with the horizon
- Read the number on the seaward board at the point of the horizon
Check out the diagram below, and imagine you are standing at 8
o'clock and looking at someone performing an emery board survey on a
large sand dune. Closer to the beach, the dune is descending, the
beachward stick is lower and aligned with the horizon, and the numerical
value from the landward stick is recorded. Further along in the survey,
the beach is now sloping upward in an offshore direction! In this
instance, the landward stick is lower, therefore the landward stick is
aligned with the horizon and the number off of the seaward stick is
recorded.
Figure 1. This diagram illustrates how to use emery boards in situations where the terrain is ascending and also where it is descending.
Using the horizon as a constant, you are able to calculate the elevation change from one stick to the other. Because they are equal in height, you are able to measure the difference in the height of each meter stick, and therefore the change in elevation of the terrain. If multiple measurements are calculated along a line extending perpendicular from the shore line, with a known distance between each measurement, then an accurate profile of the beach can be graphed by plotting the change in elevation from one meter stick to the other. So simple, yet it produces incredibly valuable data! Figure 2 shows the emery board method being used in the field, and the resulting data produced from this method.
Adaptations
Figure 2. This image illustrates the original method for use of Emery Boards, as well as a sample dataset.
That being said, there are some obvious fall backs to Emery's proposed method. For example, what if the dune you are surveying is so tall that the horizon is completely obscured? What if you're measuring an urban landfill and there is no visible horizon? Even simple logistical issues can introduce lots of human error: what if your measurements are 10 meters apart, and you have to read the exact centimeter off of a meter stick 10 meters away from you? Therefore, we've adapted the original method to make up for these issues! In our adaptation, a laser level mounted on one of the boards acts as the constant, and the laser shines upon the opposite emery board clearly demarcating the elevation change measurement - no need for squinting or binoculars to read a number 10 meters away! (tip: make sure the distance between measurements is less than 2 meters, so that the laser light remains visible)
How to Survey
Now that you know how to collect measurements, and what those measurements stand for, let's discuss how to perform the survey! (For a step by step overview of this process, skip ahead to the next activity)
Basically, the two boards of equal length are used to measure elevation change by collecting many data points along a transect line, or an imaginary line that bisects the landform being surveyed. One board has the laser level attached to it- we'll refer to this as the BASE BOARD. The other board we'll call the READER BOARD, because with this configuration, it is the board that you will always read the measurements off of. The Reader Board is placed a known distance from the base board, further along the transect line. Both boards face each other, and they're both level with the ground. When everything is properly set up, the laser light is turned on so that it reflects upon a mark on the Reader Board. A data point is collected including
- Distance between the two boards
- Centimeter marking closest to where the laser level lands
- In this example, our laser level was attached 20 cm below the top of our Emery Board. Therefore, we subtracted 20 cm from the values collected in the field in order to determine the true change in elevation.
Once the measurement is collected, the Base Board is moved to the same location that the Reader Board was in for the previous measurement, and the Reader Board is again brought a known distance from the Base Board, still along the transect line. The entire process is repeated, and another data point is collected. If you think of this in mathematical terms, the change in elevation is the rise, and the distance between the two boards is the run, therefore you are modeling the slope of the landscape from one data point to the next.
How to Build Emery Boards

Figure 3. This diagram illustrates how to use the adapted Emery Board technique.
Materials Needed
- 3 x meter sticks
- 2 x wooden boards for support (approx 3" x 1" x 5')
- Laser level with wall mount
- (we used Black & Decker BDL220S)
- 2 x bubble levels
- 2 x contrasting color sharpies
- Hand saw
- Wood glue
- Hammer / nails for affixing levels

Steps
Figure 4. @eustatic doing big carpentry in a tiny office.
Basic Set-up
- Saw one of the meter sticks in half
- Affix meter sticks to support boards using wood glue
- Align full meter stick to top left of support board, with lowest numbers at top
- Put glue on the front of the support board and back of the meter stick
- Align top half of sawed meter stick to left of support board
- Values where the two meter sticks meet should appear as such: 90, (blank), 10, 20, so on.
- Put glue on the front of the support board and the back of the meter stick
- Repeat process with second set of meter sticks and support boards
- Values where the two meter sticks meet should appear as such: 90, (blank), 60, 70
- If desired, use white out and a sharpie to amend the values.
For example, the 60 cm mark should be changed to 110, 70 cm should be changed to 120, so on and so forth... - Wipe off excess glue from sides of board
- Place weight on top of emery boards and allow 24 hours to dry completely

Figure 5. Wipe excess glue from boards so the surface is clean when adding color in next steps.
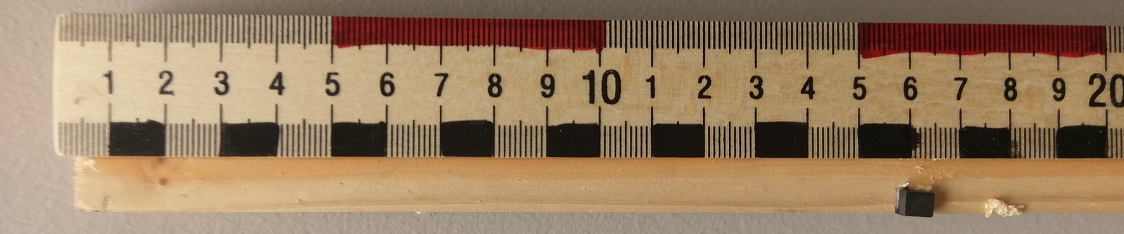
Adding Color
- Using a sharpie, color in every other centimeter so that users can distinctly tell where the measurement falls when viewing from a distance. Do this for both emery boards.
- For example, color every other centimeter on one side of the meter stick black. Using another sharpie, color every other 5 centimeter block red. An example of this color scheme can be seen in Figure 6.

Figure 6. This color scheme clearly demarcates 1 and 5 centimeter increments so that marks will be visible from a distance.
Adding Levelers
Last but not least, we'll add bubble levels to our Emery Boards. This step is not essential, but it is highly recommended and will greatly improve the accuracy of your data. The bubble level should be at chest height for the shortest participant in your survey, but can be placed anywhere on the board.
Next we will attach a laser level so that measurements can be recorded without a visible horizon line...
- First, ensure that the laser level is at exactly 20 centimeters. To do this, align the two emery boards on flat ground so that the numbers are facing each other. Using the bubble level, make sure both boards are level. Next, turn on the laser level and hold it on the Base Board so that the laser is visible on the 20 centimeter marker of the Reader Board. Using the sharpie, make a marking on the base board of where the laser level should be.
- Attach the laser level at this precise height.
- The Black & Decker BDL220S comes with a wall mounting kit that attaches the laser level to a surface using magnets, as seen in Figure 7. We mounted our laser level using these magnets, and have had minimal issues with the laser level falling off of the Emery Board when traveling with equipment.

Figure 7. This image shows the wall mounting system of the BDL220S.
Final Product
.jpg")
Wrap Up
Now that your emery boards are built, you're ready to start surveying! Click here to continue onto the next activity, a walkthrough for in-the-field surveying. Scott and I teamed up with Atchafalaya Basinkeeper Dean Wilson to monitor the spoil banks resulting from construction of the Bayou Bridge pipeline using the Emery Board survey technique.

7 Comments
Trying to write a comment on this great post, but attempts to upload an image along with my comment are not working...darn! It's a png file, should work, any suggestions?
Is this a question? Click here to post it to the Questions page.
Reply to this comment...
Log in to comment
Hi @pataxte! Things can be making the upload fail:
Image too large.
Name of the file including blank space or weird character.
Reply to this comment...
Log in to comment
@xose awards a barnstar to a1ahna for their awesome contribution!
Reply to this comment...
Log in to comment
if you have more trouble, you can email it to me at jeff@publiclab.org and I can try, or at least hopefully figure out why it's not uploading!
On Fri, Dec 7, 2018 at 3:19 PM \<notifications@publiclab.org> wrote:
Is this a question? Click here to post it to the Questions page.
Reply to this comment...
Log in to comment
@eustatic awards a barnstar to a1ahna for their awesome contribution!
Reply to this comment...
Log in to comment
Hey, @pataxte, send it to me, i can post it, or just post your comment! thank you!
Reply to this comment...
Log in to comment
Here's an amazon list of materials, including a different laser level that i think will be less of a hassle
I have the craftsman version of this, except all it does is distance
photo
Is this a question? Click here to post it to the Questions page.
Reply to this comment...
Log in to comment
Login to comment.