For many years, the Cave Pearl project [https://thecavepearlproject.org/] has been proving that open source equipment built with inexpensive pre-made modules can serve the needs of both scientific research and STEM education. We've been deploying Pro Mini based data loggers in underwater cave environments since 2014, and the first publication from that work was released in 2018 [ https://www.mdpi.com/1424-8220/18/2/530 ] At the start of 2019 there are more than 100 of these units in service with a range of sensor configurations, deployed in four countries.

In 2015, Dr. Beddows introduced a simplified version of that research logger to her instrumentation students, and they have been building them enthusiastically ever since. Before that time the courses relied on proprietary 'black box' instruments from commercial suppliers. Now students develop a hypothesis, and then build their own instrument to test it. This has transformed the material into a truly problem based learning experience that challenges the students technically & creatively.
see [ https://thecavepearlproject.org/2020/10/22/pro-mini-classroom-datalogger-2020-update/ ]
In 2023 we released an even more simplified 2-Module 'EEprom only' version of the logger that runs for more than a year on the Cr2032 coin cell attached to the RTC module:
https://thecavepearlproject.org/2023/12/01/the-e360-a-10-classroom-data-logger-for-science/
The e360 course required different sensors for each lab, so we tweaked the 2022 2-part model with 3D printed rails holding mini breadboard to provide this flexibility. The software has also been streamlined significantly and people shouldn't have too much trouble adding other sensors provided you stick to 1,2,4,8 or16 bytes/record and your modules don't pull more power than the coin cell can provide.
This research note was started near the beginning of the project, and now provides a readers-digest version of some of the projects developmental milestones, as we pushed the crude early builds towards multi-year performance, and created a complete DIY system including the electronics, sensor configurations, and underwater enclosures.
70 Comments
cool!!!!
Reply to this comment...
Log in to comment
Ed, see my note, excited about this effort.
http://publiclab.org/notes/eustatic/3-27-2012/thoughts-water-sensing-needs-non-profits-louisiana
Reply to this comment...
Log in to comment
Wow, very cool, Ed. Would you be able to cross-post your blog here? How could we make that easier for you? I think a lot of folks here would be interested in following.
Is this a question? Click here to post it to the Questions page.
Reply to this comment...
Log in to comment
Also see this newly posted discussion of dragging underwater loggers: http://publiclab.org/notes/maxliboiron/02-11-2014/underwater-plume-sampling-methods
You can subscribe to more updates on this topic by subscribing to this tag: http://publiclab.org/subscribe/tag/water-quality
Reply to this comment...
Log in to comment
Hi Warren. Nice to meet you. Wrt cross posting, I am wondering about the content that would be most helpful to the audience here, as I interwove (with different types of navigation) posts for two very different audiences in the main project blog. And by cross posting, do you mean just posting links to new blog entries as I make them...or do you mean transferring the actual images and content?
Perhaps I should keep the "narrative" posts at my site, and just cross post the "how to build" and technical updates to this forum? Those are the ones most likely to help someone else who is trying to make something. I think my pvc underwater housings would be especially useful to some of the water quality projects you have been sending to me.
Also, i'm still new to your site, so forgive me if it takes me a little while to figure out where everything is...in fact I don't even know where these comments are going yet. (...found them...ha!)
Is this a question? Click here to post it to the Questions page.
Reply to this comment...
Log in to comment
Hi everyone. I just wanted to post an update as I have done some major code development for the Cave Pearl data logger recently, and a weeks worth of power draw tests have given me a real world idea of how much power it takes to buffer your sensor readings to an I2C eeprom. Essentially 192 block writes(&reads) on an AT24C32 eeprom + 1 SD card write, uses twice as much power as 8 SD card writes. I really did not have any sense of what these numbers were going to be be before trying out this little experiment. Anyone interested, and using an arduino based datalogger, might want to look a the scripts for some ideas for their own project.
Cheers!
(http://edwardmallon.wordpress.com/read-the-blog/)
Reply to this comment...
Log in to comment
Hi everyone,
Just a quick note to say the first gen loggers survived their initial 3 month deployment giving us real water flow data, (6m depth,~ 50% marine salinity). I had some significant doubts about the rubber bottom model, and the pipe clamp did rust a significant amount. Still, I suspect that design could do 6 months before standard stainless steel pipe clamps gave out.
The next gen builds are now installed:
http://edwardmallon.wordpress.com/read-the-blog/
P.S. I am still in the field for a few days, and internet time is patchy at best. So I will have to respond to any comments next week.
cheers!
Reply to this comment...
Log in to comment
Despite my zeal for the project, I have tried not to bomb everyone here with the many incremental updates as I go along. But I think I might have produced something that could really help people doing citizen science. Basically its cheap DIY datalogger that most could assemble out of 3 components, for about $10-15. Add another tenner and you have an waterproof housing for it as well.
http://edwardmallon.wordpress.com/2014/07/01/a-10-diy-data-logger-is-born/
Anyway, I hope that this helps someone out there who's project needs cheap data-loggers that can be assembled from "off-the-shelf" parts. As I mention in the post, these units will probably run for at least 3-four months on 6 AA batteries.
Reply to this comment...
Log in to comment
It's been a while so I thought I would post a project update to Public Lab
1) We had another successful fieldwork season, marking the deployment of the third generation of Cave Pearls, including a new "dry" cave model for sensing drip water in caves: http://edwardmallon.wordpress.com/2014/09/18/field-report-2014-08-25-retrieve-deploy-flow-sensors/
All of the beta generation survived five months under water (Woot!, a full data set!), so we reloaded them with fresh batteries and threw them in the ocean! We are making contacts now with other researchers, and are hoping to calibrate to true point velocity calibration by codeployments with commercial sensors (preferably acoustic Doppler) with the next set of installations around the end of the year.
2) I have updated the DIY datalogger by adding one more component: http://edwardmallon.wordpress.com/2014/10/07/the-diy-data-logger-v2-with-low-power-shut-down-capability/
I have the component cost down to about $15 for the core logging platform. This new design gracefully powers down when the batteries go low, protecting the data. Most of my builds sleep around 0.5-0.6 mA (with an ADXL345 sensor attached) so I am pretty confident that the design will run for about a year on 3x AA batteries IF you have a real BrandName SD card (fakes don't go into low current sleep-mode properly - there are posts about that on the blog if you are interested). I have also included links to all the parts, so anyone who wants to can whip one up. Bread-boarding these takes about an hour, and my current build time for a complete drip sensor is about 4 hours (course by now I have had a fair bit of practice, YMMV :-)
P.S. The way I have setup the blog, if you click the links that say ---click here to continue reading the story--- it jumps you to the next narrative post, skipping over the technical updates. I had to do this because a fair number of people were complaining that they did not no how to navigate my "website". After trying to explain what a blog was so many times, I just gave up, and that was my solution. If you actually want all the gory technical details, use the blog navigation at the top of each post. There is much more content to read that way.
Reply to this comment...
Log in to comment
Hi Everyone
Just thought I should post a progress update on the Cave Pearl Project. We finished off 2014 with a challenging field trip that had some great success, and some very frustrating sensor failures. You can read through the field reports on that work starting here:
http://edwardmallon.wordpress.com/2015/01/05/field-report-2014-12-10-retrieval-of-the-salt-water-pearls/
But the real reason I am posting is that I have finally figured out how to make reasonable underwater housings from Formufit PVC parts, that have very few fabrication steps:
http://edwardmallon.wordpress.com/2015/02/04/a-new-diy-underwater-housing-for-2015/
I have also developed a simple DIY underwater connector system that uses pex tubing adapters, and given all the other water related projects at Public lab, I am hoping that this info helps give them a boost.
Cheers!
Reply to this comment...
Log in to comment
Hi again everybody.
I finally got around to posting the Cave Pearl Project on Hackaday, and realized that it turned out to be a pretty concise summary of the current state of the entire project. So I thought I would post a link to that here so that people don't have to wade through my entire blog if all they want is the "readers-digest" version:
http://hackaday.io/project/6961-the-cave-pearl-project
Reply to this comment...
Log in to comment
Just back from our recent fieldwork, and we've had great success with the DS18b20 temperature strings that we deployed back in March.
http://edwardmallon.wordpress.com/2015/08/26/field-report-2015-08-12-success-with-ds18b20-temperature-strings/
With all those joins, these are easily the most complicated build I have ever put underwater. And with waterproof DS18b20's being so inexpensive, the parts cost runs between $90-100 for these 20 sensor units. So I even managed to undercut low-end Thermochrons there. Woot!
Reply to this comment...
Log in to comment
It's been on my to-do list for ages, but I finally got around to posting the build tutorials for the basic 3 component data logger based on Promini sized Arduino's:
Build Instructions - Part 1 - component preparation
Build Instructions - Part 2 - logger platform assembly
Build Instructions - Part 3 - sensors & housing
Build Instructions - Part 4 - power optimization
That last part on power optimization might be a bit tricky for people just starting out with Arduinos, so I would build the basic three component logger first, just to get the hang of it, before moving on to the advanced build. Hope that helps a few of the people who were interested.
Reply to this comment...
Log in to comment
One of my high school teacher friends mentioned that he wanted add Arduino based projects to his science classroom, but after I posted those DIY guides he suggested that my logger build plans still had too much detail (and soldering...) for him to tackle with a class full of high school students. So I cobbled together a simpler Uno-based version that can be jumpered together quickly with a breadboard:
An Arduino UNO based Datalogger for the Classroom
The code posted with the logger captures the temp register from the DS3231 RTC, which has low 0.25C resolution but has actually proven to be pretty accurate compared to other dedicated temp sensors. Hopefully that starter script is simple enough that people don't have too much trouble modifying it for the sensors they want to add.
Reply to this comment...
Log in to comment
I am really impressed with the new tutorial. Thanks for that great effort. This definitely lowers the barrier for me to try this. I just dove into eBay for a while and have these items in a shopping cart. Does this collection look like it can be assembled into a working logger? The total cost with shipping is $20.00 (without wires or sensors).
Arduino Uno clone $3.61 http://www.ebay.com/itm/161863547083
Breadboard $1.50 http://www.ebay.com/itm/181711836632?_trksid=p2055119.m1438.l2649&ssPageName=STRK%3AMEBIDX%3AIT
SD card module $4.99 http://www.ebay.com/itm/401035802070
Real time clock module $4.60 http://www.ebay.com/itm/401015650947
LEDs 20 for $1.67 http://www.ebay.com/itm/301726745400
8 GB micro SD card $2.99 http://www.ebay.com/itm/252096582221
Could an Arduino Nano replace the Uno for this build or are some features missing from the Nano? It might be cool to design a shield for a Nano to connect all the other components to. That could make a tidy package.
Below are some more or less random sensors. I am not sure these sensors operate at the correct voltage, so I'm not sure these will work:
AM2301 DHT21 humidity and temperature sensor $3.41 http://www.ebay.com/itm/301410138124
BMP180 Barometric pressure sensor $1.09 http://www.ebay.com/itm/371449104171
Adafruit MCP9808 temperature sensor $6.68 http://www.ebay.com/itm/161886933708
Can you estimate how long a logger like this could operate on four AA or AAA batteries? I really like the tidy way you wired the breadboard. Do you know what gauge wire is best for breadboarding?
Thanks again for your "educational" version. I'm thinking of trying this in parallel with a Riffle to learn what the Riffle is actually doing and highlight the clever things built into a Riffle like the fancy power management.
Chris
Is this a question? Click here to post it to the Questions page.
Reply to this comment...
Log in to comment
Not sure about that Arduino clone, as I don't know about the chips it's using. But for less than 4 bucks just try it and see. Just don't expect them to be as robust as the real Arduinos. The DS3231 RTC boards should not cost you much more than a buck and neither should the SD card holders, so hunt for the cheap ones with free shipping. Those other parts look ok, just don't forget your limit resistor. I usually use 22 or 24 AWG solid core jumper wire which you can find anywhere.
WRT the sensors, just read the specs. Adafruit boards are usually designed with level shifters so that they can run with both 5V unos, and the smaller 3.3v arduinos but you have to read the specs for each sensor. If you can't find the voltage tolerance information in the listing don't buy the sensor because it probably won't work. Also, I buy Adafruit sensors directly from Adafruits online store, same with Sparkfun, etc. I noodle around with dodgy sensors from china all the time because they are cheap enough to experiment with, but it really irritates me when those vendors copy 'real' company logos and then try to pass the stuff off on eBay as genuine.
As I outlined in the post, you need at least 6-7 AA batteries to power an UNO, and I expect that would only give you between 2-4 days of operation because the UART chip is always going to use power even if the main processor is sleeping (and with a clone you have no idea how much that might be...) The NANO also uses 5v logic, and has the same UART issue, so it will likely have a similar operating life, but you would have to provide your own voltage regulation (ie: you can't run it from the raw batteries)
If you want more lifespan, first build the UNO unit for experimenting and working out the code needed to drive your sensors, and then look at the links I posted earlier for the pro-mini based data logger. That unit runs for at least 3 months on 3xAA's, but you need to solder those parts together, so there would be a significant learning curve there. But I suggest you get your first few loggers working properly on the USB tether first, as that is a real achievement, before you jump into stand alone builds.
Is this a question? Click here to post it to the Questions page.
Reply to this comment...
Log in to comment
Thanks for the tip about cheaper SD card modules and RTC modules. I see now how you made your pro-mini logger for $13.00.
One of those sensors I listed (BMP180) says it runs only at 3.3v, so I guess that will not work with the UNO. The others say something like 3.3 - 5.2v so they should be good.
I think I am getting the picture that the challenge in building a logger is power management, especially sleeping. So far I have noticed three different projects succeeding in this:
I'm curious about how these approaches differ. I assume the Pro-mini does not have the UART chip that makes it so hard to sleep the UNO. But the Dead_Bugs_Prototypes logger is based on a UNO and claims to last for months on a 9v battery. I guess @donblair avoided the UART chip on the Riffle? Again, I'm just curious about this because it seems to be quite an art to make an Arduino-based logger last more than a couple of weeks.
Here is an updated list of potential components for the educational build of the Cave Pearl logger ($12.00 without wire or sensors):
Arduino Uno clone $3.61 http://www.ebay.com/itm/161863547083
Breadboard $1.50 http://www.ebay.com/itm/181711836632?_trksid=p2055119.m1438.l2649&ssPageName=STRK%3AMEBIDX%3AIT
SD card module $0.99 http://www.ebay.com/itm/131132034753
Real time clock module $0.99 http://www.ebay.com/itm/251401815796
LEDs 20 for $1.67 http://www.ebay.com/itm/301726745400
2 GB micro SD card $2.79 http://www.ebay.com/itm/381450686867?var=650599379406
10 colors of 24 AWG solid wire $14.97 http://www.ebay.com/itm/271939281212
Also need a resistor or two.
These sensors seem to run on either 3.3 or 5 volts:
AM2301 DHT21 humidity and temperature sensor $3.41 http://www.ebay.com/itm/301410138124
Adafruit MCP9808 temperature sensor $6.68 http://www.ebay.com/itm/161886933708 (not from overseas, but much cheaper shipping than from Adafruit)
Very fun,
Chris
Is this a question? Click here to post it to the Questions page.
Reply to this comment...
Log in to comment
Oh gosh -- Chris, thanks for tagging me in this thread -- I had no idea that this existed! Wow, Ed -- what amazing work you've been doing!! It's going to take me a little while to catch up with everything, but just wanted to say quickly: if you've seen the Riffle project, we've been putting together some of the components you've been using on a single circuit board. The current design might not be so useful for your (fantastic!) enclosure design, as we've made it long and thin in order to fit in a water bottle. But it's simple enough to rearrange the parts into e.g. a disk pattern. I don't know that a single circuit board could be made as cheaply as the version you've assembled from separate boards, but I'm guessing it could be comparable, and might save a lot of work / be less finicky. Let me know if it'd be of interest to design such a board together -- I've fumbled my way through Eagle CAD enough times that I think it wouldn't be so hard. It's now pretty easy to get these boards made and assembled via services like macrofab.com.
I also like the idea that Chris has of making a relevant shield for the Nano!
Ed, it'd be great to pick your brain about power issues. @cfastie -- yes, it looks like the Dead Bug shield bypasses the USB-Serial chip in order to conserve power. The Pro Mini has no such chip (though it has an onboard always-on LED -- I haven't looked, but I'm guessing that Ed removes it). The current version of the Riffle has a circuit that only powers the USB-Serial chip when plugged into USB power; when on a battery, the USB-Serial chip isn't powered. I still haven't looked into the power consumption stats of the Riffle in nearly the sort of detail that Ed has for his setup, but that's a necessary next step.
Looking forward to connecting! - Don
Reply to this comment...
Log in to comment
@ cfastie: To be honest I probably would have started with Geir Andersen's shield to if I had known about it back at the beginning of my project. And it's also worth digging through to find his stuff at LetsMakeRobots (eg: http://letsmakerobots.com/node/37728 ) as he has been playing the data logger game for quite a while now.
@donblair: So far I have been avoiding the temptation to move to a custom PCB because what I really want is the flexiblity to customize loggers to suit each experiment and sensor configuration. For example I have been playing with Moteinos to road test the 1284p, side by side with a variety of mini-form factor arduinos like the one from Rocket Scream. The translation of my build plan from one board/mcu combination to the next is pretty trivial, provided you are willing to pay for it with 4-5 hours soldering jumpers. Compared to the time I spend calibrating & deploying them, that build time is still acceptable for me. But I realize that is not the case for everyone.
WRT power issues, read through the blog before you start firing off questions. Then you will see that I am just bringing together stuff that's already out there from Nick Gammon, Jeelabs, Rob Tillaart, etc. and they are much better primary sources than I am. My big contribution is simply building alot of loggers and putting them in the real world to see what happens to them. So I guess I am becoming an expert on how things stop working :-)
Reply to this comment...
Log in to comment
Believe it or not, the UNO Datalogger tutorial I posted last year has risen to the top of the traffic stats on our blog, and has generated more than a few requests for me to post a complete parts list, which I finally put together:
https://edwardmallon.wordpress.com/2016/08/08/build-your-own-arduino-classroom/
I'm sure there is nothing on that short list that Public Lab members don't already know, but feel free to pass the link on to any teacher friends who want to use Arduinos as part of their STEM curriculum, but are working within a very limited budget.
Cheers.
Reply to this comment...
Log in to comment
We just fired up a new collaborative project, and some of the academics from the other university suggested that our blog was something of a spaghetti monster, and that they had a hard time navigating through it all. So I whipped up a short summary page which summarizes all the latest build instructions:
☀ How to Build an Arduino Data Logger ☀
I've also posted a short video clip from one of our recent deployments on the
Year in review post which might be of interest to others here working on underwater projects. It's worth noting that since the beginning of the project, we've accumulated more than 700 months of operational time with these little guys, and about half of that is in underwater. We have only had one housing failure, and that was from using bad epoxy.
Cheers!
Reply to this comment...
Log in to comment
After much experimentation, I finally came up with a simple dithering method that allows you to easily use oversampling to add 4-5 extra bits of resolution to the humble 10-bit ADC on the 328p (aka Arduino) processors:
Enhancing ADC resolution with Dithering & Oversampling
My primary use for this will be reading thermistors at resolutions better than 0.01°C. The technique would work with any resistive sensor, though you might need to tweak the pin currents a bit from one board to the next.
Cheers!
Reply to this comment...
Log in to comment
Wow, Ed, this is really cool, and obviously applicable to many sensor projects using Arduinos. Just curious if you'd be interested in posting a more step-by-step how-to post, perhaps linking to your in-depth blog post?
Thanks!
Is this a question? Click here to post it to the Questions page.
Reply to this comment...
Log in to comment
I'm currently working out how to calibrate these oversampled thermistors to a reasonable level without breaking the bank for a high quality reference. But life is fairly intense right now, so I probably won't get that out the door for another month or so. I will try to put more photos, etc in that.
With regards to the how to, all you have to do is connect an 85k ohm resistor from pin D5 to ground, an run the code example I included in the post. That's all there is to it if you use the pin noise technique. When you call the asyncOversample function, change the readPin to whichever ADC input line you have the Thermistor divider on, and set extraBits to a value of 4, 5, or 6. I did not bother configuring the code for more bits than that, because I really did not see much benefit in the data past 6 bits, and it takes a really long time to capture all those samples. In fact most of the time 256 samples (4bits) looked really good.
If you are using an UNO, I would use the triangular dither method which Qwerty outlines in great detail at the freetronics forum, so I was not going to rehash all that material.
Reply to this comment...
Log in to comment
I've developed a method to calibrate thermistors of unknown specification to something near +/- 0.1 C
https://edwardmallon.wordpress.com/2017/04/26/calibrating-oversampled-thermistors-with-an-arduino/
If you are not using the oversampling method, or the 1.1v as aref. Simply get rid of the rail voltage/aref factor in the calculations.
cheers!
Reply to this comment...
Log in to comment
I know the RIFFLE project has been doing this for a while now, but I saved SD power control to the end of my quest for low power logging, because I was worried about the potential weirdness that could arise with the Arduino libraries.
But after a reasonably thorough round of testing it does seem to be working OK with a BJT switch on the ground line:
Switching off SD cards for Low Power Data Logging
Reply to this comment...
Log in to comment
While breadboard loggers are quick, the connections tend to be a bit too fragile for serious testing. So I've come up with a configuration based on a screw-terminal expansion board that breaks out all the pins nicely:
Arduino Data Logger: 2017 Build Update
As a bonus, I've also included modifications that bring this 4-part logger below 0.02 mA sleep current. Current assembly time for the basic unit is under one hour.
Reply to this comment...
Log in to comment
Hi, Ed - thanks so much, I always love your updates. We'd love to feature your work more prominently -- would you be interested in posting this update on our blog?
Is this a question? Click here to post it to the Questions page.
Reply to this comment...
Log in to comment
@warren awards a barnstar to EdMallon for their awesome contribution!
Reply to this comment...
Log in to comment
Hi Warren, I think that would be a good idea for the screw-terminal logger, as it's a generic, and would provide people with lots of flexibility to modify it for their particular project. But I'm totally swamped at the moment prepping for fieldwork, and we still have not gotten our first pub out the door so I'm kind of cautious about any republishing till we get that into review. One of the big things I need to get ready for that pub is a complete overhaul of the loggers codebase for release on GitHub - right now its a herd of cats.
But I really like the work you guys are doing at Public Lab. So could I put that feature post off for a month or so? Also I'll have some decent run time with those low current modifications (as opposed to my acccelerated testing), so we will know if they are really safe for people to implement..
Is this a question? Click here to post it to the Questions page.
Reply to this comment...
Log in to comment
Ed,
The new Mini Terminal Logger is brilliant. Those Nano terminal shields are a great find. They not only reduce the number of solder joints required but allow beginners to correct wiring mistakes without extra soldering. I ordered some and will try them out. I could never reproduce your elegant builds though. You must be really good at cutting and stripping wire ends to get the wire lengths that precise. Beginners don't need that tight a build, but your result is a great model to emulate.
I also really appreciate the effort you put into documenting the process of preparing parts and building your various loggers. I know how hard it is to take such information-rich photos.
Thanks,
Chris
Reply to this comment...
Log in to comment
Aside form the research goals, I've always wanted to create something that everyone could make on their own. And don't worry about the soldering - my early builds were really rough looking - but as long as they work, you get data. After you make a few, you will be surprised how fast they start to look better. Just keep at it!
Also, having good tools helps with the fine details. I've been happy with Hakko tools for strippers, soldering iron, etc.
Reply to this comment...
Log in to comment
I strongly echo everything Chris said - and honestly, we'd really love to give your work more exposure -- I wonder if even simply posting a lot of the content you've already put together (and linked to/summarized in this thread) in separate posts could be a first step. I'm happy to help get this done, if you're interested! This comment thread is getting really long and all your work deserves more prominence on the site!
Reply to this comment...
Log in to comment
For starters, we would be very interested in cross posting your last post on our blog -- i think even if there's more you'd like to add to it, many people across the PL network would love to see it in its current state!
Reply to this comment...
Log in to comment
I really appreciate the encouragement guys. But I need at least a month before I could do anything about it. We've already turning away other offers because we are at saturation, and I'm worried about opening up the floodgates of people asking me for help before we get the pub out. We're also spinning up several academic collaborations this year from Canada to the Bahamas, and I don't want to leave those people (mostly grad students) hanging. So I'm content to let things grow slow and steady. Cross posting sounds fine, but then we run into the fact that I'm always constantly updating the posts with addendums, etc, and older material off the main site get orphaned. I really don't treat the wordpress site like a blog, it was just the best free hosting service available.
While I don't think this would happen with a dynamic group like P.Lab, as your group are real movers working on a bunch of interesting projects, but I've let others copy content before ( https://www.wevolver.com/edward.mallon/the-cave-pearl-project/main/description/ ) and the end result is pretty much zero traffic generated. Heck even Hackaday barely adds 1 reader per day and I sank an enormous amount of time into copying a full description of the project to that site. So many of those sites are silos that just don't encourage people to reach out the larger world. So 85% of our traffic comes from google, 10% comes from pinterest, and everything else really doesn't amount to much.
I will follow up with you about this stuff later, I promise!
Reply to this comment...
Log in to comment
I've been working on an overhaul of the code base for our data loggers and in the process I standardized some of that spagetti code into a simple set of functions to access memory registers on I2C sensors. So posted those to the project blog to help others trying to figure out how to add a sensor to their own Arduino Project:
Configuring I2C Sensors with Arduino
Reply to this comment...
Log in to comment
Like a great Hollywood franchise I finally released the prequel to that "Configuring I2C Sensors" post from a few months ago:
Adding Sensors to an Arduino Data Logger
With this new addition, I think we finally have a good "Tutorial set" to help my high-school science teacher friends get into the Arduino game.
How to Build an Arduino Data Logger
This new 'Adding Sensors' post does not cover the whole range, so there will be an 'Adding Sensors:part 2' when I can find time in the new year.
Reply to this comment...
Log in to comment
I try to keep the blog tightly focused on the logger build details. But this year, I felt that I had to say something a bit more pointed about the spirit of the times we are currently living in:
The 2017 Cave Pearl Project ‘Year in Review’
Reply to this comment...
Log in to comment
We have finally published:
A Flexible Arduino-Based Logging Platform for Long-Term Monitoring in Harsh Environments http://www.mdpi.com/1424-8220/18/2/530
Sensors is an open access journal, so the PDF is free to download. By the standards of most DIY instrument papers, we probably over-shot the mark by a fair margin. The irony there is that even with many years of underwater work, we still wish we had more data.
Reply to this comment...
Log in to comment
Guys, all of you specially Ed, this thread is awesome!
Reply to this comment...
Log in to comment
Thanks xose! Its been a long road, and we documented the entire process on the blog over time, including the mistakes. Now we are working towards making DIY loggers a standard part of the earth & environmental science curriculum. A key piece of that was developing housings that the students could build, which cover a range of deployments:
This year we will try to add more material to support other instructors, and hopefully get at least one "data" focused science paper out per year.
Reply to this comment...
Log in to comment
I had a project that needed some live data display, and looking for the cheapest low-power solution for our loggers lead me to the Nokia 5110 LCD. Once you get the backlight current under control, you can power the entire display from a digital pin, and if you use shiftout for soft SPI you can then get rid of the Reset and CSelect lines. This brings the display down to any four wires you can spare on your build (incl. the power pin) and a ground line. This is much more manageable than what you see with the standard hookup guides if your mcu is I/O limited like our pro-mini based loggers:
Adding the Nokia 5110 LCD to your Arduino Data Logger
Reply to this comment...
Log in to comment
A visiting researcher dropped by our humble basement workshop with questions about the physical skill level students would need if they added one of our DIY data loggers to their environmental curriculum. I figured the easiest way to cover that was to simply build one, while they recorded the process.
The result of that 3 hour session is now available on YouTube:
Cave Pearl Project Build Tutorials
Is this a question? Click here to post it to the Questions page.
Reply to this comment...
Log in to comment
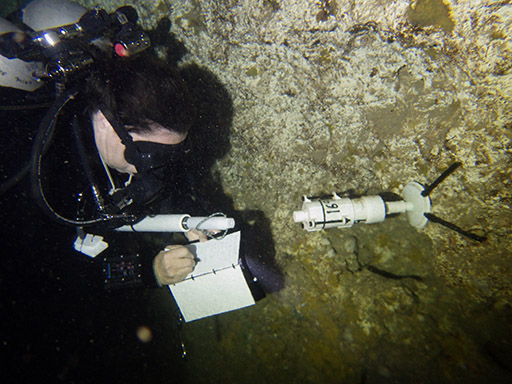
While the logger core is generic, surface deployments tend to use the 4" housing (which is easy to build) while the underwater deployments (~ half of the current fleet) use the 2" body style. Usually those deployments are too deep to record with our little point & shoot camera, but we recently did an install in a coastal outflow that was shallow enough to capture a clip of the method we use to anchor the sensors in place. In this video we are placing the anchor in the faster flowing fresh water, with extension rods to move the actual sensor into the zone where saline water (the silty brown layer) in intruding into the system.
Flow Sensor installation
Reply to this comment...
Log in to comment
This is a follow-up to our post about using Nokia 5110 screens on three unused analog lines with shift-out. That saved me from messing with the hardware SPI bus which we reserve for the SD cards. A secondary benefit is that the code is really lean, on the order of about 250 bytes for the default font after the compile if you already have EEprom.h in the build anyway. The font, however takes up about 500 bytes, and I wanted the smallest possible footprint so that we could add live data output to loggers that are already compile near the memory limits. As it turns out, stuffing those fonts into the internal EEprom was pretty easy to do:
Using the Arduino’s Internal EEprom to Store Calibration Data & LCD Screen Fonts
Reply to this comment...
Log in to comment
Hi @EdMallon -- this is so great! I was just scrolling through all of the updates on here, and was wondering if you had any interest in turning this research note into a Wiki page, where people could follow along and try to replicate if they were interested and you could share your progress as activities or research notes (I see that you are already generating that content over on your own site aready). You can see a nice example of how a tool wiki goes together over at http://publiclab.org/coqui . I'd be happy to help set that up with you if you like!
Reply to this comment...
Log in to comment
That's very tempting, but I'm not sure I can add another thing to the plate this year. I still have several important new features to add to the core of the design and with this years intensive fieldwork schedule, and our academic collaborators asking for more units, I'm really fighting for scraps of time. I also want to run those new features by another crop of Trish's undergrad students, as that always results in insights that make the loggers easier for beginners to build.
I feel bad to pass up this opportunity (...again...), because PublicLab is one of the best organizations in the entire citizen science movement. But I also know that everyone will want what I'm currently working on even more than what we've already done. There just is not enough time in life..
Reply to this comment...
Log in to comment
Posted a new Tutorial: Adding the SSD1306 OLED Screen to an Arduino Logger (without a library)
This is the third in our series about using shift-out and unused analog lines to drive SPI displays. The primary reason to use this method is to save power in data logging applications that need to run for years at a time. When you drive the pin-power line down the screen is completely disabled and draws no current.
Reply to this comment...
Log in to comment
I finally completed the set of logger build tutorials on Youtube, to go with the screw terminal logger posted in 2017:
Pro Mini Logger Build: Battery Platform & Sensor Connections https://www.youtube.com/watch?v=SPeUWtE0pIY
Epoxy sensors & waterproof connectors https://youtu.be/EKNNDPGr1Aw
Is this a question? Click here to post it to the Questions page.
Reply to this comment...
Log in to comment
@EdMallon Glad to see more video links. The basic logger build videos you did were great. Really helped me. Thanks for continuing to share.
Reply to this comment...
Log in to comment
For some months now I've been unable to upload images to comment posts in this research note. I've tried multiple different browsers. Though the image selection process appears to be normal, the image upload never begins. Any ideas what might be happening? Is this research note so old it's gone into legacy status?
Is this a question? Click here to post it to the Questions page.
Reply to this comment...
Log in to comment
Hi, Ed; thanks for reporting this; we'll take a look ASAP. I've opened an issue for you here if you'd like to provide any other information (for example a sample image): https://github.com/publiclab/plots2/issues/4617
I've confirmed that the "choose one" link doesn't seem to be working. You can drag and drop an image in, however, and that should work.
Reply to this comment...
Log in to comment
Dr. Beddow's instrumentation students have been building our EDU logger for more than three years and, based on that experience, we've redesigned the classroom model to accommodate a wider range of student projects. A full set of part links & YouTube videos explains the new assembly in enough detail for beginners. We've also released a new "Data logger starter script" which should run on just about any Arduino-based project:
Pro Mini Logger Project for the Classroom [ EDU v2: 2019 ]
Please pass this along to any STEM educators who would like to add Arduino based experiments to their teaching portfolio.
Cheers!
Really liked the tutorials!
Reply to this comment...
Log in to comment
A high-school teacher friend asked us for faster build that is less dependent on soldering because they don't have the budget for that kit. So we've developed a "minimum version" of the 2019 classroom logger using pre-made Dupont jumper cables (as we did in 2016) to reduce the build time down to about 1 hour. I've also added support to the code base for using the indicator LED as a light sensor, so they can use the logger with their existing curriculum right away.
This version of the Cave Pearl is probably the best starting point for people building their very first Arduino-based data logger.
1 hour Logger Project for the Classroom [Feb 2019 Update ]
Reply to this comment...
Log in to comment
You can use a Pro Mini (or any other Arduino with an Atmel processor) to measure temperature using only the mcu. I think this is the best "No-Parts" temperature method I ever noodled around with:
'No-Parts' Temperature Measurement with Arduino Pro Mini
This method generalizes to any other processor with a hardware driven watchdog timer, and should be easy to adapt for other projects here at PublicLab.
Reply to this comment...
Log in to comment
I've been experimenting with the Input Capture Unit on our pro mini's 329p processor, and with it you can make ‘High-Resolution’ Sensor Readings with DIGITAL I/O pins
I've been using this to read garden-variety Thermistors, and this new method easily outperforms the 16bit oversampling we've been using up till now. Works with any resistive sensor, and a similar approach should work with ANY processor provided they have schmitt triggers on their digital IO pins.
Is this a question? Click here to post it to the Questions page.
Reply to this comment...
Log in to comment
With the school year beginning we have some new instructors spinning up their own courses around the classroom logger released earlier this year. Some of them are more focused on biology than we are so we did some noodling around to come up with a bio-monitoring idea that could be done just about anywhere with as few resources as possible.
https://thecavepearlproject.org/2019/08/30/creating-a-normalized-vegetation-index-sensor-with-two-leds/
The result was a ‘Leaf Transmittance Index’ based on readings from an IR LED and the red channel of the indicator LED already on the logger. Although using garden variety LED’s with no real spec introduced several non-optimal aspects wrt frequency & bandwidth, the trial successfully distinguished ‘healthy’ vs ‘unhealthy’ plant leaves where a simple visual inspection could not.
Now, before all the bio folks jump on us for all the hand-wavy unknowns, and creating a pseudo NDVI with transmittance, rather than reflectance: keep in mind this was meant from the start to be a conceptual proof of concept, rather than a rigorous tool. From a teaching point of view, students would have to create "custom calibrations" for their one-of-a-kind builds & for each plant species - but that's actually a useful teaching exercise in and of itself. This fun little hack really has legs in that educational context, and it wouldn't take much to tune the idea to any specific application with better led selection.
Reply to this comment...
Log in to comment
Progress with the LED light sensor technique revealed that you can can also measure temperature by timing the reverse-bias charge decay on ANY type of diode. This makes high resolution readings possible without the op-amp you often see used with diode-methods that measure forward voltage deltas. So we are currently trying to decide between thermistors vs diodes for ambient temperature sensing. As a bonus, the two devices are close enough that I can even use the Steinhart & Hart calculations over a range of about 30C, so changes to the base code are minimal:
https://thecavepearlproject.org/2019/11/04/single-diode-temperature-sensor-with-arduino-icu-via-reverse-bias-leakage/
If you use the D8&D7, a 1n1418 is so small you can hang it right off the pin headers in a tight build.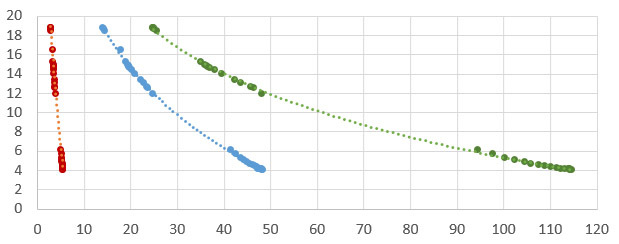
Is this a question? Click here to post it to the Questions page.
Reply to this comment...
Log in to comment
With Covid making it hard to predict whether students will be in the lab, or working from home we’ve done an incremental update to the ‘Classroom Logger’ tutorial which separates the soldering steps from the rest of the assembly. Instructors can add/remove those steps as need for whatever situation they are dealing with at their institution.
https://thecavepearlproject.org/2020/10/22/pro-mini-classroom-datalogger-2020-update/
Reply to this comment...
Log in to comment
Finally have acceptable screen captures exporting from zoom (though frame rate is low) so we've been producing tutorial videos for Dr. Beddows instrumentation & hydrology students.
Two that might be of interest to the folks here at Public lab:
Derive empirical fit constants with Excel's trendline (24min) https://youtu.be/XWDPZST3Iws
Using Excel's FFT to derive a tidal frequency spectrum (22min) https://youtu.be/0VzX-3erjPI
Again, the focus for this series is on using real-world data from our loggers instead of the 'synthetically generated' inputs that many of the existing tutorials on YouTube seem to be using.
Fantastic! Just adding some screenshots of your videos so people can get excited:
Is this a question? Click here to post it to the Questions page.
Reply to this comment...
Log in to comment
It’s been a long time since I posted, and you’d be forgiven for thinking the Cave Pearl Project was yet another victim of COVID. While the attendant travel restrictions did require replacement of entire field deployments (due to low battery leakage) we are still very much alive & kicking. Several sensor development & student projects are on a slow burn, but unfortunately that also involves a ‘soft embargo’ on the newest toys until certain students finish their papers...
Anyway, at this point we’ve proven that it IS possible to teach a ‘hands on’ instrumentation courses over zoom. Though that required removing soldering from the labs with the 2020 build - something which is highly suboptimal from a fieldwork perspective. Other teachers stepped into the breach with us, and with feedback about their time & budget limitations we've developed a new 2-Part ‘EEprom only’ version of the logger which handles all download & control through the IDE’s serial monitor window. Unix timestamps are reconstituted from the record number during download which means none of the limited storage space gets used for that predictably repeating sequence.
A typical sleep current below 5uA means this new data logger will easily run for a year on the CR2032 backup coin cell that’s already attached to the RTC module, and unlike just about every other low-power Arduino project we haven’t used custom fuse settings or bootloaders to lower the BOD. With a 220uF tantalum buffering the rail none of that annoying confabulation is necessary. Add a couple of cheap 32 or 64k EEproms and you have the perfect platform for low power sensor ICs like the BH1750, BMP280 or the SiLabs7051. This may well be as minimal as it is possible to go and still offer beginner-level students an opportunity to develop their own projects.
https://thecavepearlproject.org/2022/03/09/powering-a-promini-logger-for-one-year-on-a-coin-cell/
Is this a question? Click here to post it to the Questions page.
What a fantastic update! It's great to hear from you @EdMallon. An underwater logger running for a year on a single coin cell battery?? COOL. Tagging in @rebeccaMw to see this hardware designed to be built and deployed in a remote learning educational context.
Is this a question? Click here to post it to the Questions page.
This latest update was motivated by several factors but the most important ones were: (1) Our own project has grown to the point that every fieldwork trip generates a significant number of dead batteries. You can't spend your day doing groundwater research, without having some awareness of what that implies for the very environment you are trying to protect. (2) A significant number of the teachers & NGO staff we want to help are basically buying everything out of their own pocket. This is especially true when you step out of the ivory tower and go to community colleges & high schools. That means you have to be able to kit an entire class for around $50 or you are only ever going to reach those who are already pretty well-off in the grand scheme of things. I think this 2-Part design might finally have broken through that barrier.
Thanks for this update, @EdMallon! I read the full post you linked and laughed at "Pro-Minillennium Falcons." 😃 The Falcon tube housing is neat!
The ones from Fisher Scientific and Thermo have notably better quality seals than no-name brand tubes. So if you are putting them somewhere swampy it's worth the effort to get them instead. Even then for deployments past a couple of feet I'd still look at how we build our PVC housings - those things spend years down at 20-30m depth without issue.
Reply to this comment...
Log in to comment
A summary of the many waterproofing methods we've used over the years. Might be a few ideas there that Public Lab builders find useful: https://thecavepearlproject.org/2023/03/17/waterproofing-your-electronics-project/
Reply to this comment...
Log in to comment
The latest in our ongoing series of build videos supporting Dr. Beddows enviro-sci students who have to first build the logger(s) used to collect data for their final research project. These Promini based loggers may well be as minimal as it is possible to go while still offering the flexibility of supporting multiple sensors. The 200mAh CR2032 levels out at 3.0v and runs all the way down to 2.8v before shutdown - which rules out some older sensors like the DS18b20 which has a lower limit of 3.3v. But the NTC has so much more resolution that it’s not a problem, and thermistor calibration is an exercise that dovetails nicely with the course material. https://www.youtube.com/watch?v=58ps9fUyY0Q&ab_channel=EdwardMallon
Is this a question? Click here to post it to the Questions page.
Reply to this comment...
Log in to comment
The e360 course required different sensors for each lab, so we tweaked the 2-part logger with 3D printed rails holding mini breadboards to provide this flexibility. The software has also been streamlined significantly and people shouldn't have too much trouble adding other sensors provided you stick to 1,2,4,8 or16 bytes/record and your modules don't pull more power than the coin cell can provide.
https://thecavepearlproject.org/2023/12/01/the-e360-a-10-classroom-data-logger-for-science/
Reply to this comment...
Log in to comment
Login to comment.