Purpose
There have been several runoff events and spills around frac sand mining sites in Wisconsin. Timing is critical during a spill as evidence and pollution from the spill can quickly change and move down stream. In several past spill events, it has taken authorities several days to get to the site to investigate the issue. By this time, much of the evidence of the spill in the waterway has dispersed.
My goal in this post is to share a sampling methods that community members can use to collect evidence of runoff events and spills themselves. If you are the first on site, or able to get there quickly, the evidence you collect documenting the spill can be critical in helping authorities understand the scope of the pollution event.
Materials needed
- A violation report form: Sentinel_Program.pdf
- Two unopened and unused 500ml polyethylene sampling bottles with caps (new, these bottles will come ready to use, do not open them until you are gathering your sample) Here is a link to a lab who carries them
- Sampling labels (see below)
- A pen
- Clear packing tape
- A camera or phone with a camera (helpful if it has a timestamp, you can often add a timestamp on your camera phone)
- Boots or shoes you don't mind getting wet
- A plastic bag or tote bag.
Optional:
- Waders
- Gloves
- Evidence stickers (like these)
- Someone to go with you as witness, and assistant documenter.
Sample Labels: (you can make these yourself or print these out): 
Step 1: Gather your materials
A: Gather the materials from the list above. If you do not have sample labels, you can make them on a small 3x5 inch paper that has room for you to write down your name, the date, time, the site location (GPS, or address)Sample 1 (and Sample 2) on the other. Filling out the sample labels should be done at the site.
Step 2: Observe and identify your sample location
A: Observe: Once you arrive at your site, walk around and find the best way to access the water. If possible, and you have waders, you will want to go into the stream and collect a sample from a safe location in the water. If you do not have waders, the stream is too small or it is too dangerous to enter, you can plan to collect your sample from the stream edge.
B: Document: Once you're decided where you will do your sampling from, start to fill out your Violation Report Form including information about the site location and the incident summary.
C: Photograph: Set your camera so the date/time appears on the photo if you are able, otherwise document the date and time on the Violation Report Form. Take photos of the site including photos of your access point, and the waterway with the pollution. Be sure to include photos that help to show the scale of the photograph, for example, trees, street signs, bridges, or roadways along side the water.
Step 2: Prep your materials
Once you've figured out where you will be collecting your sample from, gather your sampling material.
A: Label samples: Fill out your sample labels with your name, the date, time, the site location (GPS, or address). Write Sample 1 on one label, and Sample 2 on the other. Attach one label to the side of each unopened sample bottle covering the label entirely with clear packing tape (this will help keep it dry).
B: Prep for the stream: Put on the shoes you will use to collect your sample (waders if you have them), and put your two sample jars in your plastic or tote bag unopened, and put the bag around your arm so you can easily carry both bottles into the stream. Put on your gloves if you will be using them._
(Note: You can use gloves if you are nervous about touching the water, or if you want to be extra cautious about sample contamination, most water sampling methods do not require you to use gloves) _
C: For those who are extra cautious about wanting to document your sampling, you can have someone video record you prepping and collecting the sample. This is further evidence that the sample you are collecting is genuine and collected properly.
Step 3: Collect your sample
A: Entering the stream: If you are going into the stream to collect the sample, you will want to walk a 5-7 steps up stream from where you enter. This way, your activity is not affecting the sample you collect. If you are not entering the stream, you do not need to do this.
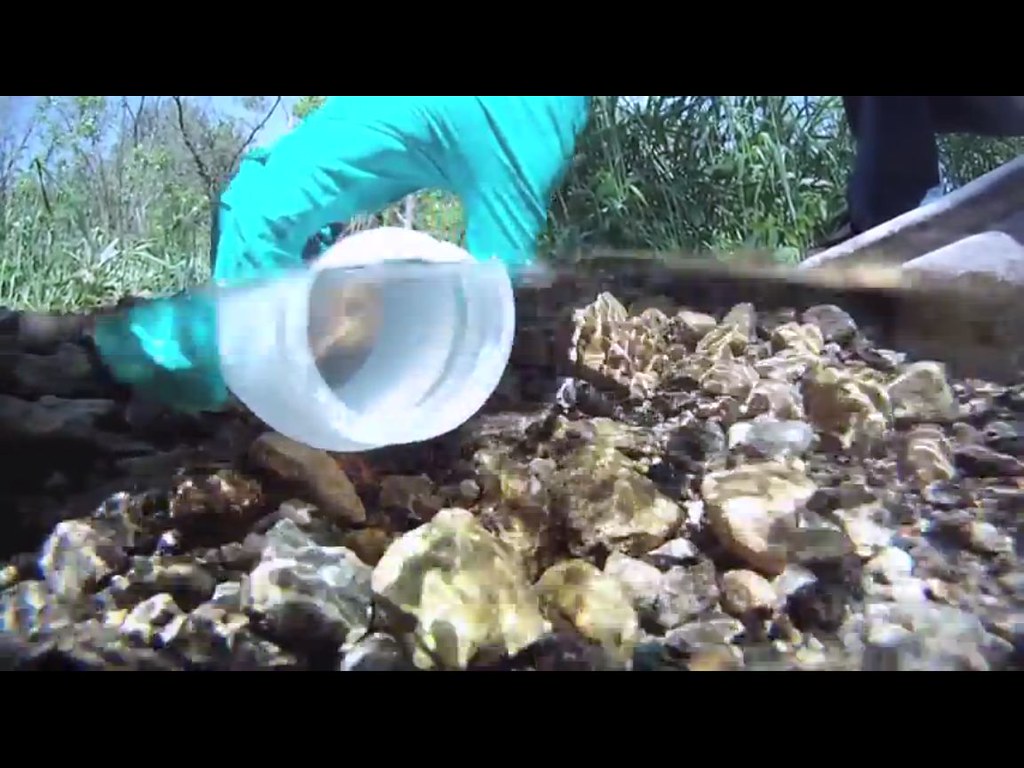
B: Rinse your bottle: It is very important that you use stream water to rinse your bottle three times. To do this, uncap your sample bottle and fill the bottle about 1/3 of the way with water. It is important to never touch the inside of the cap or bottle, but always hold the cap by the rim and the bottle by the outside. Once your bottle is about 1/3 filled with water cap it and lightly shake it around. Then uncap it and dump the water out downstream behind you. Repeat this activity twice more.
C: Collect your sample: uncap your bottle and hold the cap by the rim. Submerge the bottle parallel to the steam with the mouth of the bottle facing upstream. If possible, you want to submerge it 7 or so inches. However, you should never let the bottle touch the bottom of the stream. If the water is not deep enough for this, or you do not want your hands to touch the water, you can skim the water from closer to the top of the stream, but this is not preferred.
Fill your bottle all the way to the rim and bring it to the surface. (Note: some water sampling methods don't have you fill your bottle to the top. You would do this if you were adding testing materials to your sample, this is Not the case here, so fill your bottle all the way to the top). Cap your full bottle and put it in your bag.
D: Repeat: Repeat step C with your second sample bottle. Once you have both bottles filled return to shore.
E: For those who are extra cautious about your samples, you can use an evidence label over the top of your sample cap. By filling out an evidence label and putting it over the cap of your lid (so that the sample couldn't be opened without breaking the label), you can ensure that the sample isn't tampered with until it is ready to be tested. If you are recording your sample collection, you can record through this part. Most water sampling protocols do not require evidence labels.
Step 4: Report the event
A: If you haven't done so already, once you have collected your samples, report the pollution event to the authorities. You should let them know you have photo documentation and water samples from the site.
B: Complete the Violation Report Form with the information about how you reported this incident.
Supporting materials:
Wisconsin Grab Sample Procedure document: https://dnr.wi.gov/water/wsSWIMSDocument.ashx?documentSeqNo=38519940
Video showing how to collect a water sample:
NOTE:
1) This person needed to leave room in the sample for testing materials, you will not need to do this, you can fill the sample bottle all the way.
2) This person did not cap the sample in the rinsing process, this is incorrect and you should cap it each time you rinse the bottle.
3 Comments
Nice explanation. I do this a few times a month and this is the same procedure accepted in Colorado. The one minor difference is the option to use composite sampling. Composite sampling is where the sample is taken at various points across the stream by walking across the stream and repeatedly dipping the sample bottle. The sampling procedure is then noted on the label as either GRAB or COMPOSITE. Again, thanks for a nice write-up.
Thanks @MadTinker! Question for you - The sample bottles I found here are a little smaller than ones I've used in the past, and the ones suggested in the WI Grab Sample procedure document (500ml vs 1qt). What type/size bottles do you use, and do you know where people can get them?
Is this a question? Click here to post it to the Questions page.
We take two different samples: one sample is used for local chemistry analysis (alkalinity, pH, hardness, ...). That sample is collected typically in a 1L bottle (e.g. nalgene), but can even be taken in a bucket off a bridge and transferred to 1L bottle. Again, this is used for local analysis. The samples we send off to a professional lab are in 60mL bottles and are usually used for metals analysis. I think the latter is more appropriate for the subject of this discussion. Each bottle is individually labeled and there is a chain of custody form completed for each sample, listing who/what/where/when for each bottle, that we keep locally. We get our supplies from the Colorado Parks and Wildlife, but they look like these:
https://www.amazon.com/uxcell-Plastic-Chemical-Reagent-Container/dp/B07S1W84DP/ref=sr_1_36?crid=237HYG9D1HOHP&keywords=60ml+plastic+bottle&qid=1579895921&sprefix=60mL+plas%2Cgarden%2C174&sr=8-36
I didn't look very hard and there must be cheaper alternatives. Hope that helps. Dave
Is this a question? Click here to post it to the Questions page.
Reply to this comment...
Log in to comment
Login to comment.