About Me
Name: Nirav Asher
Github: https://github.com/niravasher
LinkedIn: https://www.linkedin.com/in/nirav-asher-974447182/
Email: f20171066@pilani.bits-pilani.ac.in
Gitter: niravasher
Affiliation: Birla Institution of Technology and Science, Pilani campus.
Location: Pilani, India
Being a user-focused full stack Web Developer and Open Source enthusiast, I am pursuing a degree of Bachelor at BITS Pilani, Pilani campus.
Project description
Image Sequencer is a general purpose, step-by-step image processing library in pure JavaScript, which we are building to support a range of image-analysis tasks across Public Lab and beyond. We have a range of big projects we are eager to implement to dramatically improve performance, implement much-needed new module types, and more.
Abstract/summary (<20 words)
Creating new modules for Image Sequencer that will process the image and produce the desired output that can be previewed and downloaded in PNG/JPG/GIF format.
Problem
This project aims at implementing the following new features:-
- Implementation of npm Web Workers.
- Text overlay module.
- Box Blur module, Blur Radius.
- Canvas Resize module.
- Add click to choose pixel x, y as an input type.
- Blob Detection module.
- Reprogammable WebGL shader module
- Round corner module.
- Compress Image module.
- Noise Module
- Multi colour gradient Meta module.
- Grid Overlay Module.
AIM
PART 1: WEB WORKERS
DESCRIPTION:
Using web workers provides an asynchronous and continuation passing style for moving or blocking CPU bound tasks out of Node's event loop to Javascript thread that runs in parallel in the background and that use all the available CPU cores automatically, all from within a single node process.
APPLICATION:
Install the module npm install webworker-threads
CURRENT FUNCTIONING OF MODULES
Consider the module DrawRectangle-
.png")
POST PROJECT FUNCTIONING
.png")
This chart shows how I propose to asynchronise the working of modules. This will separately run the for loops inside the respective pages and will not interrupt other parts.
PART 2: TEXT OVERLAY MODULE
DESCRIPTION:
The text overlay module overlays the text on the image. This module has the following inputs text, position, font-style, text-color and font size.
FEATURES TO IMPLEMENT:
**1) **Bold, Italic and Underline


Pango is a special purpose library for text and not a general purpose graphics rendering library.
Install Pango before installing node-canvas. On Ubuntu, apt install libpango1.0-dev
After installing Pango, reinstall node-canvas. rm -r node_modules/canvas && npm install canvas.
Pango can insert features like text-weight, text-style, font-family, font-size, etc.
A text-weight of '900' is extra-bold, '700' is bold, and '400' is normal.
Font-style opens up the options to choose between italic, oblique or underlined text. const Style = 'italic'
**2) **ALIGNMENT
The currently existing module has two inputs for positioning the text along the x and y axis of the image. Generally, for websites users require text to be centre-aligned in most cases. This feature has an option to centre-align the text no matter what the size of the image is.
If the user chooses centre-align, the default value of the text will be at the centre of the image, both vertically and horizontally. We consider this centre to be the new origin and the default value of "Starting text horizontal position" and "Starting text vertical position" will be 0. These can be altered manually for changing the position.
If the user chooses left or right align, the text will be at 10% shift from the left of the image or at 10% shift from the right of the image, respectively. At this position, the default value of "Starting text horizontal position" and "Starting text vertical position" will be 0. These can be altered manually for changing the position.


**3) **SUPPORT PURE NODE FUNCTION
This module works on the browser currently and is not pure node.js supported.The aim here is to make the module node compatible. The in-depth discussion of proposing a new npm module is described in the grid-overlay module below.**
PART 3: BOX BLUR MODULE, BLUR RADIUS
DESCRIPTION**:**
The box blur module intends to blur a square part of an image. Blurring can be achieved by many ways. The common types of filters that are used to perform blurring are Mean filter, weighted mean and Gaussian filter.
APPLICATION:
We will be using Gaussian filter to create the blur effect.
4 inputs will be taken from the user:
- Starting X position of the box.
- Starting Y position of the box.
- Ending X position of the box.
- Ending Y position of the box.
A small change in the file Blur.js which is already present inside the Blur module gives us the Box Blur Module.
Code inside the Blur.js file goes this way
.png")
The outer nested for loop with counter variable "i" goes from 0 to the width of the image and the inner nested for loop with counter variable "j" goes from 0 to the height of image. This covers the entire image. The following changes will change the area where is to be applied.
.png")
Also to the existing blur module, we can have an option to create circular blur. This can be done by taking the centre of the image as the reference and going in the radial direction and applying the blur filter to the pixels.
.png")
PART 4: CANVAS RESIZE MODULE
DESCRIPTION:
Changing dimensions of an html5 canvas element, resizing from a relative position on canvas (centre by default) and preserving image data.
APPLICATION:
STEP 1:
Import the canvas-resize package into the module.
npm install resize-canvas --save
STEP 2:
We will create new module in src/modules named ResizeCanvas. Three files will be created namely info.json, index.js, and Module.js .
We will make a new JavaScript file called resizeCanvas.js and similarly to the text overlay module, the code progresses in the following way.

This package preserves image data and does not allow the image on the canvas to get resized along with it. Resizing of the canvas can take place from the centre or by adjusting size difference along the top and left sides.
.png")
PART 5: ADD CLICK TO CHOOSE PIXEL X, Y AS AN INPUT TYPE
DESCRIPTION:
On clicking of the image, the x and y co-ordinates of the pixel should be returned as an input type.
APPLICATION:
A new click event listener can be implemented which can allow the user to get the values of x and y co-ordinates of the pixels instead of downloading the image. This feature can be implemented to various modules like DrawRectangle or crop or paint bucket, etc.
PART 6: BLOB DETECTION MODULE
DESCRIPTION:
Blob detection is finding continuous regions of a single colour. It can be used to extract the pixels of a character (in optical character recognition) or to extract a foreground object from the background.
APPLICATION:
The basic blobbing algorithm works in the following manner :-

To merge regions with different labels we will keep a table of labels. In this table we can track which labels can be merged.
| INDEX | LABEL |
|---|---|
| 1 | 1 |
| 2 | 2 |
| 3 | 1 |
| 4 | 2 |
| 5 | 1 |
So any pixel labelled 1, 3 and 5 is a part of blob 1, whereas any pixel labelled 2 or 4 is part of blob 2. This table will get updated when we label a pixel. Simultaneously, we also update the label of its neighbours in that table.
Run the entire algorithm twice. The first time identifies all of the blob candidates. The second run merges any label that the first pass failed to merge.
.png")
We take care of the borders by leaving 1 pixel gap to avoid out of bounds exception error. For visibility we make use of alpha values. If the alpha value is greater than 127, the Flag value of isVisible is (srcPixels[pos+3]>127).
From here, find the lowest blob index nearest this pixel which starts a new blob. Increase the label count and an entry for it in the label table. Update the labels of the neighbouring pixels in the label table so that we know a merge should occur and mark this pixel with the label.
.png")
Next we compress the table of labels so that every location refers to only 1 matching location. Merge the blobs with multiple labels and rename them. Finally convert the blobs to the minimized labels and return the blob data.
PART 7: CREATING REPROGRAMMABLE WEBGL SHADER MODULE
DESCRIPTION:
WebGL is based on openGL EL, a subset of openGL found on desktops, for embedded systems. Because this module wraps openGL, it is possible to do things that may not work on web browsers. Node has a special module named node-webgl that can be installed and imported to run webGL into browsers. A shader is a program used for shading the appropriate levels of light, darkness and colour within the image and also perform a variety of other functions, for instance, post-video shoot edit.
APPLICATION:
STEP 1:
Import the node-webgl package into the module.
npm install node-webgl
STEP 2:
Carry out various calculations required for developing a shader.
For performing greyscale mapping, we define vectors and return them after performing the required math. This is done to satiate the commands as input by the user.
.png")
For performing multi colour mapping, we define various vectors based on the value of n, which is a floating point value.
.png")
A nested for loop give access to the entire image, all the pixels can be set using pixels.set() function in pixelManipulation.js. The above processes will be carried out which will be returned to pixelManipulation.js where pixels.set() function will apply the changes to the pixels of interest.
PART 8: ROUND CORNERS MODULE
DESCRIPTION:
This module takes the two line segments and round the corner where they meet with an arc. This function is built to be un-opinionated about its end use and can be applied to Canvas 2d, SVG, D3, or whatever applications.
APPLICATION:
We will use the round corners module as we want to render a 2D canvas. There will be a segment array called sequence and the first and third components will be the two required line segments and the second component will be the arc joining the two line segments.
Once you have defined all these, a function drawCanvas2dArc() takes two inputs, the canvas itself and the sequence array. Start with:
ctx.beginPath()
ctx.arc(arc.center[0], arc.center1, arc.radius, arc.start, arc.end)
.png")
PART 9: COMPRESS IMAGES MODULE
DESCRIPTION:
There are various projects where compression of the image is required. Particularly the one's in where users have slow internet and large images probably won't load or would take a lot of time. We will be using compress images package available in node for doing the same.
APPLICATION:
STEP 1:
npm install browser-image-compression
STEP 2:
Import image using import imageCompression from 'browser-image-compression';
STEP 3:
Next we specify certain options provided by the package by making a json options object.
.png")
We can set the maxWidth to the current width of the canvas and maxSizeMB will be taken as an input from the user.
STEP 4:
Use the try and catch exception handling method to get the compressed image.
.png")
We can print the error message below the input options and prompt the user to try again on failure.
PART 10: NOISE MODULE
DESCRIPTION:
Image noise is a random variation of brightness or color information in images, and is usually an aspect of electronic noise. It can be produced by sensor and circuitry of a scanner or digital camera. Image noise is an undesirable by-product of image capture that obscures the desired information.
APPLICATION:
The GraphicsMagick library for nodejs helps us to create noise on the image.
STEP 1:
Subclass gm is being used to enable the image-magick library.
STEP 2:
We can vary the noise on the image as per the requirement of the user.
.png")
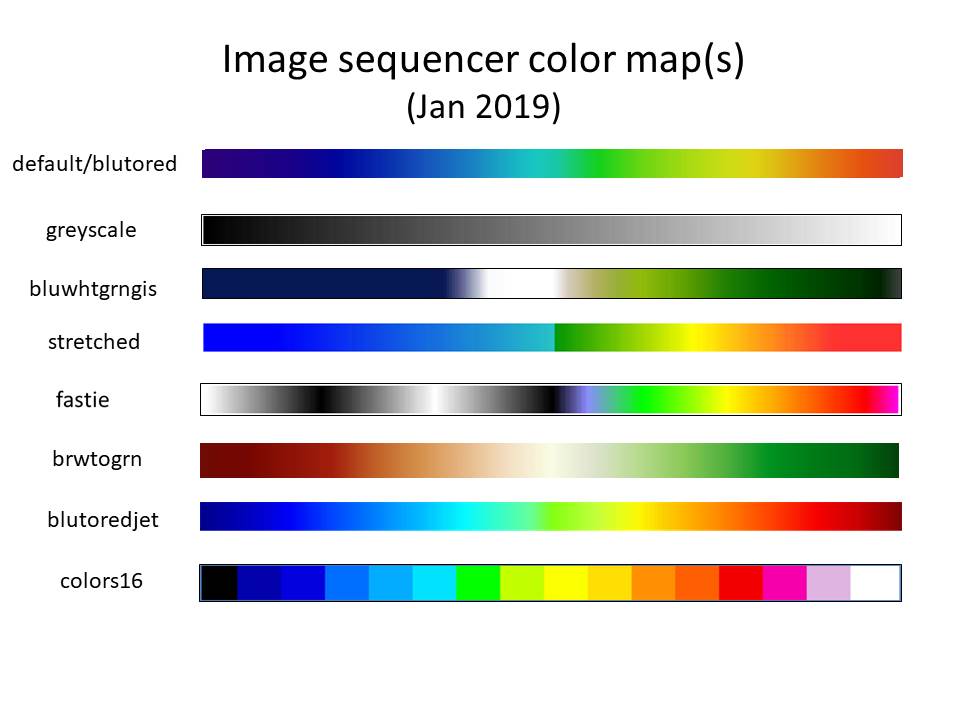
PART 11: MULTI COLOR GRADIENT META MODULE
DESCRIPTION:
Multi colour gradients include rainbow, stretched, colours 16, etc.
.png")
APPLICATION:
This will be a Meta module combining the gradient and colormap module to create rainbow-like gradients.
The format for the Meta module will be as follows:
PART 12: GRID OVERLAY MODULE
DESCRIPTION:
The Grid Overlay Module overlays a grid in the image whose color can be changed.
APPLICATION
This module works on the browser currently and is not pure node.js supported.The aim here is to make the module node compatible.
Here are the steps to make to make a new npm module
- Require modules.
- Add XSJS initialization.
- Create route handler.
- Create destination module for route.
- Add the route in the web module.
- Extend dependencies in package.json.
- Build and Run.
TIMELINE:
.png")
Requirements
I would require help from mentors and would always accept help from other contributors.
Contributions to Public Lab
Here are the issues reported by me:
For Image sequencer
https://github.com/publiclab/image-sequencer/issues/created_by/niravasher
For PublicLab.Editor
https://github.com/publiclab/PublicLab.Editor/issues/created_by/niravasher
Experience
Being interested in programming languages, I began my adventures in this arena by being a front-end web developer in my first year of college. As a member of Association of Computing Machinery (ACM) and Coding Club at BITS Pilani, Pilani campus, I have worked on many projects that these two associations host during college fests, and will be working in the future events as well.
- The official Bits Open Sports meet (BOSM, the sports fest) website and the registration software has been completely developed by the coding club web development team of which I am a part of. https://www.bits-bosm.org/
- www.qbox.com is a Bitsian startup that is accessed to and used by multiple users simultaneously and I contributed towards the making of the user interface, the back- end of this. In a nutshell, I helped to create most of the web-app, which is a huge success now.
- In my sophomore, I have worked with a company named Ekeeda, and contributed to develop its website (www.ekeeda.com) which provides video lectures to students all over the world.
- Stock market simulation, a collaborative project with Economics and Finance association is an annual online event whose front-end model is developed by me.
These are some of the major ones that I developed, there are many others on my github repository. https://github.com/niravasher
Teamwork
Group Projects and events, talks, hackathons, etc, and all the successful events organized by my club / organization required huge amount of co-ordination and teamwork. I currently being a sophomore, also have to manage the team and to get the work done by everyone, alongside managing my academics. I believe in the quote "Talent wins games but teamwork and intelligence win championships". I have always given my 100% to the team no matter how hostile the conditions are and always have set the team as my first priority.
Passion
"You have a lot of passion for what you are doing because it is so hard...that if you don't any rational person would give up". After coming to college, I started to explore different things and find what I am really passionate about. I would try and feel what I really enjoyed doing and went on to pursue it. I would use this as a yardstick and not feel the pressure to do what others are telling me to do. I am sure that I want to work on computing, to build computing products and to do the thing which still keeps me going, that is, to build products that will be used by billions of people and makes a difference to them.
Audience
It is my dream to build something that the whole world can use, no matter their age. My goal is to build image sequencer in such a way that it can be used to make all the modifications that the user wants it to have. The more it's user friendliness increases, the more will be it's success to making a better and simpler tomorrow. Modules like adding text or shadow on the image or adding a gradient to the webpage can be a bit confusing in css, but it can be a lot easier after developing these modules.
Commitment
I totally understand that developing this product is a very serious commitment. I will stay dedicated and give my best to perform each part of the project responsively. I'd love to contribute to PublicLab even after GSoC because I have really seen the technology built here and am being more attracted to it.
6 Comments
Text overay module has already been added by Aashna!!
Yes, I have proposed certain modifications to it.
Reply to this comment...
Log in to comment
yes - indeed however it only works in the browser at the moment, so we are still looking to make it compatible with a pure node environment. Thank you!
On Fri, Apr 5, 2019 at 8:47 AM \<notifications@publiclab.org> wrote:
Is this a question? Click here to post it to the Questions page.
Reply to this comment...
Log in to comment
Great one!!. May be you can even add the grid overlay module similar to the text overlay. Making it compatible with a pure node environment.
Thank you Harshith, I will publish the edits suggested by you and jeff very soon. Also I want to ask that does my proposal have enough number of new modules to add? Or should I add more new modules to it? I did not have a very clear idea about how much the time exactly will the making the new modules take.
Is this a question? Click here to post it to the Questions page.
Reply to this comment...
Log in to comment
Hi, please upload your proposal at the Google Summer of Code website at the earliest. Please ignore this comment if already done.
Reply to this comment...
Log in to comment
Login to comment.