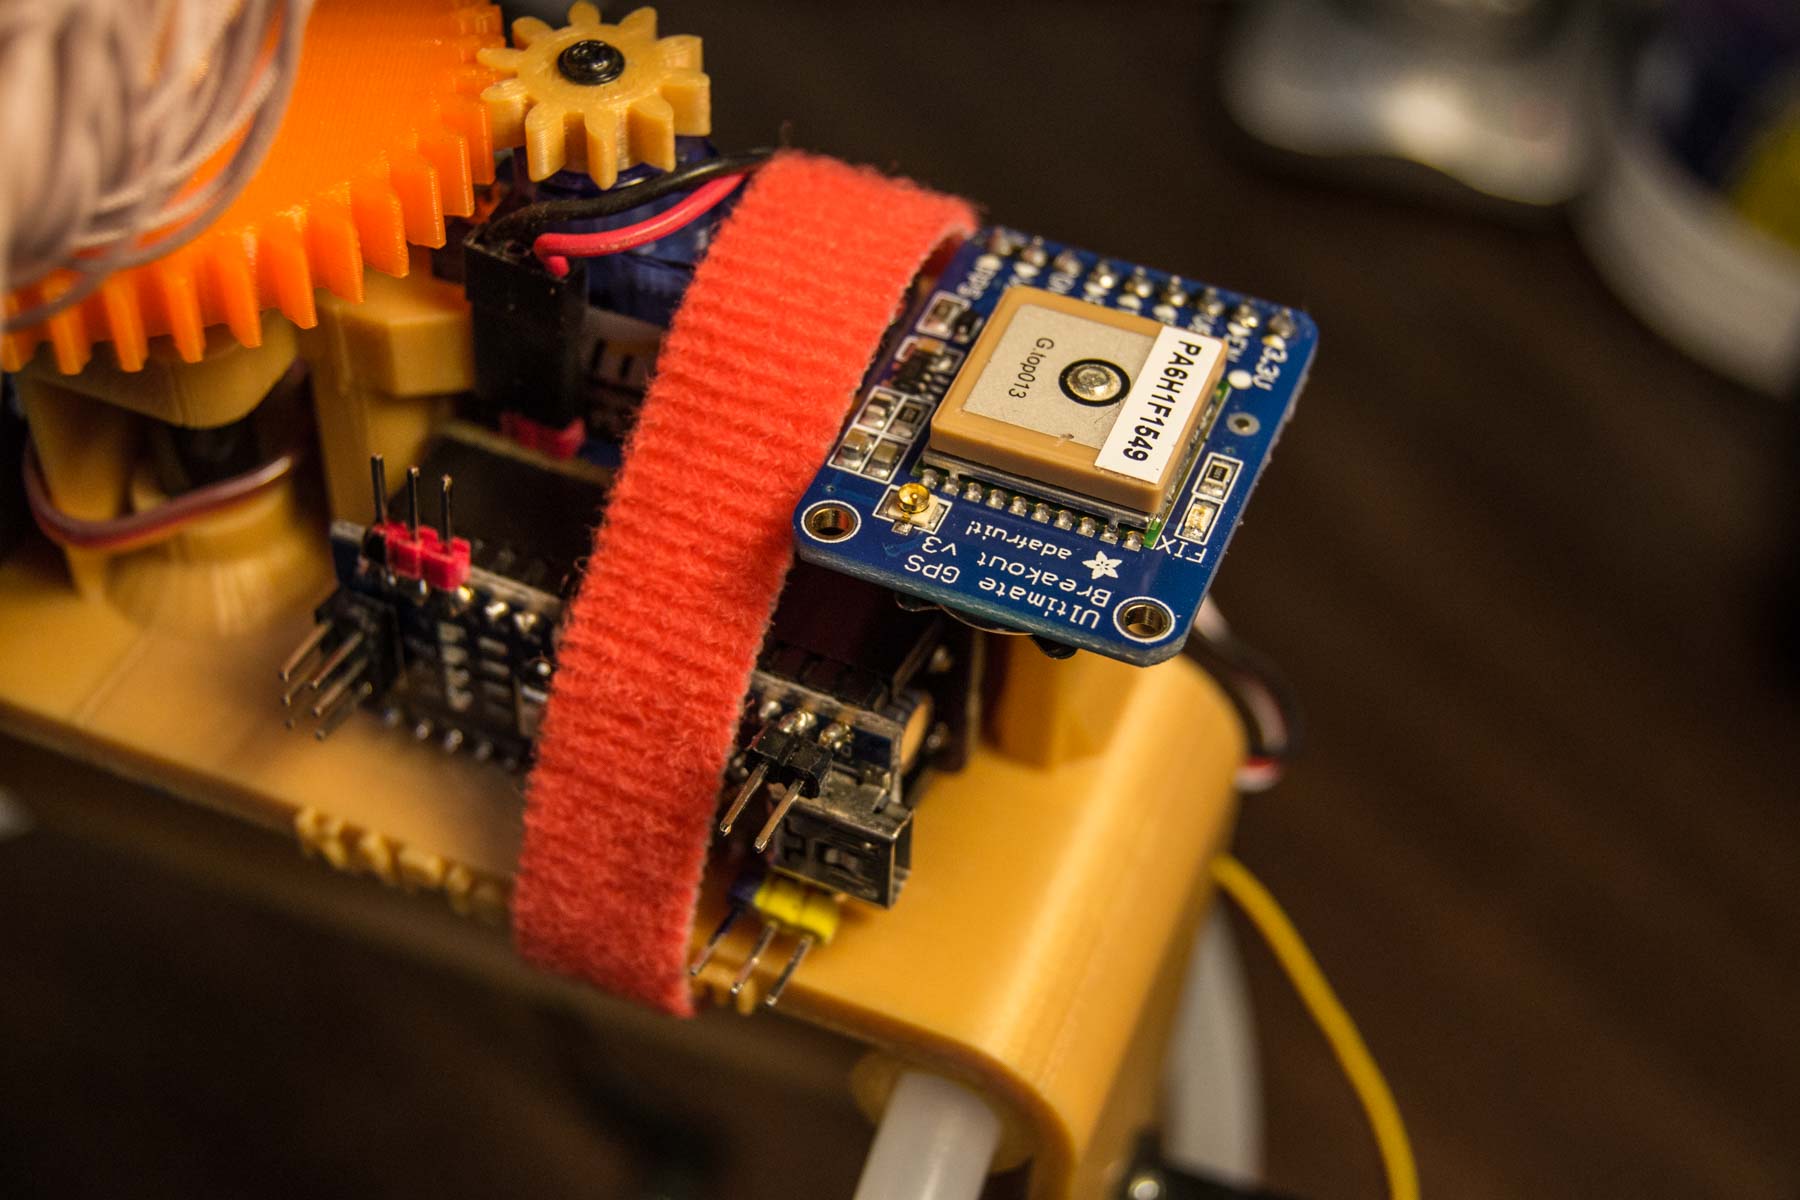
Above: A GPS board mounted on a Saturn V Rig. The module is powered by the existing battery on the rig and adds only 10 grams. It logs GPS data every 15 seconds.
Why do this?
There are a few reasons to use a GPS receiver on a flying camera rig to collect location data:
- Some structure from motion software (makes 3D models from photos) requires that photos have GPS data in the EXIF header.
- Some structure from motion software scales the final 3D model if GPS data are present in the photos.
- Some orthophoto mapping software can georeference the stitched image if GPS data are present in the photos.
- Mapknitter and Google Earth will automatically place photos if they contain GPS data.
- The track followed by the flying camera can be displayed in three dimensions, possibly with other data collected.
- You can learn how high the camera was.
Various approaches
There are several ways to collect GPS data during a flight:
- Use a camera with integrated GPS.
- Use a smartphone as the camera.
- Fly a smartphone running a GPS logging app in addition to the camera.
- Attach a small GPS receiver in logging mode to the camera rig.
- Attach a dedicated GPS logger to the camera rig.
- Attach a smart watch, GPS watch, or fitness tracker with GPS to the camera rig.
- Attach a bare GPS module or board with required power supply and electronics.
The easiest way to collect GPS data is to use a camera with integrated (or add-on) GPS capabilities. Most of the inexpensive point and shoot cameras do not have GPS built in, but the ones that do can write the GPS data into each photo file. Smartphones also do this.
Other solutions do not write the data to the photo files but keep a log of GPS data which can later be used to add the data to the photos (using the timestamps to match them). Some handheld GPS receivers are small enough to include in the payload of a kite or balloon rig. Some GPS devices are designed exclusively for logging data (e.g., for tracking your pet or other untrustworthy family member). Many fitness trackers have GPS built in and some watches are primarily GPS devices. Most of these products are rather expensive ($100 to $400). Some simple GPS loggers are under $50, but I don't know which of these provide the correct type of data (I think what you want is gpx file output). The inexpensive loggers tend to be the largest and heaviest but there might be some nice little ones out there.
If your camera does not have GPS built in, and you don't want to fly your phone or buy a fancy watch or heavy logger, there is one option left. The bare bones GPS module is a common commodity today because all the drones and most remote or autonomous robotic gadgets use them. GPS modules cost between $10 and $70, and there are many to choose from. Most of these are really small and weigh just 10 to 20 grams. I have experience with only one -- the Adafruit Ultimate GPS breakout board ($39.95).
Adafruit Ultimate GPS breakout board
Adafruit charges a premium for its products, but they have very good online instructions for using them and in this case also provide the free Arduino sketches (programs) required to make them work. I have tried four different configurations of this breakout board.
- The module on this breakout board has a feature which logs data to internal memory every 15 seconds with no attached electronics other than a power supply. An Arduino is required to make the module start logging, but then the Arduino can be detached (and left on the ground). If your camera rig already has a power supply, GPS logging can be added for a weight penalty of just 10 grams.
- By adding a small Arduino like the Nano (6 grams, $5.00) to the payload, all you have to do to start GPS logging is turn on the Nano. The sketch on the Nano automatically starts the logging.
- If your camera rig already has an Arduino, like the Saturn V Rig with SkyShield, the sketch can be modified to start the GPS logging and then do all the autoKAP pan/tilt/shoot stuff. The 10 gram GPS board and some wires is all you need to add.
- If the integrated 15 second GPS logging is not sufficient, you can add a microSD card (5 grams, $5.00). The Arduino sketch can instruct the system to write GPS data to the SD card at any interval or coincident with programmed events. On the Saturn V Rig the GPS logging can happen simultaneously with each shutter release. [Update: I never got this to work. Operating servos and also doing serial communication (with the GPS) is fraught with error on 328p Arduinos.]

Above: The simplest way to incorporate the GPS board on any camera rig is to attach a power supply like the three AAA batteries here (left). A separate Arduino with power (right) will be needed to start the logging on the module. The Arduino does not fly.

Above: To make it much easier to start the logging, an Arduino (like the Nano, right) can fly on the rig. The Nano supplies power to the GPS board and sends it the start command, but does nothing else.
 _
_
Above: The SkyShield incorporates an Arduino Nano and controls the pan/tilt/shoot operation on a Saturn V Rig. The SkyShield can also power and start the GPS board. The SkyShield provides smart power management for attached devices.
 _
_
Above: The SkyShield can also power and write GPS data to a microSD card board. This allows full control over logging interval and timing. Adding this capability to a Saturn V Rig adds only 20 grams (GPS board, SD card board, and wires). [Update: I never got this to work. Operating servos and also doing serial communication (with the GPS) is fraught with error on 328p Arduinos.]
Results
I have had good results with all but the last of the above configurations. I tested the default 15 second logging while powering and starting the GPS board with a SkyShield. I Velcroed the gear to a wool hat along with the antenna for a Garmin GPSmap 76CSx handheld receiver and took a hike. The Garmin was recording data every 10 seconds and the Adafruit module every 15 seconds.
 _
_
Above: The testing instrumentation to compare a 10 year old Garmin GPSr with the Adafruit GPS module. Nothing fell off.

Above: Screen capture from Google Earth of the GPS tracks recorded by the two receivers during my hike.
The two tracks recorded are not identical. It is not obvious which track is more accurate because I don't know how well the Google Earth images are georeferenced, and each track seems to be more accurate than the other for some parts of the hike. So I have to call it a draw.
The integrated feature of internal logging in the Adafruit module is very handy. However, it does not seem to record standard NMEA GPS data sentences. I used an online parser to extract the data, and the result did not include a timestamp with each GPS waypoint. Without the timestamp it is not possible to add the GPS data to photo files. Maybe the parser I used ignored the time data, so I need to look into that.
Although all of the configurations using the default 15 second logging to internal memory were successful, I did not have success writing GPS data to a microSD board. The microSD card boards were bought for $1.00 each on ebay (shipped from Asia). I could not figure out how to make them work. So I have ordered some microSD boards from Adafruit ($7.50 each) and will follow the online instructions.
I have run into one other obstacle during this testing. The limited memory on the Arduino Nano is barely sufficient when the sketch has to operate servos, a GPS board, an SD card, and do serial communication. There might be some tricks to use memory smarter, but I have pretty much run into the limit of what the Atmega 328p can do. I was hoping to add some sensors to the rig (temperature, pressure) but I think that would require a second Nano. No problem, that's just 6 grams.
Here is an update about logging GPS data to microSD card.
0 Comments
Login to comment.