
This is a beginner's guide to assembling the Coquí
NOTE: a new version of this tutorial can be found here.
The Coquí is a simple water conductivity sensor designed by @donblair that is designed for use in an educational context. The coquí is a simple circuit assembled on a breadboard that has a speaker that outputs high frequency sound when the water conductivity is higher and lower frequency sounds when the conductivity is lower.
This post, originally by @akshaya and @kanarinka, is being reposted from this wiki page in order to integrate with the new activities system
Want to measure something other than water conductivity? With simple modifications a Coquí can measure temperature, ambient light and LED light. Check out Don's original post to learn how.
Who is this for?
Buillding a coquí is a great way to introduce principles of water monitoring, DIY hardware, and sensors to new audiences. @kanarinka and John Keefe use coquís to teach workshops in sensor journalism. The coquí is featured in the Educator's Guide to Sensor Journalism pamphlet by @kanarinka (download here).

Duration
Assembly will take around 30-45 minutes for a novice, including troubleshooting and debugging.
Ingredients

##Step-by-step guide to assembling the Coquí
1. Attach the 555 chip on the breadboard.

2. Connect pin #4 to VCC.

####3. Connect pin #8 to VCC.

4. Connect pin #2 to pin #6.

5. Connect the speaker to pin #3 and GND.

6. Connect pin #3 to some row.

7. Connect pin #2 to a row right below previous.

8. Add a capacitor from previous pin to GND.

9. Connect pin #1 to GND.

10. Using a photocell as a sensor: add the photocell between the previous two wires.

11. Connect the battery (positive / red to VCC, negative / black to GND).

12. Place an LED between VCC and GND to make sure there's power, when debugging (Optional).

13. Wave your hand above the photocell - you should hear the coquí make a sound. As the light level changes, the resistance changes and the sound changes.
####14. Now, replace the photocell with your water probe (see below for instructions to make one if you do not have one) and dip its two screws into a cup of water.
DONE! Start testing water samples!
Step by Step Instructions for Making the Coqui's Probe
The probe is the part of the coquí that you dip in water to measure its conductivity. The coquí actually passes a low-voltage electric current through the water and the two screws in the water bottle cap measure the resistance of that current. You can fashion a simple DIY probe using the following materials:
- Plastic water bottle with plastic cap
- Scissors or Xacto knife
- 2 screws of the same size
Cut the top part off the water bottle using the scissors or knife

Screw the two screws into the top of the water bottle.

Attach the alligator clips leading from the coquí to the bottom of the two screws

Now you have your probe!
Learn more about the Coquí in context
- Don Blair's original post, including more technical information and modifications
- A round-up of John Keefe's use of the Coquí in West Virginia with Journalism students
- Photos of building the Coquí with @liz in Hong Kong
- Journalism student @mattmullen reflects on the potentials and pitfalls of sensor journalism
Are you more advanced? Check out this circuit diagram

18 Comments
Hi, I reposted this from https://publiclab.org/wiki/coqui-a-simple-water-conductivity-sensor -- to make it into an activity that can be featured in the Coqui activities listing: https://publiclab.org/wiki/coqui#Activities -- to help @kgradow run a class based on this.
I hope I got it right -- if it should be authored by @kanarinka and co-authored by @ashkaya, please tell me and I can switch it. Thank you -- it's a WONDERFULLY documented activity!
Reply to this comment...
Log in to comment
This is a great overview! One suggested edit: Include an explanation of how component variability might impact the circuit. I've tried to build this circuit literally dozens of times and about half the time it fails because my resistor / capacitor values are incorrect or I haven't taken into account speaker resistance or I've gotten the wrong voltage for the 555 and burnt out the timer or it's simply not making a tone in the audible range.
One solution is to post a set list of components -- better would be to post some explanation of which components matter and what acceptable parameters are (for resistors, capacitors, tolerance on the 555, and power) so that people actually can drop in whatever components they have on hand. As written it suggests that that's possible, where there seem to be a lot of fail points that are relatively easy to hit if you're not taking ranges into account.
Reply to this comment...
Log in to comment
Thanks @warren! @kgradow1 - this is a great suggestion for improvement as I've also had that happen. How about @akshaya and I will make a digikey shopping cart with all the parts and then people can go look at it for reference? (Do those stick around for awhile?)
Is this a question? Click here to post it to the Questions page.
Reply to this comment...
Log in to comment
I'm intrigued by the speaker resistance - can that be measured with a multimeter - and what are the rules of thumb for not burning out the timer?
Is this a question? Click here to post it to the Questions page.
Reply to this comment...
Log in to comment
I'm actually not sure about this - @donblair - do you know the answer?
Is this a question? Click here to post it to the Questions page.
Reply to this comment...
Log in to comment
Hallo!
I haven't had great luck with Digikey shopping carts sticking around, so it might be better to put direct links to parts in e.g. a wiki ...
Re: burning out the timer, haven't had that happen myself (I don't think?) but I guess you'd just want to be careful to stay within the voltage limits of the 555. There might also be ways of applying a reverse voltage to the wrong pins which could make the 555 decide to curl up and die.
E.g., for this version, looks like the voltage inputs need to be between 2V and 15V.
Is this a question? Click here to post it to the Questions page.
Reply to this comment...
Log in to comment
Reply to this comment...
Log in to comment
@kanarinka - we're planning to order a bunch of these to test out at MakeFaire SF at the end of may -- getting ready for a big order, and printing up the guide as well -- quite a few of them. Happy to share!
Reply to this comment...
Log in to comment
Hi! I made a bookletized version of the pdf for printing on half-letter-sized paper --
Booklet_Sensor_Journalism_Final.pdf
Reply to this comment...
Log in to comment
Added a 3.5mm jack to record the wave ;D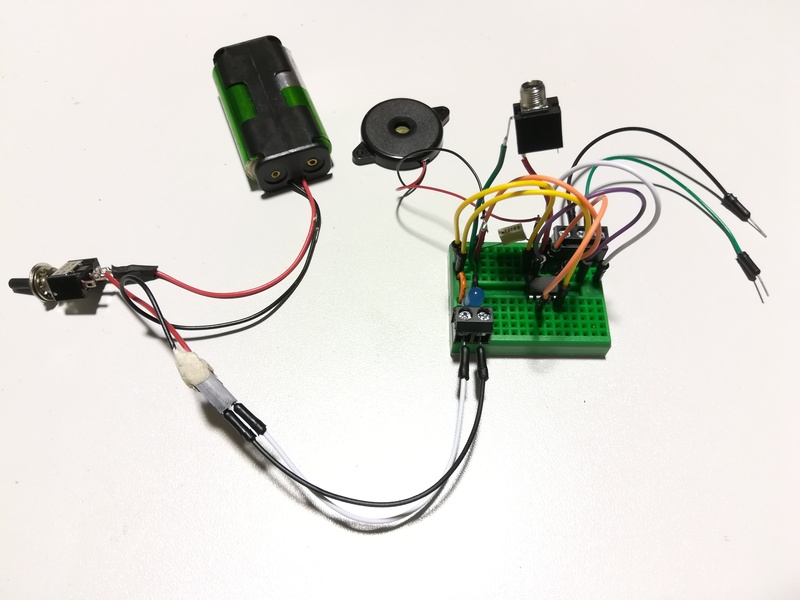
Reply to this comment...
Log in to comment
Oooooohhhhhhhh!!!!!
Reply to this comment...
Log in to comment
This is really cool. A recording would mean you could calibrate it later, too -- if you maybe dipped it in 2 different high and low solutions of known conductivity at the start or end of each test? Like a 🎬 before a film clip!
Is this a question? Click here to post it to the Questions page.
Reply to this comment...
Log in to comment
Deffinitely! On wednesday i'll post the mod ;)
Reply to this comment...
Log in to comment
A bit late but here is how to plug the jack https://publiclab.org/notes/imvec/06-08-2018/adding-a-jack-to-the-coqui
Reply to this comment...
Log in to comment
Hello,
I know this a long time but, I just designed a PCB for this circuit that can be easily made at home and is exactly the size of a AA battery holder. https://github.com/sushil-sundaram/Public_Lab
Reply to this comment...
Log in to comment
Oh WOW! Do you have any photos of the board, or a screenshot you could post? Thanks!!
Is this a question? Click here to post it to the Questions page.
Reply to this comment...
Log in to comment
Hi @sushills - i reposted your design to Upverter (with attribution and license ref), and took a few pics:
https://upverter.com/jywarren/523e05396087d5a9/Coqui/
Reply to this comment...
Log in to comment
Hi all! With help from @zengirl2, @asnow and @bronwen, we've posted a new Coqui activity with a smaller breadboard and flatter wiring here: https://publiclab.org/notes/warren/03-01-2019/build-a-sound-generating-coqui-conductivity-sensor
Reply to this comment...
Log in to comment
Login to comment.