
What I want to do
Scan dust & look for potential Asbestos Fibers.
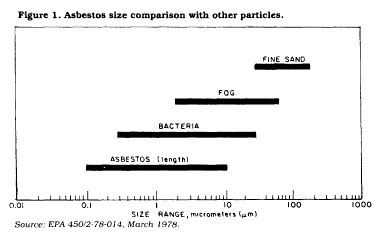
Asbestos fibers are needle-like when viewed close up.
The image below shows what they are like in comparison to other types of mineral fibers.

From: https://www.osha.gov/OshStd_gif/zkf1.gif
They tend to be around 0.9µm - 10µm (micrometers) in size.
From: http://en.wikipedia.org/wiki/Asbestos
My attempt and results
This piece of sticky tape is 15cm*5cm.
This is what it looks like when scanned at 600dpi.

Fibers become more visible after applying the inverse color filter.

If you zoom in on the main article image, I have added a little ruler indicating that approximately 1mm = 15px on that image. It was scanned at 150dpi, thus accordingly, 300pid: 1mm = 30px & 600dpi 1mm = 60px.
At 600dpi:
1mm = 1000 micrometers. 1µm = 0.001mm.
60 px = 1000 micrometers. 1µm = 0.06px.
1µm (small asbestos fibers) - wouldn't render properly at this resolution.
10µm (large asbestos fibers) - could potentially show as 1px (as it is 0.6px- more than half a pixel) at this resolution.
With this kept in mind, anything with a resolution of 1000dpi+ is going to start capturing larger asbestos fibers.
There is already consumer access to flatbed scanners with this kind of resolution (&higher).
Questions and next steps
How can resolution be refined further? How can samples be taken in a way that produces a 'clean' image?
Update: I am working with the idea of having a piece of cardboard act as a window frame.
It isn't perfect, but the idea is:
- Unroll sticky tape & attach part you have touched to the bottom of the frame.
- Unroll carefully, trying not to touch the sticky tape, against the surface you wish to study.
- Carefully rub the back of the sticky tape against the surface.
- Unpeel the sticky tape from the surface and then continue rolling the tape to seal up the other side.
- Label the frame with the location, date & time.
- Scan & analyse.
Here is an example:


Why I'm interested
I want to know if this will be fruitful in serving as a basic indicator of the presence of asbestos fibers in the home.
If there are fibers present that even slightly resemble asbestos, then a concerned citizen could use this as a form of preliminary observation as justification to get further, more detailed testing done by an environmental hygienist.
12 Comments
The inverse helps make particles stand out. Another filter you might try is a threshold. If you're using GIMP (free and open source software for image manipulation), here's the menu option for threshold: http://docs.gimp.org/en/gimp-tool-threshold.html
In normal color mode, the histogram should show a sharp band on the right, representing the white background. You'll want to leave that marker. On the left side of the histogram, you might see a wider, shorter peak representing the different darkened objects. If you drag the black arrow to the right past that wide peak, everything that is sort of black should become jet black, highlighting it a little better. You can always invert after the threshold to help it stand out.
Reply to this comment...
Log in to comment
@btbonval
Did you mean like this?
I used Paint.net > Adjustments > Levels and made it so that the Input histogram was between 255-240.
(*That is mostly cat hair, for those of you going "ewww gross" in reaction to that image)
Is this a question? Click here to post it to the Questions page.
Reply to this comment...
Log in to comment
@amysoyka Yeah, that's pretty much what I meant.
It worked way better than I would have thought. You can see wrinkles and bubbles in the tape! Inverting the color isn't even necessary.
That should definitely help you find asbestos ... or whatever else is all mixed up in there. ;)
Reply to this comment...
Log in to comment
I just realized the images shown in the research note are thumbnails. The threshold enhancement helped the thumbnails a lot.
Looking at the actual images, I'm not sure if threshold adds much. Maybe it's better for the first look, and then investigate the original in more detail?
Although I can see two partial fingerprints in the lower right thresholded image which was not visible in the original image. Maybe it did help.
Is this a question? Click here to post it to the Questions page.
Reply to this comment...
Log in to comment
@btbonval
It was good advice, so thanks.
This would work for identifying clumped asbestos fibers for sure!
The thing that I really want to home in on are airbourne asbestos fibers.
Does anyone have a scanner that can scan at higher than 900dpi?
I ask, because I was wondering if someone else here would volunteer some time to attempt this and share results...:/
Is this a question? Click here to post it to the Questions page.
Reply to this comment...
Log in to comment
I bought a scanner earlier that claimed 9200 DPI, but I could only get at best 1700DPI out of it. it seems the best effective resolution of a slide scanner is currently 3300DPI: http://publiclab.org/notes/mathew/06-11-2014/a-first-look-at-dust-with-consumer-scanners
That said, there's no reason one couldn't build a gigantic microscope that uses a scanner to read the enlargement. it would be quite a bit of work though: http://publiclab.org/notes/mathew/05-21-2014/imagining-testing-polarized-light-microscopy-for-silica-dust-speciation
Reply to this comment...
Log in to comment
Would one of these hacked-webcam microscopes by http://hackteria.org and http://diybio.org be good enough magnification?
http://hackteria.org/workshops/building-microscope-in-ticino/ http://diybio.org/2009/12/13/webcam-microscope-hacks-at-bosslab/
Is this a question? Click here to post it to the Questions page.
Reply to this comment...
Log in to comment
that reminds me-- I have one of the DIY Bio microscopes i built this summer-- haven't used it for anything-- I'll take a look again.
Reply to this comment...
Log in to comment
I was planning in using a webcam + the lenses from an old CD/DVD drive. (Yes, I like my old CD/DVD drives. ;) )
Reply to this comment...
Log in to comment
What if, in constructing some algorithm to count silica particles, you used a GIMP or photoeditor threshhold editor on the image? The silica would jump using threshhold.
And,fwiw here's a link to a 2011 article on a d-i-y scanning electron microscope. $1500-a lot, but a lot less than 250,000-In the article, the engineer got 50x magnification. There's a youtube video that goes with it. I keep thinking about x-ray diffraction, because there are all those electron guns in old CRT tv's and monitors. Found a 1960 article about building your own xray machine...but I'm not going to play with x-rays at home.
Is this a question? Click here to post it to the Questions page.
Reply to this comment...
Log in to comment
@marlokeno do you have the link to the DIY SEM? I don't see it in your note.
I would love to re-use an old CRT electron gun, but I agree with you, not really the best for home experimenters.
Is this a question? Click here to post it to the Questions page.
Reply to this comment...
Log in to comment
Markdowm Sorry about that. By the way, the subtitle of the article is The hardest DIY project ever. http://www.popsci.com/diy/article/2011-07/you-built-what-scanning-electron-microscope It's beyond my skills, but I'm hoping some engineering students would be interested, and there're a few grants around. I always wanted my own electron microscope when I was a kid.
Reply to this comment...
Log in to comment
Login to comment.